FoneDog Screen Recorder
FoneDog Screen Recorder
Special Offer
Special Offer


By Adela D. Louie, Last updated: September 29, 2018
As we all know, the iPhone device is one of the most popular there is today. It had actually enhanced interpersonal connectivity by using social media and other applications for individual interactions. Because the iPhone is one of the most popular smartphones today, many users had already share some information with other people which also includes in sharing their notes.The Note sharing feature that you have on your iPhone device is one of the most useful features of the iPhone device.
This way, you will be able to invite people to view, edit all the same notes that you shared in a fashionable way. And it also works vice versa. Once that you have invited to share others notes, then you will be able to view it and as well as edit it if you want to. This is the main reason why sharing iPhone Notes is convenient and a fun way – gather other people’s thoughts or ideas on the notes you have shared.Sharing iPhone notes with friends, families, and colleagues are actually one of the easiest ways for you to pass a certain information to other people. Now, we are going to talk about here how you could possibly share your iPhone notes in three different but most certainly the easiest way. Below are some more details for you how.
Part 1: Share iPhone Notes Using Note App in iOS 10Part 2: Share iPhone Notes with Another iOS DevicePart 3: Share Your Notes from Your iPhone to Your PCVideo Guide : Use FoneDog Toolkit to Share iPhone NotesPart 4: Conclusion
People Also ReadHow to Share Live Photos as GIF on iPhone and iPadThe Complete Guide to iCloud Photo Sharing
Since the start of the new iOS 10 version of Apple, it had given the ability for iPhone users to do more with their iPhone. Regarding the note application, it had also given all users to easily share and invite some people for them to view their notes.Anyone can be invited with this feature of the iOS 10. As long as you have added them to the list, then they can have access to your notes. However, you have to make sure that the notes that you have saved and wanted to share are saved on your iCloud folder and not on the “On My iPhone” folder.Here are the steps to follow for you to share your iPhone notes.
Step 1: Make New Notes
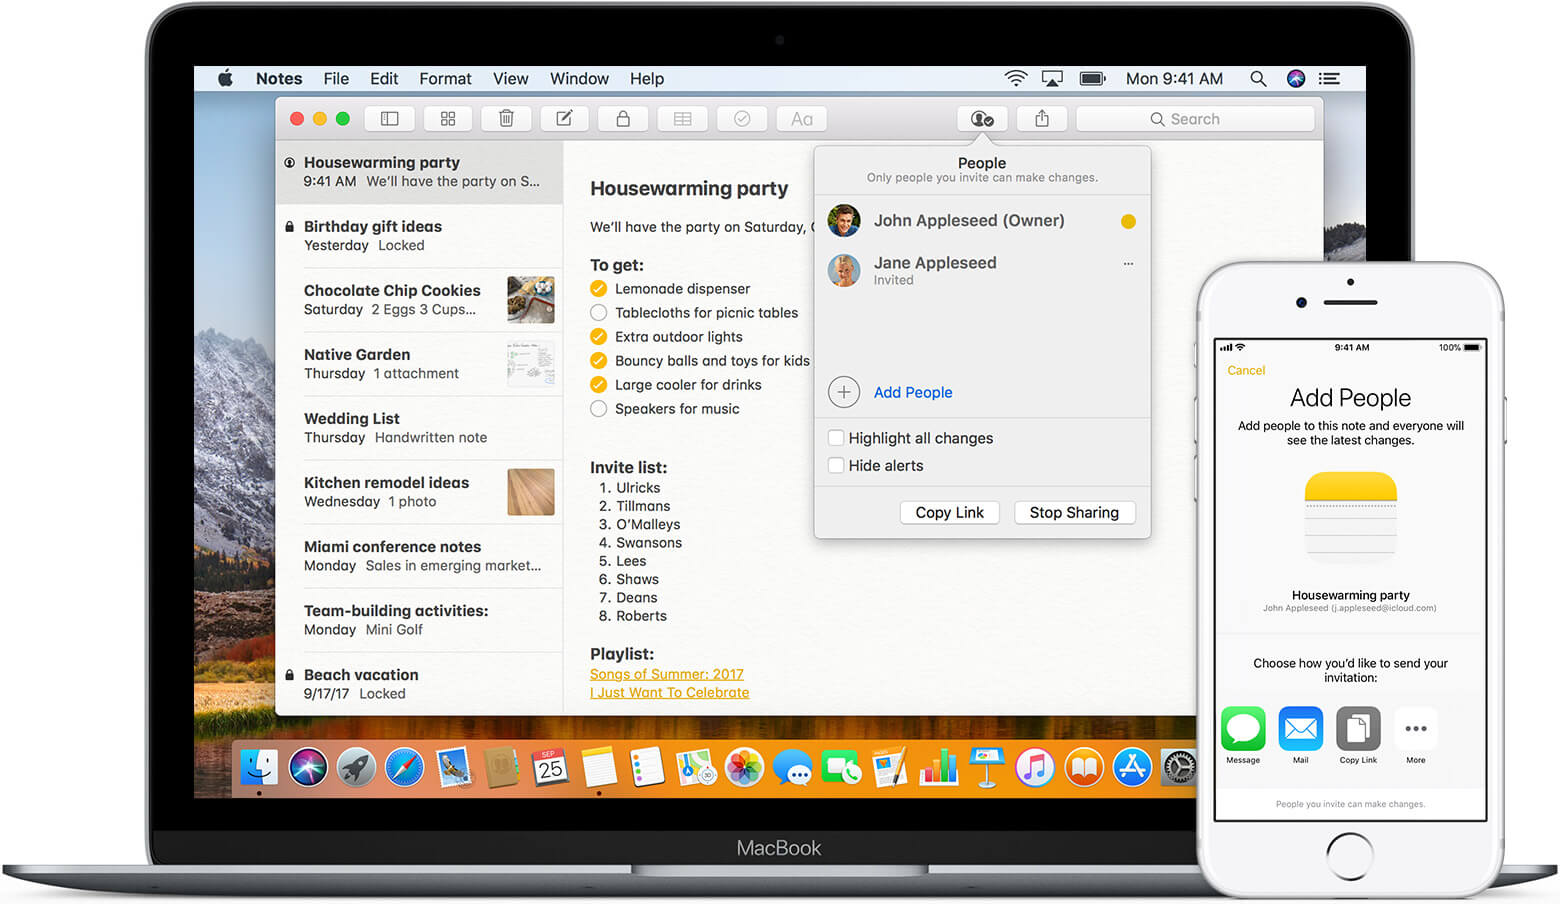
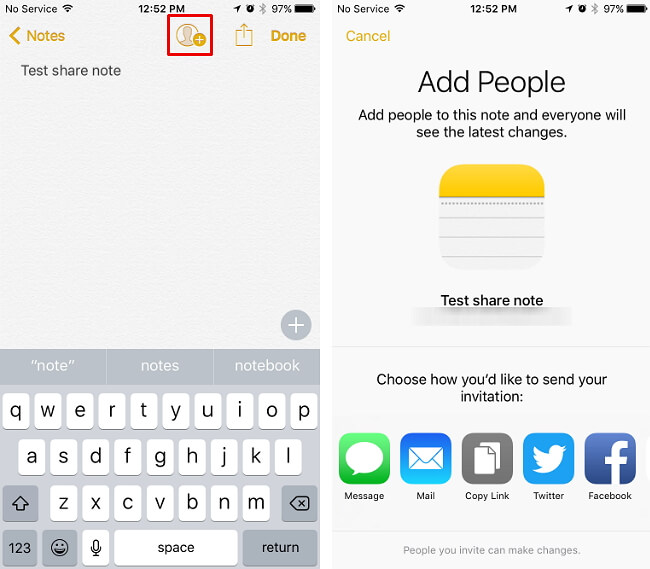
All you have to do first is to make the notes that you want to share and then find a silhouette icon. This icon is located beside the share icon at the top right corner of your screen. Do not be confused by the icon because this will not share your notes. However, the purpose of this icon is for messaging, tweeting, and more. This is like social media which invites people through Message, Mail, and other applications.
Step 2: Invite People
Tap on the silhouette icon for you to be able to invite people to share your notes with. The people that you will be invited will be able to view and edit your notes. You can add them through your Contact list, through their email address or their phone number. In this method, you will be able to invite as many people that you want.
TIP: If in case that you would want to some people to have access on the notes that you have shared, all you need to do is to tap on the “Stop Sharing” button.
iCloud is one of the features that will give the possibility for you to have your notes shareable with other iOS devices. iCloud will also give you the convenience and power to share your notes whenever you want.You will be able to organize your thoughts, make your checklist and more while you share your notes with your other friends. For you to be able to know how you can do it, we will be indicating a guide for you below.
Step 1: Go to the Settings on your iPhone device and then tap on
Step 2: After that, go ahead and turn on Notes.
Step 3: For those who are using the iOS version 10.2, they will be needing to go to their Settings and then select iCloud.
Step 4: Once that you have signed in, all the notes that you have assigned with the same as the Apple ID you are using with your iOS device will then be seen.
Step 5: From that, you will then be able to access notes easily.
Sharing your notes from your iPhone to your PC is one of the easiest ways that you can do. For you to be able to do this, we are going to introduce to you a software that you can use for you to do this. You can use the FoneDog Toolkit – iOS Data Backup and Restore. This program is a one clicks for you to back up your notes and have them restored on a different device or restored to your computer. The FoneDog Toolkit – iOS Data Backup and Restore will also allow you to preview your notes and have them restored do another iOS device.
The FoneDog Toolkit – iOS Data Backup and Restore will also allow you to export any data that you want from your backup file to your computer. Also, this is the safest tool that you can use because you will not lose a single data on your iPhone device during the restore process. The FoneDog Toolkit – iOS Data Backup and Restore will also not overwrite a single data on your iPhone device during the restore process. Here is how to use the FoneDog Toolkit – iOS Data Backup and Restore for you to share your iPhone notes using your PC.
First thing is first. Download the FoneDog Toolkit – iOS Data Backup and Restore from our official website at www.fonedog.com. After that, install it on your PC. Both Mac and Windows PC are supported by the program.Once that you have successfully installed the FoneDog Toolkit on your PC, go ahead and launch it on your PC. Then, go ahead and connect your iPhone device using your USB cable.

Once that the program had detected your iPhone device, choose iOS Data Backup and Restore from the main interface. Then select iOS Data Backup.After that, the FoneDog Toolkit – iOS Data Backup and Restore will then ask you with how you would want to back up your data. You have two options to choose from.
1. Standard Backup – allows you to backup your data from your iPhone device without a passcode.
2. Encrypted Backup – allows you to backup your data from your iPhone device with a passcode. With this, you will be assured that only you will be able to access your backup file.After choosing the backup mode, you can go ahead and simply click the Start button to go to the next step.

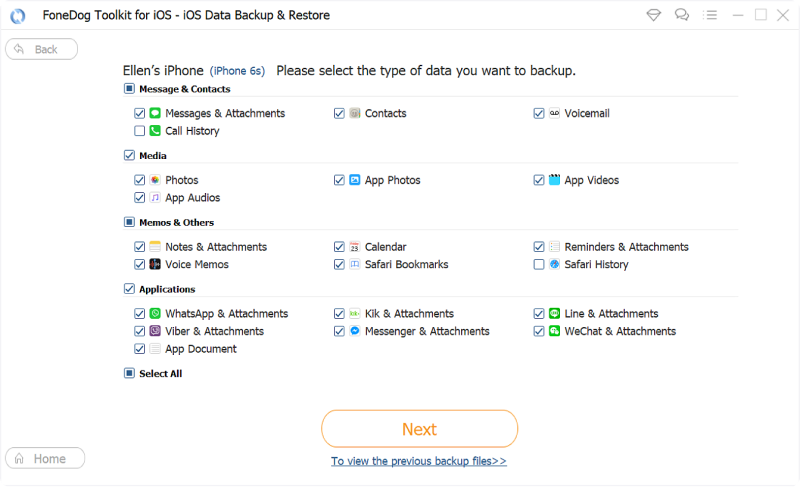
Once that you have chosen the backup mode, the FoneDog Toolkit – iOS Data Backup and Restore will then show you a list of files that the program supports such as Contact, Messages, Videos, Photos, Call logs, WhatsApp, and more.From the list shown on your screen, go ahead and choose “Notes and Attachments”. After that, click on the “Next” button for you to move on to the next step.
After clicking on the Next button, the FoneDog Toolkit – iOS Data Backup and Restore will then start backing up your notes on your iPhone device. Once that the backup is complete, it will then show you the name and the size of your backup file.
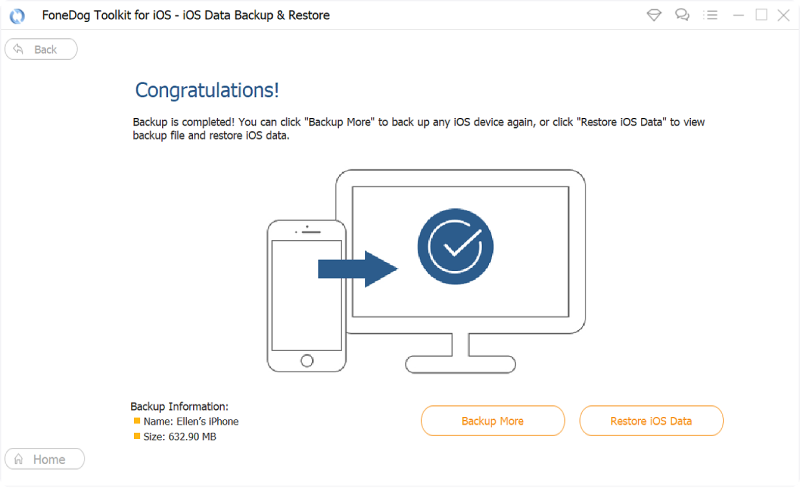
That’s it! Your notes are already backed up by the FoneDog Toolkit – iOS Data Backup and Restore. You can also choose “Backup More” just in case that you want to back up more of your data from your iPhone device or you can choose “Restore iOS Data” if you want to restore your backup file to your PC or to another iOS device.
This time, select the “iOS Data Restore” option. And then have your iPhone device connected to your PC using your USB cable.
Once that the FoneDog Toolkit – iOS Data Backup and Restore detected your iPhone device, it will then show you a list of your backup. Choose the most recent backup file that you made. You will be able to determine which backup file is the most recent because it has the date when you backed up your device.
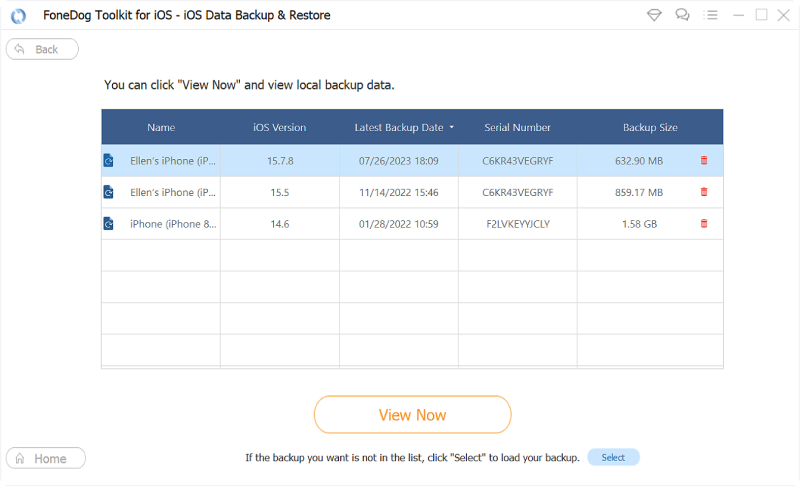
Once that you have chosen the backup file that you want to restore, go ahead and click on the “View Now” button.
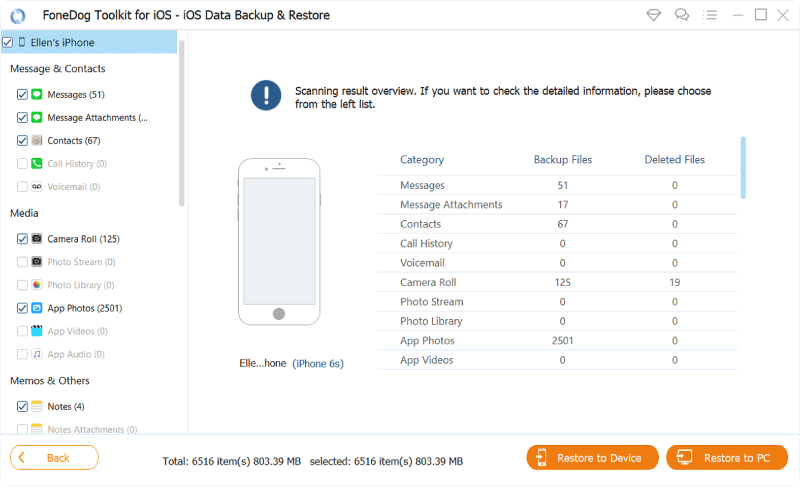
The FoneDog Toolkit – iOS Data Backup and Restore will then start scanning your backup file. Also, the progress of the scanning process will also be shown on your screen. You have the option to pause the scanning process or stop it if you desire.

Once that the scanning process is complete, you will be able to see a list of files that you have backed up on your file. From the list, go ahead and choose “Notes and Attachments”.You will then be able to preview all the items that are in your Notes. Choose all the notes that you want to share using your PC by marking it down.
Once that you have chosen all the items in your Notes that you want to share, go ahead and choose from two options with how you can restore them.If you want to share your Notes to another iPhone device or any iOS device, go ahead and click on the “Restore to iDevice” option. However, if you would want to share your notes on your PC, go ahead and click on the “Restore to PC” option.
There you have it. Your notes were shared.
For other users, being able to share their notes in different places will be able to keep their vital information safe. This will truly give you a peace of mind and an at ease. As you can see, there are several ways with how you can share your iPhone notes with others. However, one of the most convenient ways is by sharing your notes using your PC. This is simply by using the FoneDog Toolkit – iOS Data Backup and Restore.
The FoneDog Toolkit – iOS Data Backup and Restore will allow you to restore and backup any data from your iPhone device without you losing any data or overwriting them. The FoneDog Toolkit – iOS Data Backup and Restore will also allow you to selectively choose whatever data you just want to backup and restore. Also, this way, it can allow you to share your backup data to other devices or directly to your PC.
The FoneDog Toolkit – iOS Data Backup and Restore is also the safest, fastest, and the most convenient way to do this even with just your precious notes that you have on your iPhone. The FoneDog Toolkit – iOS Data Backup and Restore will definitely do its job without having any issues or trouble using the program.The FoneDog Toolkit – iOS Data Backup and Restore will definitely give you the satisfaction of sharing your notes securely and safely to other devices.
Any iOS device is also supported by the program including the new iPhone 8, iPhone 8 plus, and the new iPhone X. It can also support any Pc that you have – whether it is a Mac or a Windows PC.Have the FoneDog Toolkit – iOS Data Backup and Restore downloaded and installed for you to experience the best of the best. Actually, this is the best alternative if you would want to back up any of your data as well as if you want to restore any data from your iPhone or any iOS device that you have.
Leave a Comment
Comment

Tech Website Writing /Content Optimization
Singing, smiling, surprising every day!
So as a technical writer, it is my duty to gather effective and reliable solutions to answer questions on how to deal with the issues they are having with their devices.
iOS Data Backup & Restore
Back up your data to PC and selectively restore iOS data from backups.
Free Download Free DownloadHot Articles
 /
/
INTERESTINGDULL
/
SIMPLEDIFFICULT
Thank you! Here' re your choices:
Excellent
Rating: 4.5 / 5 (based on 95 ratings)
