FoneDog Screen Recorder
FoneDog Screen Recorder
Special Offer
Special Offer


By Nathan E. Malpass, Last updated: July 27, 2018
“I want to be able to share photos from our company outing with my colleagues. I heard that iCloud has a feature that allows you to do that. I’m just starting to use iCloud, so I’m not very familiar with it yet. Can you help me out?”
iCloud Photo Sharing is a great feature of iCloud that does exactly what the name suggests – share photos. You can share videos too. You get to share them only with the people that you want to see them. They may be your family, relatives, a small circle of friends, or even a huge group of friends.
Part 1. What is iCloud Photo Sharing?Part 2. What Conditions Should You MeetPart 3. How to Use iCloud Photo SharingPart 4. How to Recover Photos Using iCloudVideo Guide: How to Restore Photos from iCloud Backup FilePart 5. Conclusion
It's called iCloud Photo Sharing, which makes it taking photos and sharing them with family and friends that much easier. That won’t really matter as long as you know how to invite them and give them access.
Unlike image-hosting and social media sites, iCloud Photo Sharing gives you the privacy that you want for your images and videos. The sharing is also two-way. This means you and your subscribers can add your own content. And just like in sites, you can leave comments on the photos and videos.
For iCloud Photo Sharing to work on your iDevice, make sure that you meet the following requirements. If you haven’t, do the necessary steps to make your device iCloud Photo Sharing-ready.
As a bonus, we’ll also teach you how to retrieve deleted photos and videos using iCloud. Sounds great? Let’s get started!
Step 1. Activate iCloud Photo Sharing.
The first thing you have to do is to enable the feature. Follow the steps below depending on the device that you are using.
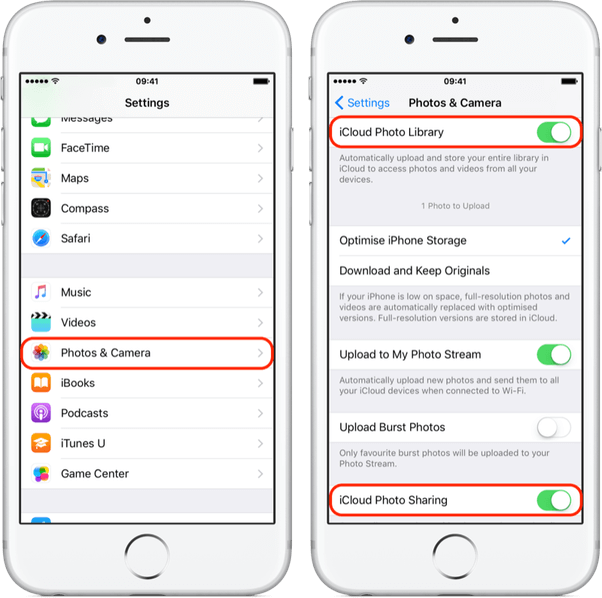
iPhone, iPad, and iPod Touch: Open Settings on your device > [Device name]. Tap iCloud > Photos > Slide the toggle to turn on iCloud Photo Sharing.
Mac: Open System Preferences > iCloud > Click Options beside Photos > iCloud Photo Sharing.
Windows computer: Launch iCloud for Windows > Photos > Turn on iCloud Photo Sharing > Apply.
Step 2. Create a shared album and invite people.
iCloud Photo Sharing allows you to add as many as 100 people to be a part of your shared album.
Here’s how.
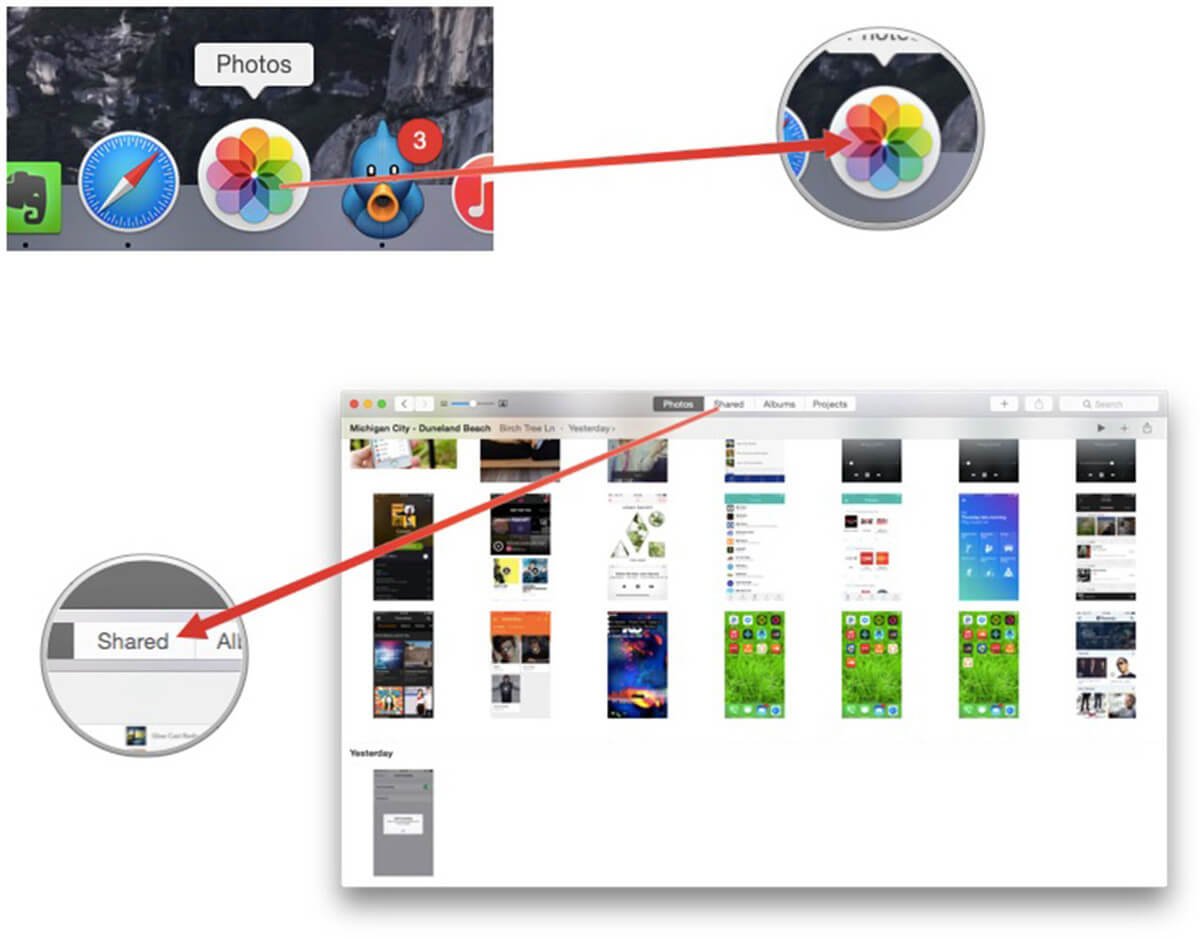
To edit the settings of your album, simply open the album and head to the People tab. You can invite more people and allow them to post their own content. You can also choose to share your photos and videos to the public by turning on Public Website. Anyone with the link to your shared album can view it. With this feature, you can even use the album as your portfolio!
Step 3. Add photos and videos to your album.
Now, it’s time to add contents in your shared album.
An album can contain up to 5,000 photos and videos. Now, that’s a lot! The best thing is that they won’t eat up space from your available iCloud storage. So let's talk about how to restore deleted photo from iCloud in the next part!
Just in case you accidentally deleted an important photo or video on your iPhone or iPad, you can get it back with iCloud Photo Sharing. You can save posts from the shared album to your Photos app.
You can also choose to use a data recovery software such as FoneDog iPhone Data Recovery. This is the next best step if what you’re looking for is not in a shared album or on iCloud.
In any case, if you think you have the photo or video on iCloud, you can still use FoneDog to access it. So why not download the 30-day free version for a try by yourself!
This method would work only if the photo or video is in your iCloud. If it’s not, skip to Option 2.
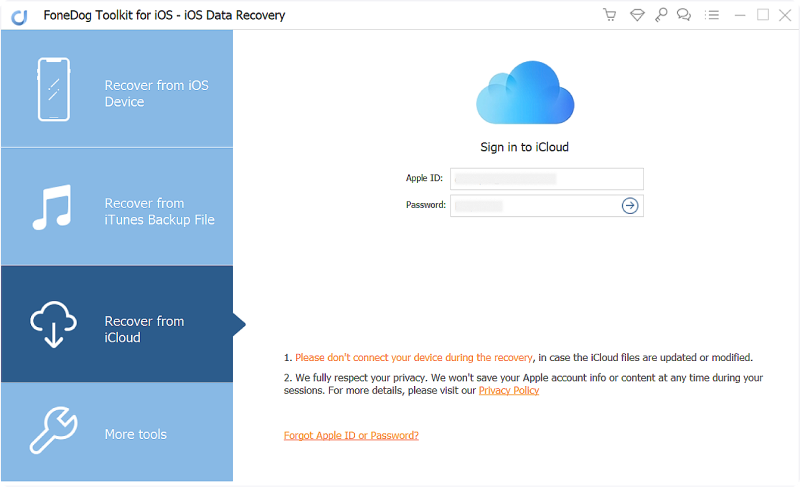
Step 1. Sign in to your iCloud account.
Open the software and connect your iDevice to the computer. From the main menu, select Recover from iCloud Backup File. Enter your Apple ID and password.
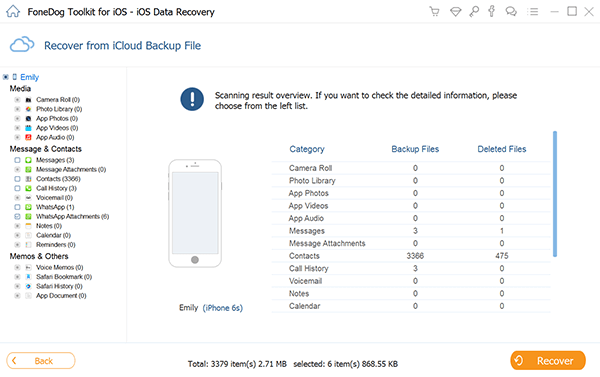
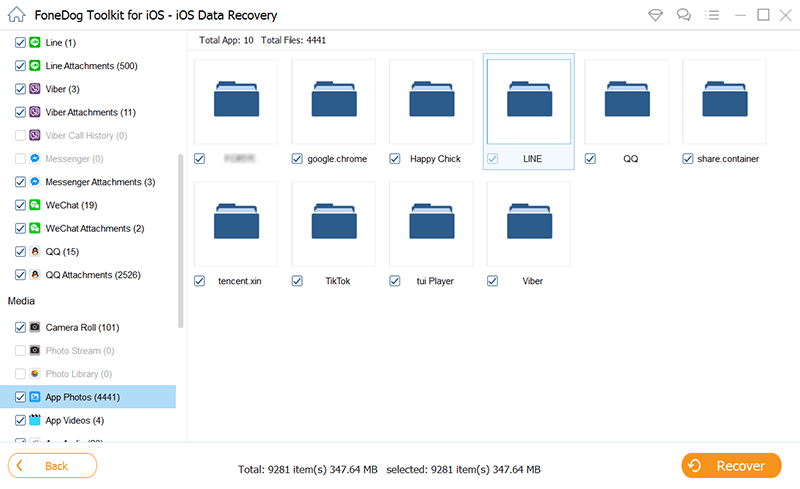
Once logged in, you will see the available backup files. Choose one and press Download. A pop-up window will appear. Make sure that you tick Camera Roll, Photo Stream, Photo Library, App Photos, and App Videos. Hit Next to proceed.
You will now see the found files. Look for the photo or video that you need and tick the box beside it. Once you’re done, press Recover.
People also read:
How to Restore Deleted Contacts from iCloud Backup
Selectively Download Photos from iCloud
Open FoneDog iOS Data Recovery. With your Apple cable, connect your iDevice to the PC. Select Recover from iOS Device from the presented options and click Start Scan.
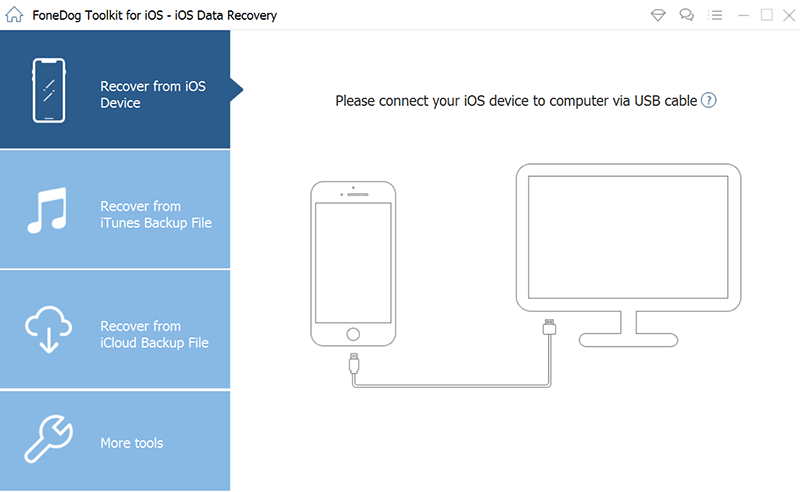
The scanning process may take a few minutes to complete. Once it’s done, view the found files and tick those that you need. Click the Recover button once you have selected the files for recovery.
Don't know how to retrieve photos videos and other files from iCloud? You come to the right place, this is a useful tool FoneDog iOS Data Recovery can help you out to do that, click the player to watch how it works for you.
Now you see how FoneDog iOS Data Recovery Software works. It is very easy, efficient and at the same time, it will give you a 100% success rate in recovering all your deleted data from your iPhone device. You don't need to look far just to find the best recovery software because FoneDog iOS Data Recovery Software will surely fit your needs.
Leave a Comment
Comment

iPhone/Android Devices’ Maintenance Expert
Staying home, listening to music, writing tech articles
Many people asked me to repair their mobile phones so I have a lot of experience in mobile phone repair, and I know a lot about Android or Apple phones.
iOS Data Recovery
3 Methods to recover your deleted data from iPhone or iPad.
Free Download Free DownloadHot Articles
 /
/
INTERESTINGDULL
/
SIMPLEDIFFICULT
Thank you! Here' re your choices:
Excellent
Rating: 4.6 / 5 (based on 59 ratings)
