FoneDog Screen Recorder
FoneDog Screen Recorder
Special Offer
Special Offer


By Nathan E. Malpass, Last updated: September 19, 2018
"I love my Apple devices. I love it so much that I have an iPhone, an iPad, and a Mac. My problem with it is I can’t see my iPhone photos when I sync it to my iPad. What’s the solution to my problem?"
In the following, we will guide you how to sync your iPhone to the iPad.
Part 1. Syncing Photos Using iCloudPart 2. Using iTunes For Syncing PhotosPart 3. Syncing Photos From iPhone To iPad Without Using iCloud Or iTunesVideo Guide : Syncing Photos From iPhone To iPad with FoneDog ToolkitPart 4. Conclusion
People Also ReadGoogle Photos Backup Slow? Here are The Solutions! 3 Top Ways to Recover Deleted Photos from iPhone X
Apple has one of the best cameras built in its phones. This gives it the title of one of the best devices to use for taking photos. For example, the iPhone 4s already has a camera with 8 megapixels. Shooting for clear, crisp images has never been better with the iPhone.
However, for photo display, the iPad trumps over the iPhone. Because of its larger screen, it allows for better viewing of digital media such as images and videos. For example, one iPad Pro has a retina display size of 12.9 inches. That’s enough to make your eyes happy.
If have both an iPhone and an iPad, you might want to sync your photos from the former to the latter. This is possible. However, a lot of people encounter problems when doing so.
In this article, we will show you three different methods on how to sync photos from your iPhone to your iPad. Let’s start with the first method, the use of iCloud.
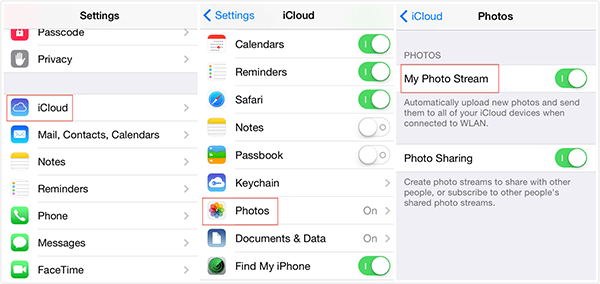
The iCloud Photo Stream can be utilized to share photos between iPhones and iPads. To sync photos using this method we have to enable “My Photo Stream” on both the iPhone and iPad devices.
Once you have turned on My Photo Stream, camera roll photos located in the iPhone will instantly be uploaded to the iCloud. This is due to the fact that both devices are within a Wi-Fi network.
Below are the steps you can follow to turn on My Photo Stream on an iPhone and an iPad:
Step 1- Visit Settings
Step 2 - Go to iCloud
Step 3 - Visit Photos
Step 4 - Enable My Photo Stream to turn it on
If you are on the iOS 10.3 and later versions, here are the steps you can follow to turn on My Photo Stream:
Step 1 - Visit Settings
Step 2 - Go to [your name]
Step 3 - Visit iCloud
Step 4 - Go to Photos
Step 5 - Toggle My Photo Stream to turn it on
There are a few things to take note of when using the iCloud to sync photos from iPhone to iPad:
First, iCloud saves photos for the last 30 days. Plus, it only saves 1000 of those photos during that time period. Thus, it is best to save other photos to another iPad album.
If you don’t do this, the photos will be automatically deleted especially if the time is more than 30 days. If the number of photos is also more than 1000, the excess will automatically be removed as well.
Second, when you sync photos from iPhone to iPad, you are required to use an identical Apple ID on both devices. Third, if the iCloud method didn’t work for you, then continue to read this article for more options.
iTunes only allows you to sync photos from iPhone to iPad by transferring it to your computer or laptop first. Thus, you have to transfer photos from your iPhone to your Mac or PC first. Then, you can sync it from your computer device to your iPad.
Here are the steps you can follow in order to sync your photos from iPhone to iPad using iTunes:
Step 1 - Import or transfer your photos from your iPhone to your computer:
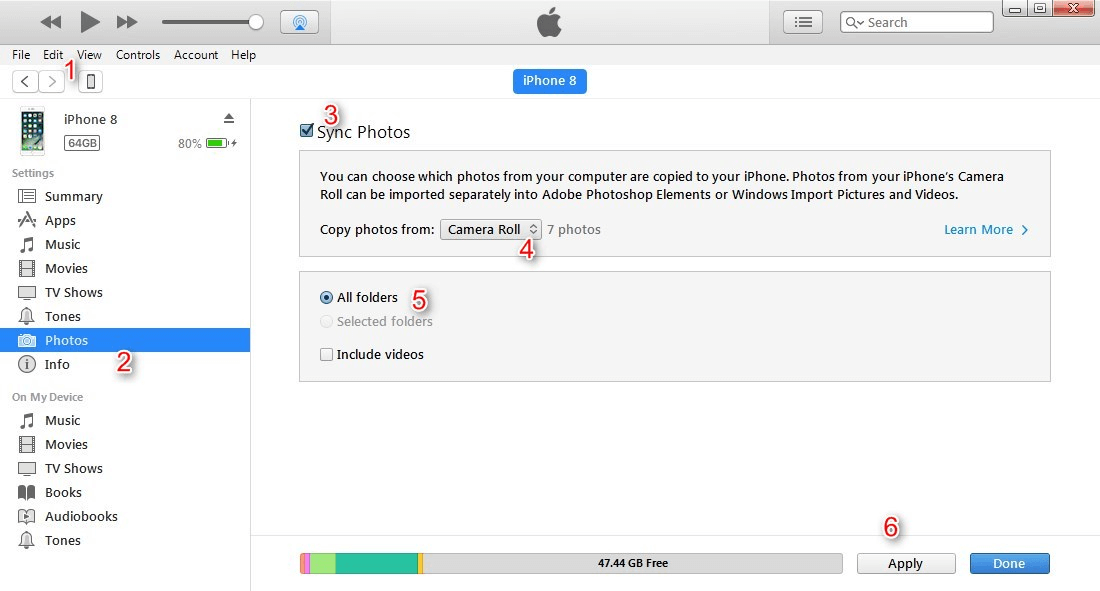
Step 2 - Use iTunes to sync photos from your computer to your iPad.
In this step, you have to connect your iPad using its USB cable. Next, you have to open iTunes. However, if it launches automatically, then you don’t have to do it yourself.
Then, you have to click the “Device” button. Go to the “Photos” tab. Then, select “Sync Photos” from a folder or an application. Finally, press the “Apply” button.
Notes:
a - When you are syncing your photos from the iPhone to the iPad using iTunes, only “Camera Roll” images can be moved. iTunes will also remove existing photos contained within the Photo Library when you sync iPhone photos with your iPad.
b - When you are currently transferring photos using iTunes and you have activated your iPhone’s iCloud Photo Library, the pop-up menu will display stating the iCloud Photos is activated and XXX will be able to access photos in iCloud.
The message adds that photos can actually be downloaded to your device through Wi-Fi or a cellular data network. If you wish to complete the process of syncing through iTunes, your iPhone’s iCloud Photo Library must be deactivated.
You must know that when you deactivate your device’ iCloud Photo Library, all photos stored in iCloud will be erased. Although photos contained on your device will not be deleted.
It is important to note that if you want to make sure all your photos won’t be deleted, you should move to the next part of this guide. This will help you learn how to share Photos between iPad and iPhone directly without experiencing data loss.
Data transfer applications are good alternatives when you face certain issues using iCloud or iTunes. You can use FoneDog’s iOS Data Backup & Restore to transfer photos from iPhone to iPad. The said tool has the following features:
-Implement simple clicks to backup your Apple device to your computer.
-Preview any item from the backup.
-Restore items from backup a device.
-Export items from the backup to your computer.
-No experience of data loss.
-No overwriting of data.
-100% secure.
Here’s how to transfer photos from iPhone to iPad using this tool:
Click the download button and follow our steps to start backing up your iPhone.
In this step, you have to connect the iPhone to your computer using a USB connector. Then, you have to install the FoneDog Toolkit - iOS Toolkit and open it on your computer. Next, select iOS Data Backup & Restore. Then, select iOS Data Backup.

There are two backup modes to choose from, Standard Backup and Encrypted Backup. Encrypted Backup allows you to backup files and protects it with a password. After choosing a specific backup mode, click Start.

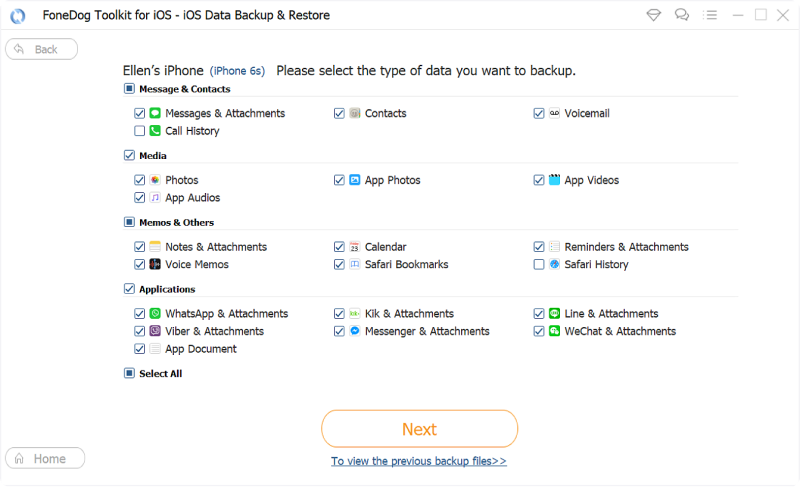
The software will display various data types you may wish to back up. In this case, select Photos and App Photos. Then, click Next.
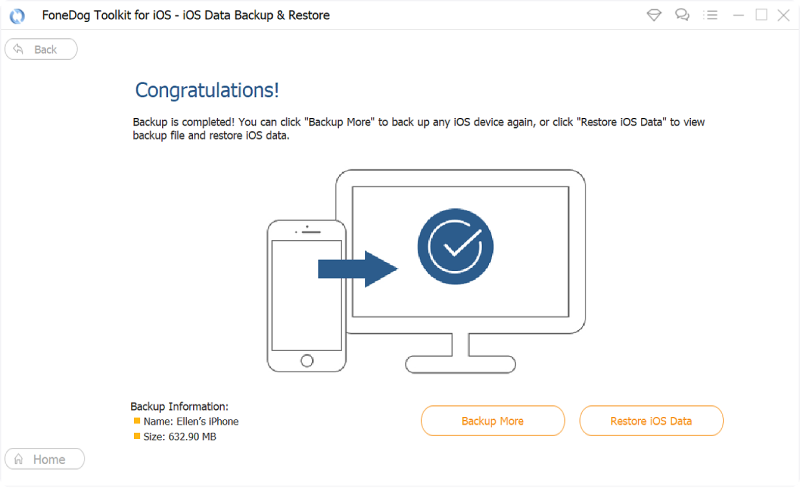
FoneDog Toolkit will no back up your iOS data. When it is done, the software will show the name of the backup file and its size as well. Finally, disconnect your iPhone from your PC or Mac.
In this step, connect your iPad to your computer or Mac. Select, iOS Data Restore from iOS Data Backup & Restore.
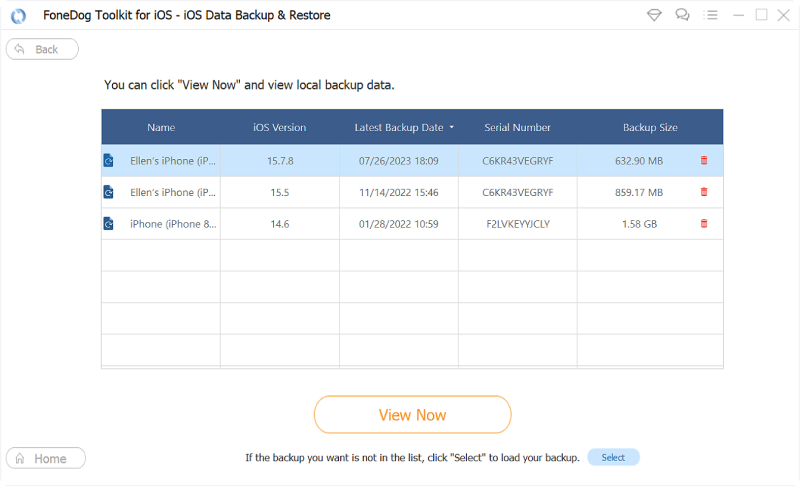
FoneDog Toolkit will now display all backups you have made. Choose the backup you have just made previously. Then, press the button named View Now.
The software will now make a comprehensive scan of your backup files. You will be able to see the progress on the software’s window. You can press Pause to pause the processor you can press Stop to stop the process.

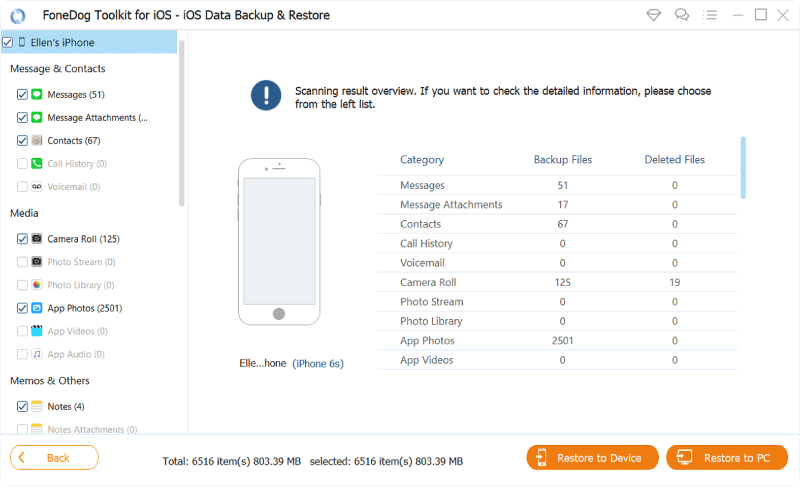
When the comprehensive scan is finished, you can check out the backup data. You can preview the items on the left-hand side of the software window. Select the photos you want to restore.
Click Restore To Device to restore photos to your iPad. You can also click Restore to PC if you want files to be moved to PC or Mac as well.
Our photos are very important parts of our lives. It can be used to relive memories and events. If you have a lot of photos in your iPhone and wish to transfer it to your iPad, you can do so through iCloud and iTunes. But there is a better way of doing it--through FoneDog’s iOS Data Backup & Restore. The tool can help you transfer photos from iPhone to iPad without experiencing data loss.
Leave a Comment
Comment

iPhone/Android Devices’ Maintenance Expert
Staying home, listening to music, writing tech articles
Many people asked me to repair their mobile phones so I have a lot of experience in mobile phone repair, and I know a lot about Android or Apple phones.
iOS Data Backup & Restore
Back up your data to PC and selectively restore iOS data from backups.
Free Download Free DownloadHot Articles
 /
/
INTERESTINGDULL
/
SIMPLEDIFFICULT
Thank you! Here' re your choices:
Excellent
Rating: 4.6 / 5 (based on 107 ratings)
