FoneDog Screen Recorder
FoneDog Screen Recorder
Special Offer
Special Offer


By Nathan E. Malpass, Last updated: September 26, 2018
With every new model coming out every so often avid Apple users would want to stay updated and purchase new iPhone's and get rid of their old ones. Although not everyone can afford to do so (new models=pricey), it is a common thing nowadays. Something that needs to be done though is to have everything transferred from your old iPhone to your new one. This is quite important if you want to keep every important file or data that you need to be stored on your new device.
Traditionally backing it up and using iTunes to transfer is the way to do it. But what if you don't have your computer with you, you're at the store holding your brand new iDevice and you want to be able to use it immediately. That's the main benefit of having data backed up using iCloud.
You got to keep in mind though that you need a stable internet connection before going through with your data back up and transfer iCloud to your new iPhone. Otherwise, it might take ages or worse you might encounter errors which might lead to data corruption. For reference, we have compiled the steps to do data back up and transfer via iTunes and iCloud to new iPhone.
Part 1: Using iTunes to Backup files and Transfer to new devicePart 2: Transfer iCloud Data to Your New iPhone Device via iCloudPart 3: Use FoneDog Toolkit to Transfer iCloud to New iPhoneVideo Guide : Use FoneDog Toolkit to transfer iCloud to new iPhonePart 4: Conclusion
People Also ReadHow to Transfer Data to New iPadHow to Transfer iMessages to New iPhone ?
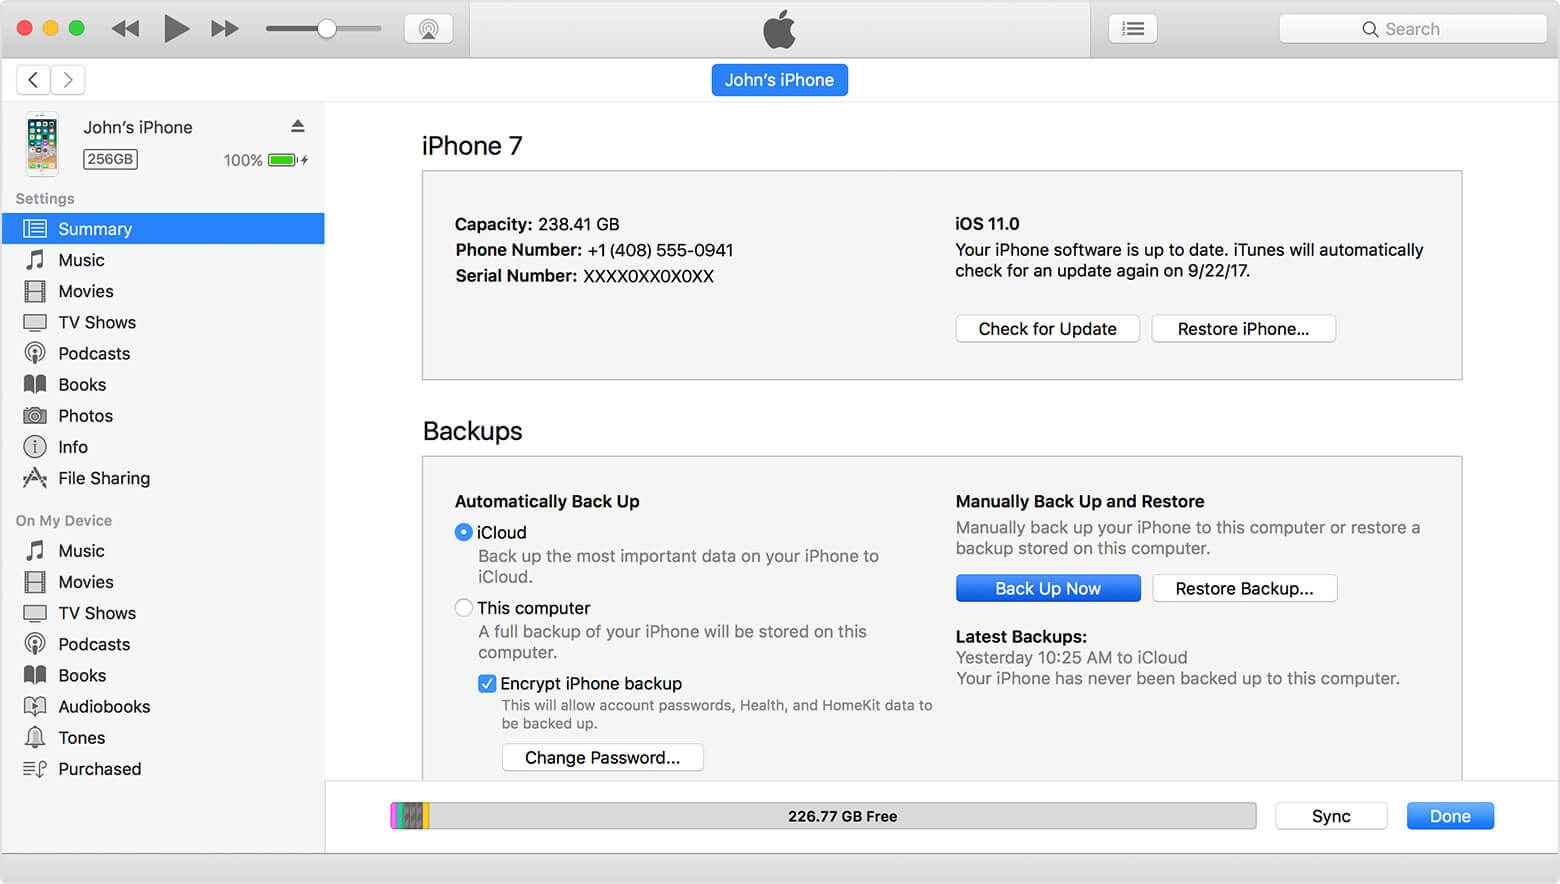
It is advised that you have the latest version of iTunes installed so that you won't encounter any issues while doing your backup and transfer.Also, take note that iTunes automatically backs up your iPhone when you connect it to your computer, but you can do it manually as well depending on how it is set up:
Step 1: Using the original cable that came with your device, connect it to your computer
Step 2: Launch the iTunes app and go to the drop-down menu and click on the device icon. On the next selection click on "Summary". This would now bring you to a page where you would see the overview of the device. On the summary page, you should be able to see "Manually Backup and Restore", the next thing to do is click on "Back up Now".
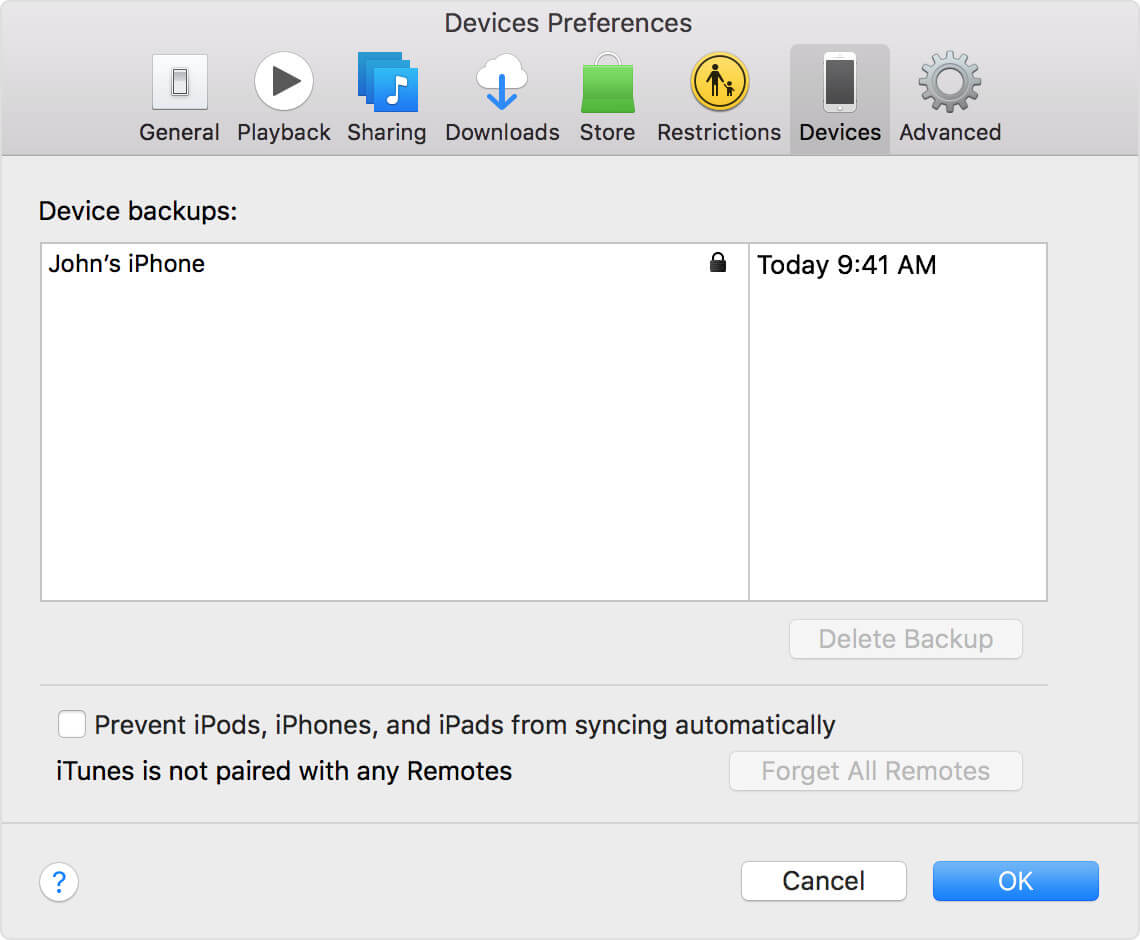
Step 3: This should initiate the backup process which would take a couple of minutes depending on the number of files stored on your device. Click on "Done" after it has completed. (To check the success of your back up got to iTunes Preferences>Devices, you would be able to see the details of the most recent backup file created)
Note: If you want to set up the automatic backup feature then go to Summary>This Computer (can be seen under the "Automatically Backup" part of the page)> If you want your passwords, health, and HomeKit data backed up check the box for "Encrypt [device] backup>Click "Done" when you are finished.
Important Note: Let's say your new iPhone is bought second-hand and it has been previously set up you would need to erase its contents before you can proceed. Just go to Settings > General > Reset > Erase All Content and Settings. Once everything has been erased it should bring you to the "Hello" screen, this would mean that you're device is ready to be set up with new settings and content.
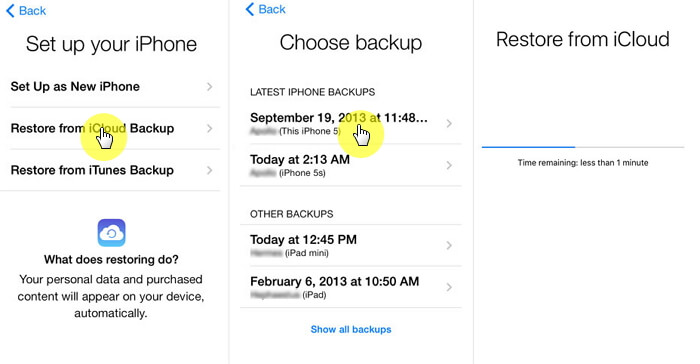
Step 4: To transfer your backup from iTunes you have to turn on your new iPhone first and follow the prompts until you get to the Apps & Data page. This will give you the option "Restore from iTunes Backup". Click on "Next" to proceed.
Step 5: You now need to connect your new iPhone to the computer where you backed up your old one. Then launch iTunes and select your device.
Step 6: Click on Restore Backup. Carefully review the list of files (if you have a couple) and pick the latest one that was created which could be determined based on the date.
Step 7. Click on Restore. Wait for the process to finish. It might take a couple of minutes again depending on the size of the file to be transferred to your new iPhone. Once completed you can now proceed to complete setting up your new device.
Important Note: Using the iCloud feature would require you to have a stable internet connection in order to avoid any errors and interruptions during the process.
If you have data from an old iOS device that you would want to transfer without being on your computer, then it would be best to go through the process of backing it up using iCloud.
Follow these steps to transfer iCloud to new iPhone:
This should now commence the transfer of your backed up files to your new iPhone. Keep track of the stability of your Wi-Fi connection so that there won't be any interruptions while the restore is being completed.
If you don't feel the need to have everything from your old iPhone moved to your new one then you would have to be able to select which ones you would like to keep a back up for. This is not possible when using iTunes or iCloud.
There are tons of data that you may have accumulated while using your old device and some of it you may find that you no longer need. It is possible to delete most of it but it would take some time for you to pick out the ones that you don't want to retain and you might have a hard time filtering it out because some might not even be categorized for you to easily recognize the stuff you have on your old device.
What if we told you that it the easier way is to select the ones that you just want to transfer to your new iPhone? You will have that ability when you download the FoneDog Toolkit and use its iOS Data Backup and Restore feature. It's guaranteed safe and is compatible with any iPhone model. You are guaranteed a 100% success rate all the time and you won't experience any data overwrite or data loss. Read on to know more about the simple steps you need to go through.
Connect your old iPhone to your computer using its original cable. After which complete the download of the FoneDog Toolkit (compatible with both MAC and Windows OS) then just follow the steps to install it. Once done launch the software choose iOS Data Backup and Restore from the main dashboard. Click on Data Backup then proceed to the next page.

You would be pleased to know that with the next step there is another cool feature that the toolkit offers. And that is choosing between "Standard backup" or "Encrypted backup". This is quite useful if there are certain data that you would want to add another layer of security since it would allow you to set up a password for your file. When you have made your selection click on "Start".

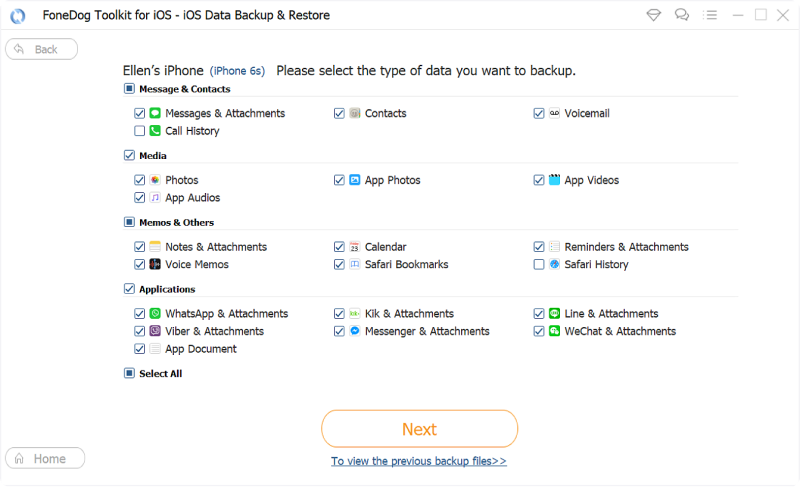
Before the backup process commences it will now bring you to the next page where you can selectively choose which data you would like to backup. To make it easier for users the FoneDog Toolkit categorizes each file i.e. Photos, Contact, Call History etc.
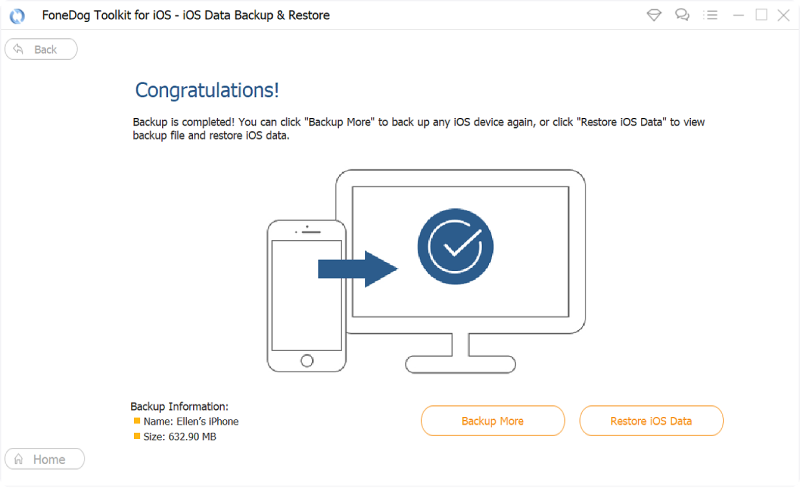
All you have you to do now is wait for the toolkit to finish backing up your data. It is advised to leave your device untouched while it is ongoing. You will be prompted once the backup is done by being shown the name and size of the file. If you think that you missed to backup any other data from your iPhone you can click on "Backup more", but for the purpose of this article you would want to select "Restore iOS Data"
Disconnect your old device and plug in your new iPhone. This time when you go to the main page of the toolkit under "iOS Data Backup and Restore" you would now need to select "iOS Data Restore".
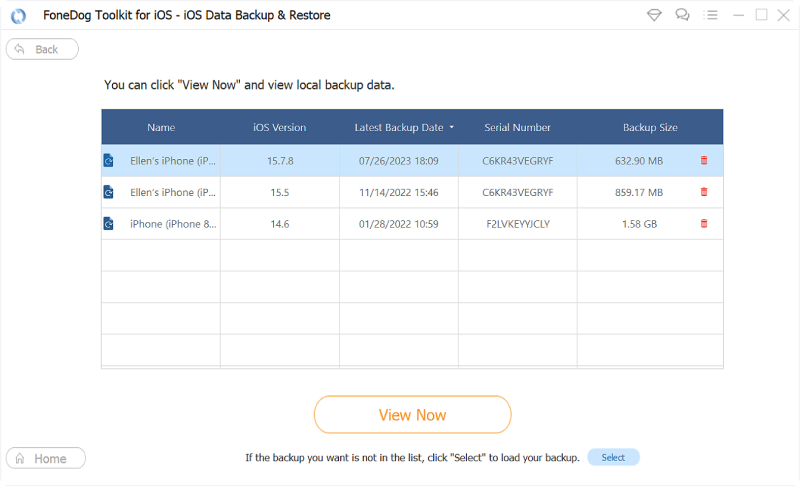
On the next page if you have created multiple backup files the toolkit will show you a list to choose from. Pick the latest one that was created based on the date. Click on "View Now" after you have made sure which file you need.
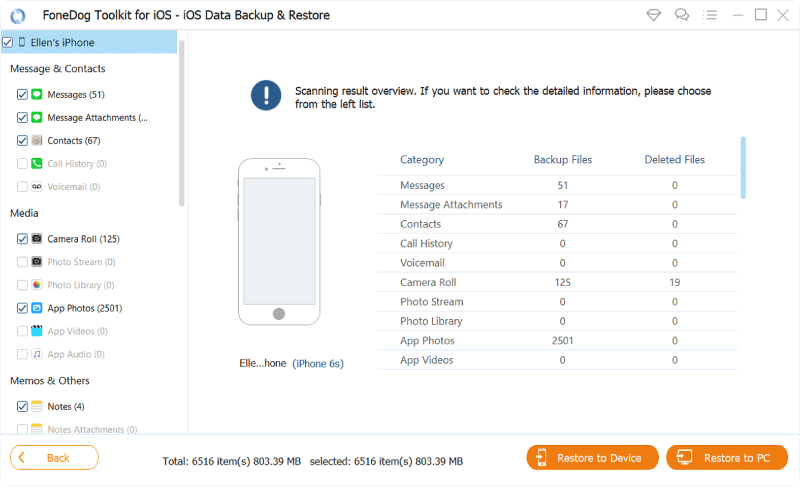
The FoneDog Toolkit will now scan the file, you can either opt to pause or stop the whole scan midway if you feel like you won't really need the whole file transferred to your new iPhone (people do have the tendency to change their minds every so often). To help you make that decision you would be able to see the progress of the scan on the screen.

You will now be shown the details of your backup file. This is another amazing feature of the FoneDog Toolkit, at this point, you would be able to further filter which data you would like to transfer to your new iPhone. After you have finalized your selection click on "Restore to Device". If you want a copy on your computer you can select "Restore to PC". When the transfer is completed you can now proceed with setting up your new iPhone.
We have to admit that not just because there is some sentimental value to our stored data from old devices we want to as much as possible keep it because there are certain things that we still need to be able to have access to when we got new devices to use. The good thing nowadays is that is feasible to be able to transfer files from your old device to your new iPhone, wherein the most convenient would be via iCloud. Although there are certain features like limiting and selecting which data to keep and transfer.
That's what makes the FoneDog Toolkit-iOS Data Backup and Restore stand out. It assures Apple users that it would be a breeze to create a backup file and set it up with newly purchased iDevice's without worrying if there will be data overwritten and that they can be detailed in which files to restore. Plus the fact that you will be able to encrypt sensitive information, what else would you ask for? Download and install the FoneDog Toolkit and be awed by the one of a kind experience the software will provide.
Leave a Comment
Comment

iPhone/Android Devices’ Maintenance Expert
Staying home, listening to music, writing tech articles
Many people asked me to repair their mobile phones so I have a lot of experience in mobile phone repair, and I know a lot about Android or Apple phones.
iOS Data Backup & Restore
Back up your data to PC and selectively restore iOS data from backups.
Free Download Free DownloadHot Articles
 /
/
INTERESTINGDULL
/
SIMPLEDIFFICULT
Thank you! Here' re your choices:
Excellent
Rating: 4.5 / 5 (based on 79 ratings)
