FoneDog Screen Recorder
FoneDog Screen Recorder
Special Offer
Special Offer


By Nathan E. Malpass, Last updated: June 11, 2025
In a world dominated by visual content, voice memos have emerged as our auditory diaries, capturing our thoughts, ideas, and memories in a raw and unfiltered form. Whether it's a brainstorming session, a heartfelt message from a loved one, or a melody that strikes a chord, these voice recordings hold immense sentimental value. You may have inadvertently deleted a voice memo that you now desperately wish to recover.
In this comprehensive guide, we will explore the steps and techniques on how to recover permanently deleted voice memos on iPhone, ensuring that your audio memories remain intact and accessible. So, let's dive into the world of data recovery and reunite you with your cherished recordings.
Part 1. 3 Ways to Recover Permanently Deleted Voice Memos on iPhonePart 2. Best Ways to Recover Permanently Deleted Voice Memos QuicklyPart 3. Summary
iTunes has long been a trusted companion for iPhone users when it comes to managing backups. If you've been diligently backing up your device via iTunes, you're in luck. You may be able to recover those erased voice memos with ease. Here's how:
Step 1: Connect Your iPhone to Your Computer. Start by connecting your iPhone to your computer using a USB cable. Ensure that you're using the computer that you regularly sync with iTunes.
Step 2: Launch iTunes. Open the iTunes application on your computer. If you're using macOS Catalina or later, you'll find your device in the Finder sidebar instead of iTunes.
Step 3: Select Your Device. Once iTunes (or Finder) detects your iPhone, click on your device icon to access its summary page.
Step 4: Choose "Restore Backup". In the summary tab, you'll see an option labeled "Restore Backup." Click on it.
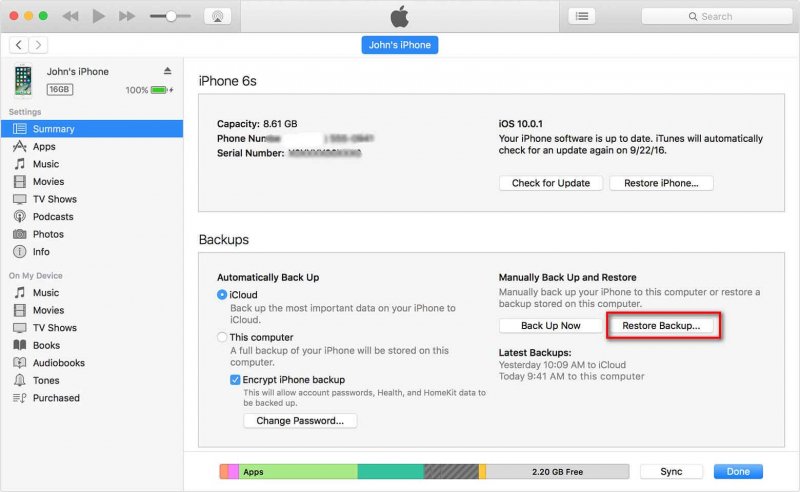
Step 5: Select the Relevant Backup. A window will appear displaying a list of available backups. Choose the backup that contains the voice memos you want to recover. These backups should be dated prior to the deletion of the voice memos.
Step 6: Begin the Restoration Process. Click "Restore" and let iTunes do its magic. Your device will be erased and then restored from the selected backup.
Step 7: Check Your Voice Memos. Once the restoration process is complete, your iPhone will restart. Check the Voice Memos app to see if your deleted recordings have been successfully recovered.
It's important to note that this method will replace your current data with the content from the selected backup. So, make sure to back up your device before proceeding if you want to preserve any recent changes.
If you didn't find the deleted voice memos in the iTunes backup or you don't regularly back up your device, don't worry. There are alternative methods to explore in our quest to recover those precious recordings. In the next section, we'll delve into another approach using iCloud.
If you've been diligently using iCloud to back up your iPhone, you can potentially recover your permanently deleted voice memos using this cloud-based method. Here's how to proceed:
Step 1: Access iCloud Settings
Step 2: Manage Storage
Step 3: Review Backups
Step 4: Delete Your iPhone's Current Data (Optional)
Step 5: Restore Your iPhone from iCloud Backup
Step 6: Erase Your iPhone (Optional)
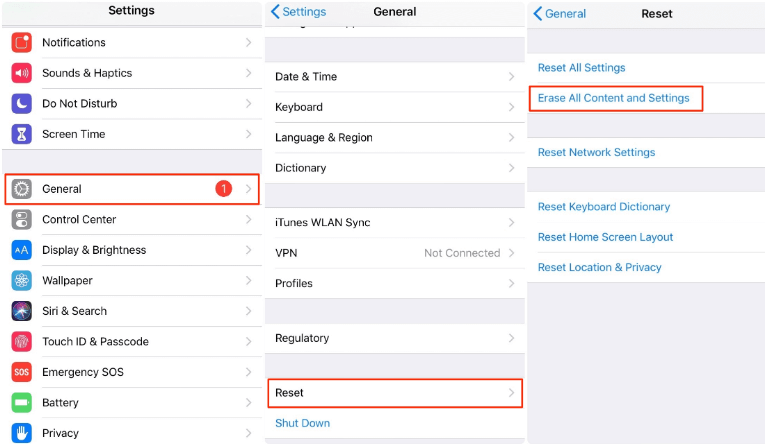
Step 7: Restore from iCloud Backup
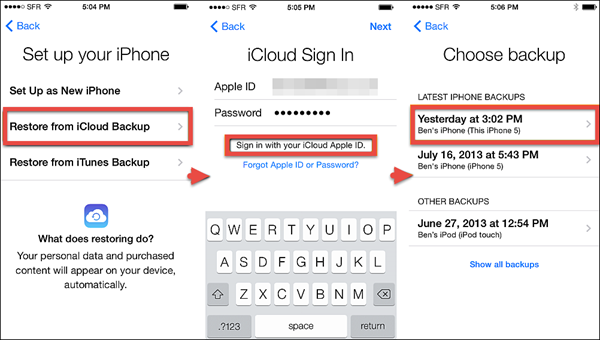
Step 8: Wait for the Restore to Complete
Step 9: Check Your Voice Memos
This method allows you to selectively recover voice memos from an iCloud backup without restoring your entire device. You can also recover the deleted photos on iPhone using this method. However, if you didn't find the deleted voice memos in either the iTunes or iCloud backup, don't lose hope. We have more strategies to explore in the quest to recover your valuable voice recordings.
If you're a Mac user and you've synced your iPhone with your computer using macOS Catalina or later (which replaced iTunes with Finder for device management), you can try recovering permanently deleted voice memos using Finder. Here's how:
Step 1: Connect Your iPhone to Your Mac
Use a USB cable to connect your iPhone to your Mac.
Step 2: Open Finder
Launch Finder on your Mac if it doesn't open automatically when you connect your iPhone.
Step 3: Select Your iPhone
In the Finder sidebar, you should see your iPhone listed under "Locations." Click on it to select it.
Step 4: Choose "Restore Backup..."
In the iPhone window, you'll see information about your device. Click on the "General" tab.
Step 5: Select the Relevant Backup
Under the "Backups" section, you'll see a list of available backups. Choose the backup that contains the voice memos you want to recover. Make sure the backup date is before the deletion of your voice memos.
Step 6: Start the Restoration Process
Click on the "Restore Backup..." button and confirm your choice when prompted.
Step 7: Monitor the Progress
Wait for the restoration process to complete. This may take some time, especially if you have a large backup.
Step 8: Check Your Voice Memos
Once the process is finished, your iPhone will restart. Open the Voice Memos app to see if your deleted recordings have been successfully recovered.
Just like with the iTunes method, this approach will replace your current device data with the content from the selected backup. If you want to preserve any recent changes or data, make sure to back up your iPhone before proceeding.
If you didn't find the deleted voice memos in the Finder backup, or if you're looking for more options to recover your data, don't worry; there are still additional methods to explore. Continue reading to uncover more ways to retrieve your precious voice recordings on your iPhone.
When traditional methods like restoring from backups fail to recover your deleted voice memos, it's time to turn to specialized software like FoneDog iOS Data Recovery. This powerful tool can help you retrieve lost voice memos from your iPhone with ease. Here's an overview of FoneDog iOS Data Recovery and the steps to use it:
iOS Data Recovery
Recover photos, videos, contacts, messages, call logs, WhatsApp data, and more.
Recover data from iPhone, iTunes and iCloud.
Compatible with latest iPhone and iOS.
Free Download
Free Download

FoneDog iOS Data Recovery is a professional and user-friendly iPhone 15 supported software designed to recover a wide range of data types, including voice memos, from iOS devices. Even iPhone contacts disappearing randomly, it can help you. It works with iPhones, iPads, and iPod Touch devices, making it a versatile solution for data recovery needs. Here are some key features:
Now, let's dive into the steps to recover permanently deleted voice memos using FoneDog iOS Data Recovery:
Step 1: Download and Install FoneDog iOS Data Recovery
Start by downloading FoneDog iOS Data Recovery on your Windows PC or Mac. Install the software following the on-screen instructions.
Step 2: Launch FoneDog iOS Data Recovery
After installation, launch the FoneDog iOS Data Recovery software on your computer.
Step 3: Connect Your iPhone to the Computer
Use a USB cable to connect your iPhone to the computer. Ensure that you have trusted this computer on your device if prompted.
Step 4: Select Data Recovery Mode
In the main interface, you'll find various recovery options. Choose "Recover from iOS Device."
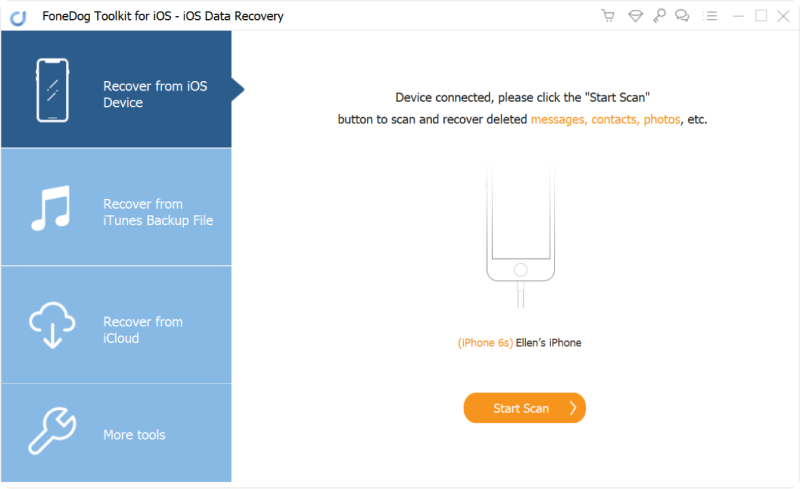
Step 5: Scan Your iPhone for Deleted Data
Click the "Start Scan" button to initiate the scanning process. FoneDog iOS Data Recovery will analyze your device for deleted voice memos and other data.
Step 6: Preview and Select Voice Memos for Recovery
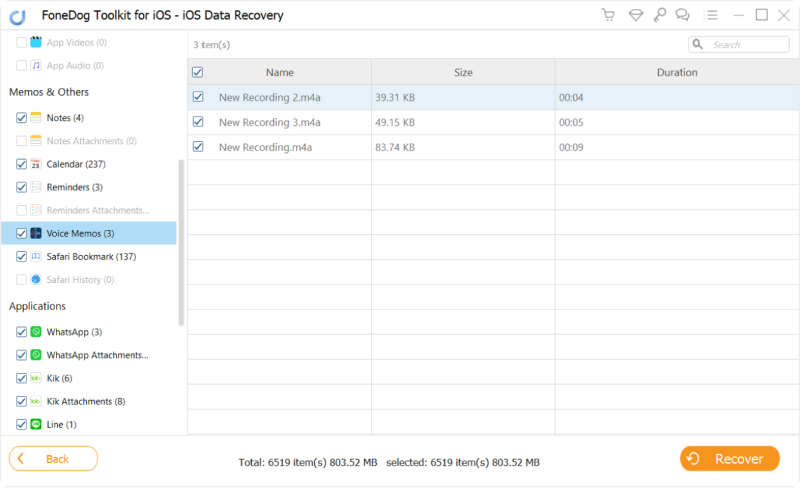
Once the scan is complete, you'll see a list of recoverable data categories on the left side. Click on "Voice Memos" to view the recovered voice memos.
Step 7: Recover Voice Memos to Your Computer
Select the voice memos you want to recover and click the "Recover" button. Choose a destination on your computer where you'd like to save the recovered voice memos.
Step 8: Access Your Recovered Voice Memos
After the recovery process finishes, navigate to the folder where you saved the recovered voice memos to access and listen to them.
FoneDog iOS Data Recovery simplifies the process of recovering permanently deleted voice memos on your iPhone, offering a reliable and efficient solution when other methods fall short. With its user-friendly interface and selective recovery options, you can regain access to your cherished voice recordings quickly and effortlessly.
Losing valuable voice memos on your iPhone can be a heart-wrenching experience, but it's not the end of the road. This article has explored several methods to help you recover those deleted voice recordings, ensuring that your precious memories and important notes are not lost forever.
In Part 1, we discussed the traditional methods of using iTunes and iCloud backups to restore your voice memos. These methods are effective if you've been regularly backing up your device.
In Part 2, we introduced FoneDog iOS Data Recovery, a powerful and user-friendly tool designed specifically for data recovery on iOS devices. This software offers a reliable solution when conventional methods fail and allows you to selectively recover voice memos and other data types.
Whether you choose to rely on backups or opt for a specialized tool like FoneDog iOS Data Recovery, the key is to act swiftly to increase your chances of successful recovery. Remember to regularly back up your iPhone to prevent future data loss and enjoy peace of mind knowing that your voice memos are protected.
In conclusion, the loss of voice memos doesn't have to be permanent. With the right approach and tools, you can recover those cherished recordings and continue to enjoy the audible memories stored on your iPhone.
iOS Data Recovery
Recover photos, videos, contacts, messages, call logs, WhatsApp data, and more.
Recover data from iPhone, iTunes and iCloud.
Compatible with latest iPhone and iOS.
Free Download
Free Download
Leave a Comment
Comment

iPhone/Android Devices’ Maintenance Expert
Staying home, listening to music, writing tech articles
Many people asked me to repair their mobile phones so I have a lot of experience in mobile phone repair, and I know a lot about Android or Apple phones.
iOS Data Recovery
3 Methods to recover your deleted data from iPhone or iPad.
Free Download Free DownloadHot Articles
 /
/
INTERESTINGDULL
/
SIMPLEDIFFICULT
Thank you! Here' re your choices:
Excellent
Rating: 4.6 / 5 (based on 78 ratings)
