FoneDog Screen Recorder
FoneDog Screen Recorder
Special Offer
Special Offer


By Vernon Roderick, Last updated: November 14, 2018
How to Fix Bricked iPhone or iPad after iOS 10 update? Even if it is exciting to update your iPhone or iPad to the latest iOS 10 version, as it’s packed with new features that can improve the way you use your Apple device.
But if you’re updating your device through over-the-air (OTA) software update, there’s a chance you’ll bump into issues during the update that will make your phone get “bricked”, which means your device becomes completely unable to function. If you’re experiencing this now, you might be seeing a stuck Apple logo on the phone’s screen, or it’s just showing a black screen with an indication asking you to connect your device to iTunes.
These issues are sure to hinder the iOS 10 update, and worst, making your phone totally unusable. But let’s get down to business – explore how we can fix this issue and bring back your beloved iPhone or iPad to life.
Part 1: Possible Reasons for Getting a “Bricked” Apple DevicePart 2: Common Solution to Fix 'iOS 10 Bricked My iPhone' IssuePart 3: Updating to the Latest iOS 10 Using iTunesPart 4: Fixing Your Bricked iPhone or iPad Using FoneDog Toolkit – iOS System RecoveryPart 5: Video Guide: How to Fix Bricked iPhone or iPad after iOS 10 UpdatePart 6: The Conclusion
You might be wondering how come your iPhone or iPad device got bricked during the iOS 10 update. There are two possible reasons why an iOS 10 update is causing this glitch to happen:
Citing this news article from The Guardian, Apple Inc. has been alerted about the brief issue on the iOS 10 software update that happened within an hour after the release last year, affecting a few users who got their hands first on the latest iOS version during that time. If you’ve obtained that iOS version, the best thing you should do is to get the latest update of iOS 10 – the version 10.3.1 as of this writing.
Getting the latest iOS 10 version gets itself a slew of new and exciting features to add or improve in your iOS device. However, not all devices from Apple Inc. are listed as compatible with this latest version. If you haven’t checked your phone’s compatibility to the iOS 10 version before doing the update, it could be one solid reason why your phone got bricked. To know which devices and models are compatible or not to the iOS 10 version, read through the items below (click a link for source):
Another reason why your iOS device got bricked during the iOS update is because you were trying to download and install the latest version via over-the-air (OTA) software update while connected to a very unstable Internet connection. Such connectivity issue can bring disruptions to the downloading and updating procedures being done during the upgrade, making your phone more prone to getting bricked.
Most people can immediately solve this problem by just getting their last backup of their reminders from iCloud. However, for people who haven’t performed any backup yet, retrieving back their lost reminders will not get solved right away...
--FoneDog - iOS Data Recovery
Fixing your bricked iPhone or iPad while getting the iOS 10 version is relatively easy, although it can still make you worry because getting your Apple device bricked means it’s considered to be totally unusable. But let’s get started – follow through the common solutions below and see if you can get your iPhone or iPad to work again.
To fix the iOS 10 bricked issue for iPhone or iPad, follow the steps below:
If updating your iPhone or iPad’s iOS to the latest version using OTA software update had previously given you a bricked device, your next best option to take is to perform the iOS update using iTunes. But before doing so, make sure to follow these tips first:
To start upgrading your device to iOS 10, follow the steps below (as prescribed by Apple Support):
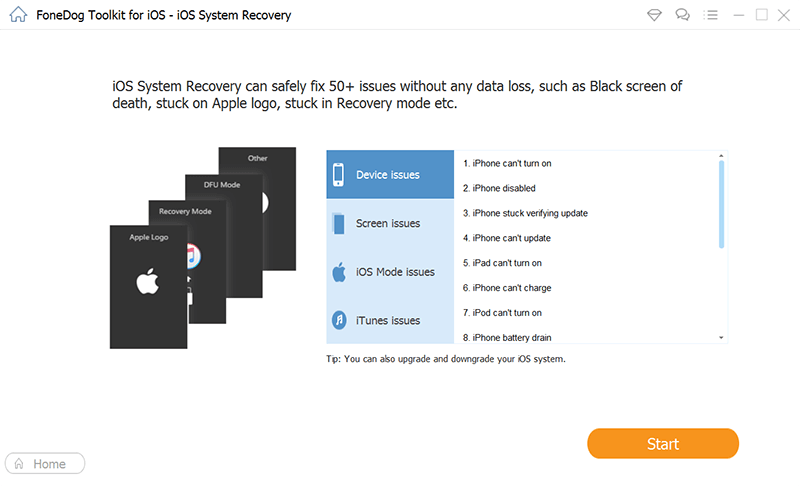
Aside from restoring your iPhone or iPad’s previous iOS version using iTunes, there’s also another effective way to do this – using our FoneDog toolkit. It’s a software packed with comprehensive instructions that deal with fixing many software and data issues for iOS and Android devices, through the modules it has which cater to such problems and needs. For the issue you have with your bricked iPhone or iPad, we’re going to use FoneDog toolkit’s iOS System Recovery module. To begin, follow the steps below:
Get your desktop computer or laptop ready and install our FoneDog toolkit. You can download the application here.
After installing FoneDog toolkit, connect your bricked iPhone or iPad to your computer. Verify that the program has detected your iOS device (this is an essential step towards the iOS system recovery procedures that our FoneDog toolkit will do later on).
Our FoneDog toolkit features several modules that help in fixing iOS and Android-related issues, as well as problems on mobile devices’ data, storage, usage and other concerns on mobile software. Since the goal is to fix your bricked iPhone or iPad and make it functional again, choose the System Recovery module. To locate this module, find the menu tile that represents a gear icon with a wrench inside of it. Click this menu to proceed to the next page.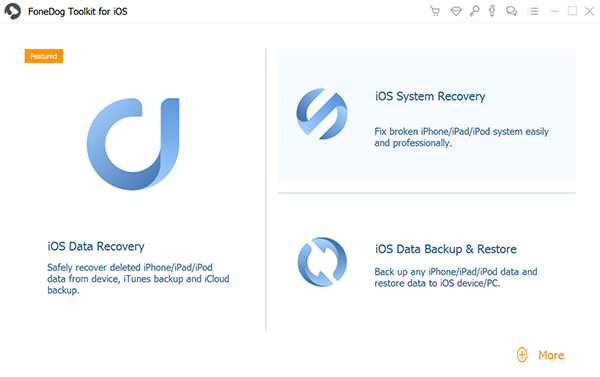
Before proceeding to the system recovery process using our FoneDog toolkit, please take note of the following reminders below:
The system recovery will not erase all files and data that your bricked iPhone or iPad has, but it’s best to perform a backup of your iOS device first before proceeding;
- If your bricked iOS device is currently unlocked, it be brought back to “locked” status after the system recovery process;
- Similar to the “locked” status, if your iPhone is currently jailbroken, it will be set back to “non-jailbroken” status after the iOS system repair.
Once you’ve noted these reminders, proceed to the next phase by clicking the “Start” button.
Our FoneDog toolkit’s System Recovery module helps in recovering the iOS software in your bricked iPhone or iPad by getting a new firmware to install to your device. For it to get that correct firmware, it will read your device’ current type, model, serial number and current iOS version, which will be automatically shown to you on the drop-down fields in the screen. This is the importance of having your bricked iPhone or iPad be detected by FoneDog toolkit during.If the preselected values are correct, proceed in getting the firmware by clicking the “Download” button.
Aside from this approach, you can also download the firmware on your own using the browser of your choice. Once you’ve downloaded the firmware for your problematic device, click the “Copy” button to get a copy of it. Afterward, click the “Select” button so our FoneDog toolkit will read and process the downloaded firmware package and begin the system recovery process.
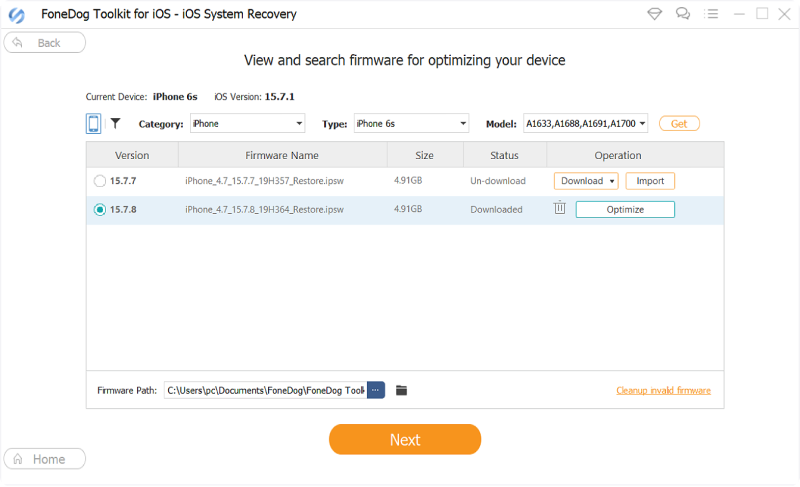
If you relied on FoneDog toolkit’s ability to get the correct firmware for your iOS device, the application will download the firmware package. This will give you a few minutes of waiting time until FoneDog toolkit has completely downloaded the firmware package. However, if you’ve personally downloaded the firmware package for your iPhone or iPad, hitting the “Select” button will skip this downloading step and will immediately proceed to the system repair process.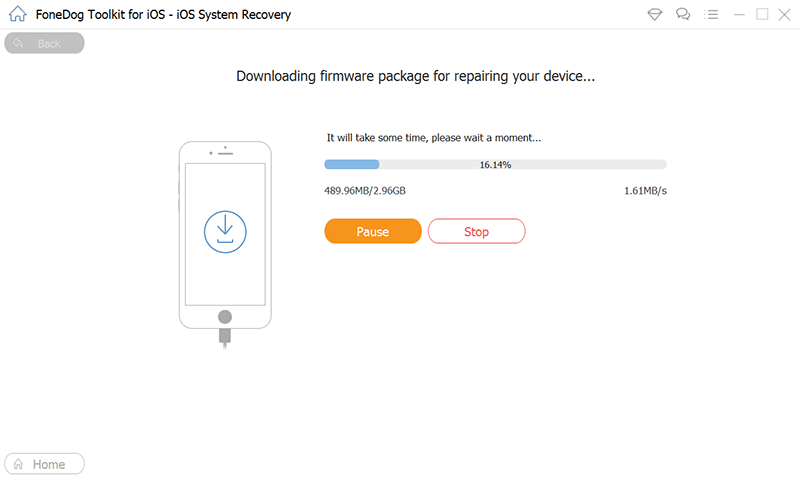
After getting the right firmware package for your bricked iPhone or iPad (through downloading it via FoneDog toolkit or getting a copy of it on your computer), the system recovery process will immediately commence. You’ll also need to wait for a few minutes until this procedure gets done. Once finished, your iPhone or iPad will automatically restart, showing to you the Apple logo until your device is fully powered on.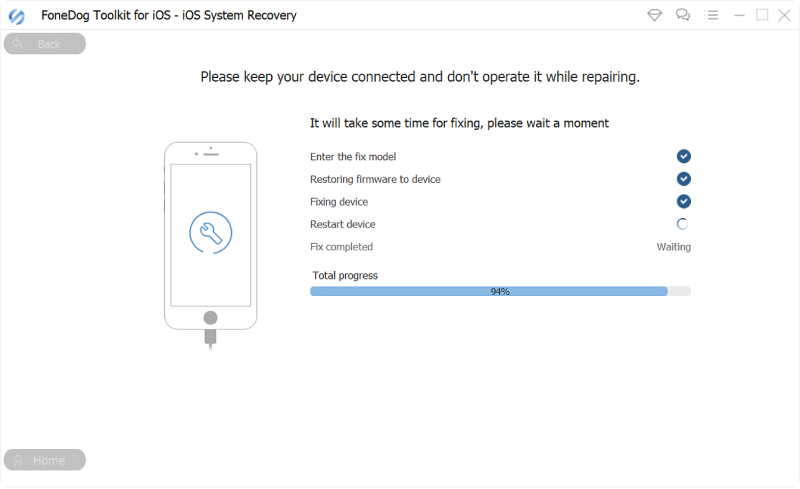
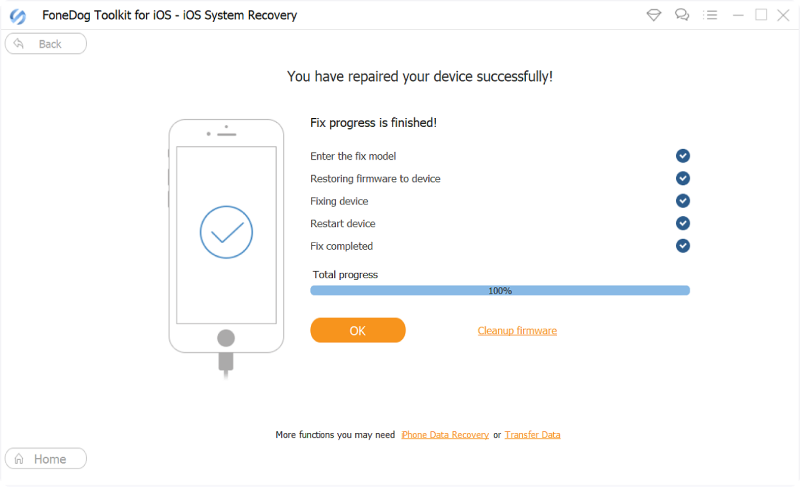
You can now check your iPhone or iPad if it’s working perfectly fine. It’s also worth verifying to check the current iOS version it has by going to Settings > General > About.
Getting your iPhone or iPad to be bricked after trying to upgrade to iOS 10 is a very worrisome issue, as this one means that your phone has just become fully unusable. But after using FoneDog toolkit to fix the problem, we hope that your iPhone or iPad is now working fully functional. If you’ll attempt to upgrade to the latest iOS 10 version again, download it and upgrade your device using iTunes this time around.
Also, make sure that you have a strong Internet connection, so chances of getting the download and upgrade be disrupted will be put at the minimum. And the most important rule – perform a backup of your iPhone or iPad first before doing another iOS upgrade.
Leave a Comment
Comment

Javier2019-06-06 22:35:04
Tras leer que recuperaría el teléfono con esta aplicación decidí comprarla. Pero no ha servido de nada, ha dado error al recuperar IOS.

Technical Expertise for PC/Website Optimization
One of my passion is to develop software of my own
I write articles to share knowledge about IT technology and some experience in developing my own software, and developing my own software is one of my passions for work.
iOS System Recovery
Repair various iOS system errors back to normal status.
Free Download Free DownloadHot Articles
 /
/
INTERESTINGDULL
/
SIMPLEDIFFICULT
Thank you! Here' re your choices:
Excellent
Rating: 4.7 / 5 (based on 93 ratings)
