FoneDog Screen Recorder
FoneDog Screen Recorder
Special Offer
Special Offer


By Nathan E. Malpass, Last updated: December 6, 2017
Users often ask us "How to fix iTunes Error 3194". It’s annoying to encounter Error 3194 in iTunes. But why do your iPhone encounter this situation? We will next explain the reasons for this situation and how to fix the iTunes Error 3194 problem on the iPhone.
Part 1. What is iTunes Error 3194?Part 2. The Easiest and Most Efficient Way to Fix iTunes Error 3194Video Guide: How to Fix iTunes Error 3194 on Your iPhonePart 3. Fix iPhone Error 3194 directly in iTunesPart 4. Conclusion and Recommendations
The iTunes Error 3194 (iPhone Error 3194) you are experiencing is basically the lack of communication between the program (iTunes) and Apple’s update servers. Your iOS device’s firmware is being checked by Apple to see if it is ‘signed’ or ‘unsigned’. If the firmware is not approved or ‘signed’, then you will run into this issue.
What Causes the Error to Emerge?
The usual cause for Error 3194 is when you have either been using an expired firmware through downgrading or have jailbroken your iOS device which modifies the host file, specifically the server IP address in charge of updates.
Apple is, for the most part, not interested in dealing with their products being jailbroken so they usually don’t provide complete solutions for that specific case. However, here at FoneDog we understand that this community is huge, and if you want to go ‘clean’ - we have those solutions ready.
Now let’s go into the ways on how we can vanquish this error 3194.
This is where FoneDog - iOS System Recovery becomes a total no-brainer to use. Here are the steps for removing iTunes(iPhone) Error 3194 from your iOS device forever:
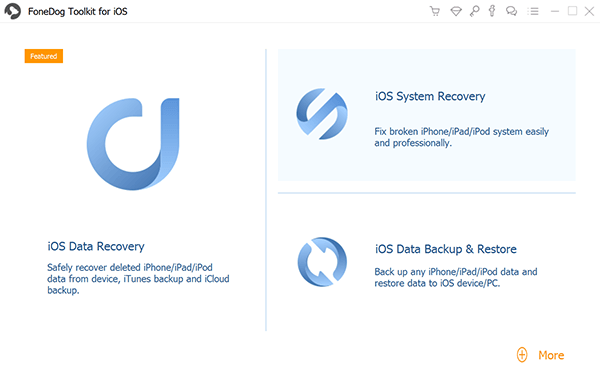
Step 1: Download, install and launch FoneDog toolkit. Once you have launched the program, verify that our easy-to-use interface is visible on your screen. In the main menu, click on ‘iOS System Recovery’. You will now notice several other options such as ‘iOS Data Backup & Restore’, “iOS Data Recovery” and the like. These are for anything else you need repairs for.
Step 2: Lug in your iOS device to the computer via USB cable. Confirm that FoneDog toolkit was able to detect your device. Click Start.
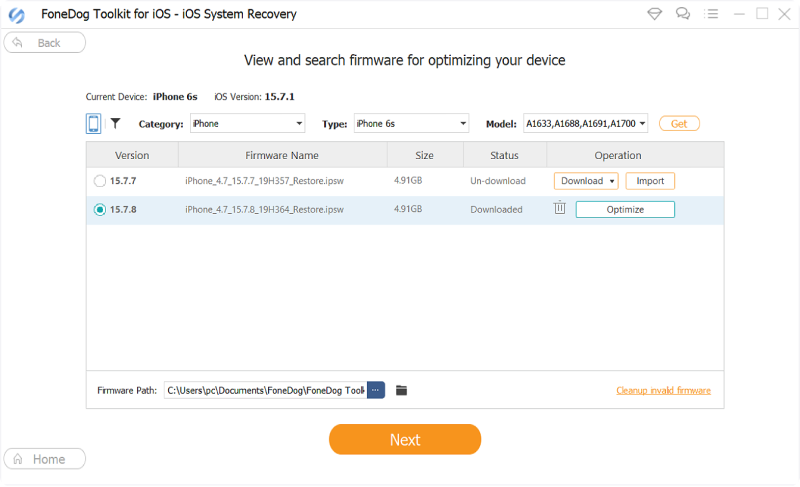
Step 3: Your iOS device will once again be automatically detected. Its firmware can be updated by clicking on ‘Repair’.
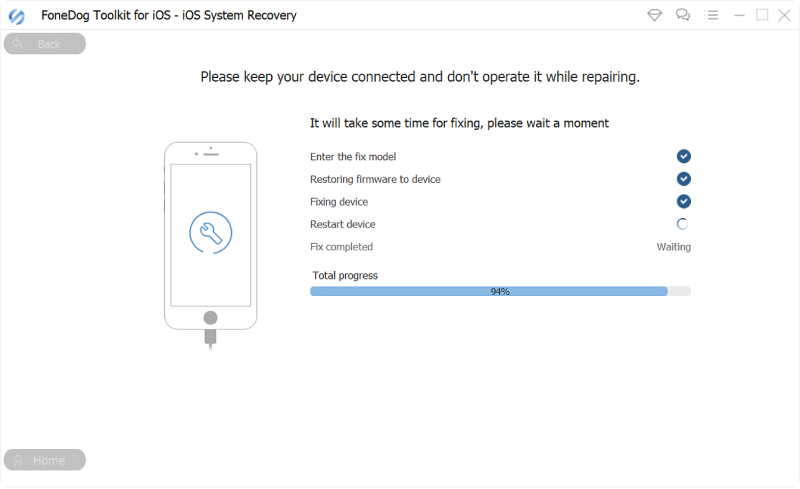
Step 4: Recovery will begin immediately. As you may have noticed, all errors (iTunes Error 3194) are gone as it undergoes restoration!
Step 5: Wait for the Process Completed.
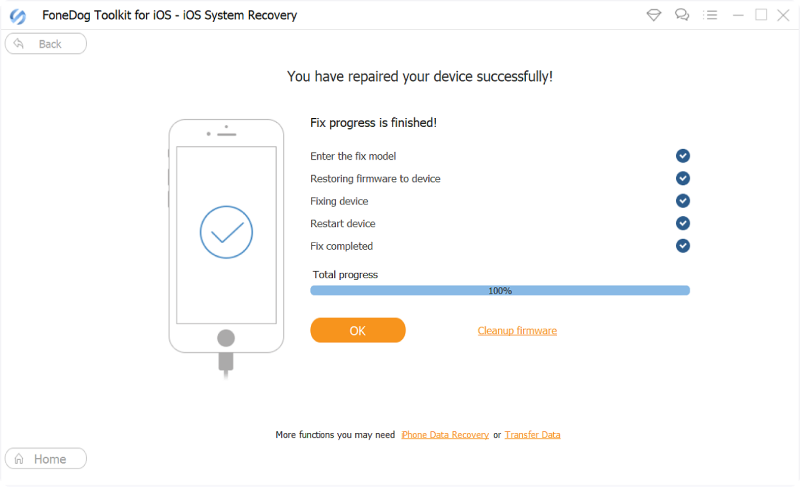
As you can see, with FoneDog all the work is done for you. You would not need to go through the long processes anymore.
It does everything from a complete system recovery to getting your precious data back to fixing those annoying restarts. All you need is a computer or a laptop. We also made it easier than previous versions to get everything done faster!
Keep in mind that you never again would have to bring your iOS device to a repair shop where your data may potentially be at risk from prying eyes as well as having to pay huge fees. Your data is only accessible by you and you alone - as it should be. You are welcome!
Click on the download and try it out to fix iTunes Error 3194!
Have a look at the methods provided here. Remember, if one does not work then try the next one to fix iTunes Error 3194! Anyone of these is guaranteed fixes so we recommend that you don’t give up until you have tried everything!
This method is something you may have already tried but if not then give it a go. Simply uninstall iTunes, look for the latest update of it online to download and install, then ensure that you are connected.While this method is a no-brainer, it is sometimes overlooked, so we are placing it here just in case.If this did not work, be prepared for a rather long but thorough one.
This method requires us to access the host file and get into DFU Mode. To be frank, it requires a bit of technical work and a bit of timing. If this method already sounds too daunting of a task, you can skip it as we have more in store. If you are willing to undergo this method, here are the preparations needed and steps.
Preparation
1. Make sure that you have successfully backed up all your data. Doing this via iCloud would be optimal.
2. It is a good practice to charge your iOS device to at least more than 50% battery life.
3. This ensures that the process won’t be interrupted - important if your area suffers from power outages. During these times a laptop may be needed as a desktop will completely be unusable.
4. Know what all the buttons do - Home Button, Power Button (a.k.a Sleep & Wake Button). For an iPhone 7 or 7 Plus, the Home Button is no longer relevant. In this case, the Volume Down button is used in its stead.
5. Have your iOS device compatible USB cable ready.
6. Count your seconds properly or use a timer. This is very important.
Precautions
1. Completing recovery with the DFU Mode results in loss of data, it is therefore imperative to have your data backed up so it can be easily retrieved later.
2. Make sure no damages to any components are reported, especially with water - this may abruptly cause ‘premature completions’ or none at all. Please note that while the iPhone 7 and 7 Plus are waterproof, any open cracks will still allow water to do damage.
With everything set, let us begin.
Step 1. Have iTunes open and ready on the side or minimized. We will now need to access the host file.
1. Launch ‘Applications’ and click on the ‘Utilities’ folder.
2. Open ‘Terminal’
3. Type the command: sudo nano /private/etc/hosts
*Note that there is a space between nano and the ‘/’.
4. If prompted to input your password, use your Mac password and press the ‘Return’ key.
5. You will now see a text file with a bunch of hashtags and addresses.
1. Go to ‘Run’. The easiest way is to press the Windows Key + R.
2. Type in: C:\Windows\System32\drivers\etc\hosts
Your computer may ask you on how you would like to open the file, find and select ‘Notepad’.
3. You should now get a list with hashtags and addresses.
Step 2. Now that you have accessed the host file for either Mac or Windows, copy and paste exactly “74.208.105.171 gs.apple.com” without the quotations into the last bottom row. Save and keep the host file open after you have finished.
Step 3. Connect your iOS device to your computer via USB cable.
Step 4. Enter DFU Mode. Here are the specific steps depending on your iOS device.
1. Shut off your iOS device. (Hold the Power Button until a red slider appears then slide to the right) (This can also be done by holding both the Power Button and Home Button until it turns off).
2. Hold down the Power Button for 3 seconds.
3. CRUCIAL STEP: While still holding down the Power Button, press and hold the Home Button.
4. Hold both buttons for exactly 10 seconds and release ONLY the Power Button.
5. Keep holding on to the Home Button for 5 seconds.
6. Once you noticed your screen is staying black without seeing the Apple logo, you have successfully entered DFU Mode.
1. Turn off your iPhone 7 or 7 Plus (Hold the Power Button until a red slider appears then slide to the right).
2. Press and hold the Power Button for 3 seconds (It is on the right side of this model).
3. Press and hold the Volume Down button (found on the left side of the device) simultaneously with the Power Button.
4. CRUCIAL STEP: Proceed to hold both buttons for exactly 10 seconds.
5. Release the Power button but continue to hold down the Volume Down button for 5 seconds.
6. Once you have noticed the screen stays completely black, you have entered DFU Mode.
1. Connect your iPhone X or iPhone 8 to your Mac or PC. Run the iTunes.
2. Turn Off iPhone X or iPhone 8/8 Plus.
3. Press and hold down the On/Off button on the right side of your iPhone for 3 seconds.
4. Still holding download the On/Off button, Press and hold down the volume down button on the left side of your iPhone.
5. Keep holding both buttons down for 10 seconds. (If you see the Apple logo, you've held them too long and will need to start again.)
6. Let go of the On/Off Button but keep holding the volume down button for about 5 seconds. (If you see the "Plug into iTunes" screen, then you've held it too long and will need to start again.)
7. If the screen stays black, that's it! Your iPhone 7should now be in DFU mode.
People Also ReadHow to Put Your iPhone into DFU ModeDFU Mode: The Basics and its Functions
*On your Mac or Windows computer, a screen should pop up indicating that it has detected a device in DFU Mode. (It may say “recovery mode” - but as long as the screen is black you are officially in DFU Mode).
*This process may take a few tries to succeed. Timing is important so proper counting or a timer is recommended.
Step 5. Next, we need to update and restore the iOS device. Do this by opening your iTunes again and clicking on ‘Update’ and ‘Restore’ respectively one after the other.
Step 6. Now that it has been updated and restored, go back to the host file and delete the line you inserted in Step 2 and save.
Step 7. We now advise you to update your iOS device once more to get the newest firmware available.
You made it! By now the error should be gone, but on the off-chance that it is still there to try the next method.
To do this method, follow Method 2 so you can access your host file once more. Once in, add these lines:
74.208.10.249
127.0.0.1
74.208.105.171
Save and try to update and restore on iTunes.
If this method worked, go back to the host file and DELETE them so that iTunes turns back to its normal state.
If you are still running into the annoying Error 3194, then a different approach such as this is perhaps needed. This method is basically using iCloud to delete the firmware and overall data found in your iOS device to refresh it.
Warning: If this method sounds risky in terms of you losing all your data, then we suggest that you do not try it. You CAN backup your device via iCloud or iTunes to get everything back, but you must remember to do so!
1. Go to the iCloud website and log in.
2. Click on the ‘Find my iPhone’ service. A map will open and present all of your registered iOS devices.
3. Go to ‘All Devices’ and find the iOS device you want to restore.
4. Select ‘Erase’ to start the process. Once it is finished, your iOS device will restore back to factory settings.
5. Now you are able to retrieve your backup once everything is done. You may also have your iOS device completely out-of-the-box - if that is your intention.
Hopefully, this method has done its job. Getting all the way this far should have produced results. However, if the error 3194 still shows up and you are looking for something easy, quick and want to avoid all the steps, you can use FoneDog Toolkit - iOS System Recovery.
After using FoneDog - iOS System Recovery your iOS device is ready to go but it does not just end there. If you have forgotten to back up your data, worry not because of the FoneDog - iOS Data Recovery has you covered. As easy as all of our software, it is always good to have a one-stop program that does everything efficiently. In addition, you may have noticed the several different repairs available - yes we are that thorough in making sure you have everything you need.
So give our products as shot with a free trial to start off. With our user-friendly interface, immediately you will see what it is capable of and why it is well loved and received amongst our satisfied customers. We stand proudly by our product and so will you. Go on and give it a try. It is as easy as 1, 2, 3!
Leave a Comment
Comment

iPhone/Android Devices’ Maintenance Expert
Staying home, listening to music, writing tech articles
Many people asked me to repair their mobile phones so I have a lot of experience in mobile phone repair, and I know a lot about Android or Apple phones.
iOS System Recovery
Repair various iOS system errors back to normal status.
Free Download Free DownloadHot Articles
 /
/
INTERESTINGDULL
/
SIMPLEDIFFICULT
Thank you! Here' re your choices:
Excellent
Rating: 4.5 / 5 (based on 92 ratings)
