FoneDog Screen Recorder
FoneDog Screen Recorder
Special Offer
Special Offer


By Vernon Roderick, Last updated: September 24, 2019
iPhone devices have a large user base. There are tons of people who are looking forward to new releases. This is perhaps due to its countless features, but others only care about the branding.
Regardless, now that the new iPhone 11 is available, you have planned on purchasing one. Now, you got one successfully. At the moment, you probably have plans to transfer data from iPhone X to iPhone 11. Fortunately, there are many ways for you to do this.
On the other hand, those ways to transfer data between iPhones isn’t easy to execute. So it might not go exactly the way you planned. For one, you’ll have to be proficient of file transferring, let alone in doing the preparations for the file transfer.
So to compensate for this proficiency, we’ll guide you personally to the different methods of how to transfer data from iPhone X to iPhone 11.
Things to Do Before You Transfer Data between iPhonesA: Recommended Way to Transfer Data from iPhone X to iPhone 11B: Transfer Data between iPhones Using Backup & SyncC: How to Transfer Data from iPhone X from DropboxD: Transfer Data from iPhone X to iPhone 11 via OTG and USB CableE: How to Transfer Data from iPhone Devices Using Quick StartConclusion
As previously said, file transfer is not only composed of the process itself. There is also the preparation part where you need to set things up before you get started.
So before anything else, there are some things you need to take note of:
Most iPhone users, regardless of the model, use their device to pair with their Apple Watch. An Apple Watch would, of course, contain information from your iPhone X.
So as to avoid having an Apple Watch with needless information, you’ll need to reset it so that it can be paired with your iPhone 11 easily.
Of course, this won’t be applicable if you don’t have an Apple Watch in the first place. Regardless, here’s how you do this.
This will reset your Apple Watch to its factory settings, so you can pair your iPhone 11 and start creating the information you’ll need in your new phone.
Having an outdated operating system will only be detrimental in your objective to transfer data from iPhone X to iPhone 11. Thus, you’ll have to make sure your iPhone is updated.
This would also help you pair your Apple Watch to your new iPhone 11. After all, if the OS of your Apple Watch and your iPhone isn’t compatible, transferring data would be troublesome.
If, however, there’s no update available, it’s either your iPhone can’t handle the update or it is updated. The former should always be the case since both iPhone X and iPhone 11 can cater to the latest OS version.
On your way to transfer data from iPhone X to iPhone 11, it’s inevitable to lose some files unintentionally. That’s why you’ll have to make sure you create a backup first before you do the file transfer.
Creating a backup is simple and you have a lot of options.
You can opt for cloud services such as Google Drive or Dropbox. You may also choose your iPhone’s built-in cloud services such as iTunes and iCloud.
Of course, this again would require you to have an updated OS on your iPhone. This just proves just how important updating your phone is.
Now that you know how to set up your iPhone before you transfer data from iPhone X to iPhone 11, let’s talk about the actual file transfer process.
File transfer isn’t as simple as you think. It might seem to be simply transferring files, but there are actually requirements for it to work. Failing to fulfill such requirements will lead to errors and in the worst-case scenario, data loss.
That’s why you shouldn’t just use any method to transfer data. You need to have a guarantee that it’ll work. Thus, we introduce to you FoneDog Phone Transfer.
FoneDog Phone Transfer, as the name suggests, is a software that allows for its user to transfer data from one phone to another.
To transfer data from iPhone using FoneDog Phone Transfer, you’ll have to make use of basic electronic equipment including:
You may be wondering why FoneDog Phone Transfer is superior to other methods, it’s simply because there are many benefits it offers.
For one, it allows the transfer of most file types, including videos, photos, documents, contacts, and more. It also supports most formats for pictures, videos, and text files.
Additionally, whatever brand your mobile device is, be it Samsung, Apple, Google, Huawei, etc., you’ll be able to use FoneDog Phone Transfer to transfer data from iPhone X to iPhone 11.
Lastly, there are useful features that you can use besides the file transferring tool itself.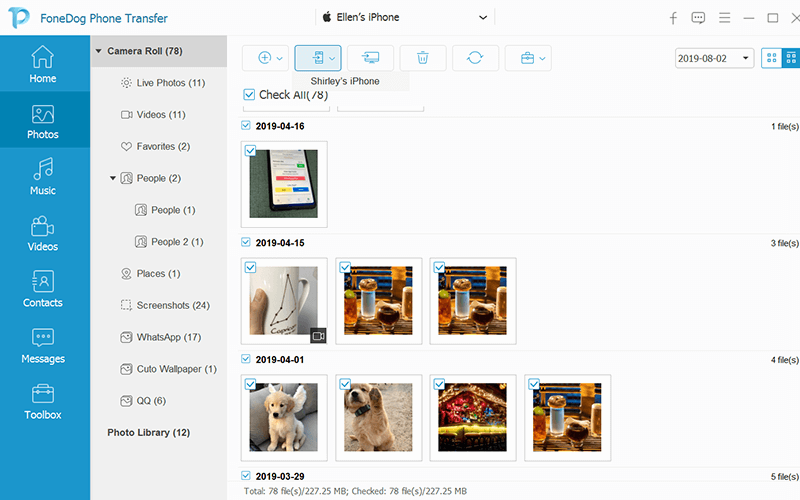
What makes FoneDog Phone Transfer superior to other software is that it offers other features. These features include:
Gaining access to the benefits that FoneDog Phone Transfer offers is easy. Simply go to this link: https://www.fonedog.com/phone-transfer/. Then, download the software. With that, you’ll be able to do what you want easily.
However, you might want to increase the options at your disposal, so we’ll be continuing discussing methods to transfer data from iPhone X to iPhone 11.
Backup & sync is a feature in Google that allows users to make sure Google storage is connected. This allows them to transfer files without actually doing it themselves.
By now, you should already know what the “backup” part of this feature means. As for “sync”, it is the service that we’ll be taking advantage of to transfer data on iPhone devices.
By definition, syncing means connecting two devices so that the changes done in one device is mirrored by another. For example, if you added a file on your iPhone X, then your iPhone 11 would change itself by adding that same file.
However, there are prerequisites to this such as (1) you must have an internet connection on both devices every time you change the files in your Google storage in any way, and (2) you must enable backup and sync.
Obviously, you must already know how to connect to an internet connection. Now all you have to do is to transfer data from iPhone x to iPhone 11 is to learn how to enable the feature:
With this, you’re already setup to transfer data between iPhones. However, there are still things to take note of.
Firstly, remember that even if it’s only activated through Google Photos, it would also affect other Google apps such as Drive, Calendars, Contacts, Docs, and more. Secondly, if you want to turn off the feature, you can do it easily by following the steps above.
Lastly, you can check out if you really enabled backup & sync by checking if your iPhone 11 now have the same pictures as there is on your iPhone X. Now to start the file transfer:
At this point, you have an efficient way to transfer data from iPhone x to iPhone 11. Now we go to another one which you might find very similar to Google Drive.
Dropbox is a cloud storage and management service, provider. It has its own website for PC users, but it also has its own app for you to use on your iPhones.
It is similar to the first option in the way that you’d have to install the app before you can use it. Plus, Dropbox is available to both iPhone and Android users for free so you’re able to use it anytime.
Without making this any longer, here’s how you can use Dropbox to transfer data from iPhone x to iPhone 11:
This might take some time depending on how many files you want to transfer. Regardless, with that, you should already have a Dropbox storage full of files.
Note: Dropbox can only store 2GB worth of files, although you can increase that by paying for an upgraded plan.
Now we proceed to the next set of steps:
With this, you’ll be able to transfer data easily. Also, we suggest deleting the files on your Dropbox that you’ve already transferred so you won’t consume the 2GB instantly.
Although that’s a very efficient solution, the fact that it requires you to have a stable internet connection is inconvenient.
The same goes for Backup & Sync. That’s why our next method won’t depend on such a factor.
While you may think that using a USB cable to connect to a computer has the potential to corrupt your phone, that won’t be the case with this method.
That might be true if you’re trying to transfer data using a USB cable only, but we’ll also be using an OTG cable. This means there won’t be a need to connect your iPhone to a computer.
This is what we call a direct file transfer.
This is not only safer with using only a USB cable, but it also makes the process faster since you will only be doing this once, from iPhone X to iPhone 11, instead of iPhone X to the computer and from computer to iPhone 11.
Note that you will need (1) a USB cable and (2) an OTG cable. With this two equipment in your hand, you can do it without any problems by following these steps:
You can also do this the other way around.
Regardless, you are now free to transfer data from iPhone x to iPhone 11.
With that, you’ll be able to transfer data from iPhone x to iPhone 11 without any detail and without relying on fast internet.
Now, as the last method of this article, we’ll be talking about an exclusive and a rather new feature for iPhones made for file transfer.
For iPhones running on iOS 11 or later, the QuickStart feature is available. With that said, since iPhone X is running on iOS 11.0.1, it would be possible to use such feature.
The process is a bit straightforward. The only thing you will need to do before doing this method is to make sure that both have iOS versions 11 or later, which is already a given.
Once you’re ready to go, follow these steps to transfer data from iPhone x to iPhone 11 using Quick Start:
You will be automatically shown the camera app after tapping Continue. We will head back to this later on.
At this point, you no longer have to do anything other than to wait until the process is finished. With that, you’ve already done your objective to transfer data from iPhone x to iPhone 11.
You may have no idea what to do to transfer data from iPhone x to iPhone 11 before you stumbled upon this article, but now you do. In fact, you’ve got hold of five methods to transfer files. On top of that, you also learned what to do to set up your iPhone X and iPhone 11 for file transfer.
Now, you should be able to transfer all sorts of files as long as you want. However, remember that you should still be cautious when doing so, otherwise you’ll lose files.
If that happens, not only will you have to learn how to recover those files, you’ll also find no use to what you’ve learned today.
Leave a Comment
Comment

Technical Expertise for PC/Website Optimization
One of my passion is to develop software of my own
I write articles to share knowledge about IT technology and some experience in developing my own software, and developing my own software is one of my passions for work.
Phone Transfer
Transfer data from iPhone, Android, iOS, and Computer to Anywhere without any loss with FoneDog Phone Transfer. Such as photo, messages, contacts, music, etc.
Free DownloadHot Articles
 /
/
INTERESTINGDULL
/
SIMPLEDIFFICULT
Thank you! Here' re your choices:
Excellent
Rating: 4.6 / 5 (based on 87 ratings)
