FoneDog Screen Recorder
FoneDog Screen Recorder
Special Offer
Special Offer


By Nathan E. Malpass, Last updated: June 30, 2025
In an era of streaming services and cloud storage, it's easy to forget the simple joy of curating your music library on your iPod. Whether you're a long-time iPod user or dusting off your old device, the need to implement the process to transferring music from iPod to computer free can arise for various reasons. Perhaps you want to back up your cherished music collection, or maybe you're switching to a new computer and wish to keep your tunes intact. Whatever your motivation, the good news is that you can accomplish this task without opening your wallet.
In this article, we will walk you through the process of transferring music from your iPod to your computer for free. We'll explore some tried-and-true methods and user-friendly software solutions that will help you preserve your music collection without any hassle. Say goodbye to expensive third-party tools and embrace the simplicity of transferring your music with ease. Let's dive into the world of free iPod-to-computer music transfers and unlock the potential of your music library once again.
Part 1. Basic Methods to Transfer Music from iPod to Computer FreePart 2. Best Tool for Transfer Music from iPod to Computer FreePart 3. Conclusion
If you're a Windows PC user and you've been wondering how to transfer your music from your iPod to your computer without spending a dime, you're in the right place. iTunes, Apple's media player and device management software, offers a straightforward way to achieve this task. Here's a step-by-step guide of transferring music from iPod to computer free:
Step 1: Install iTunes on Your PC (If Not Already Installed)
If you don't have iTunes on your Windows PC, you can download it for free from the Apple website. Make sure you have the latest version to ensure compatibility.
Step 2: Connect Your iPod to Your Computer
Use a USB cable to connect your iPod to your Windows PC. Once connected, open iTunes. You should see your iPod's icon in the upper-left corner of the iTunes window.
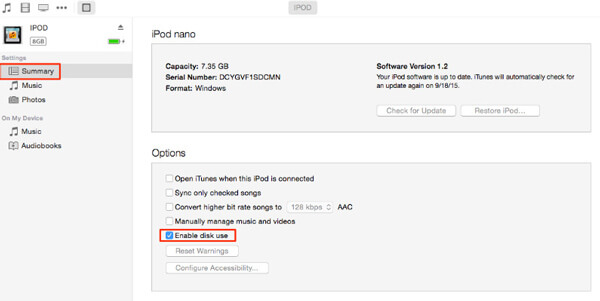
Step 3: Enable Disk Mode on Your iPod
To transfer music, you'll need to enable disk mode on your iPod. Go to the iTunes menu, click on "View," and select "Show Sidebar." In the sidebar, you'll see your iPod listed under "Devices." Click on it to access its settings.
Step 4: Configure iPod Settings
In your iPod's settings, check the box that says "Enable disk use." This will allow your iPod to function as an external storage device.
Step 5: Copy Music to Your Computer
Open "My Computer" (or "This PC" on newer Windows versions) and locate your iPod. It should appear as a removable disk. Open it, and you'll find a folder named "iPod_Control." Inside this folder, you'll see another folder called "Music." This is where your music is stored. Simply copy the music files from the "Music" folder on your iPod and paste them onto your computer's hard drive. You can choose a specific folder on your computer to save the music.
Step 6: Add Music to iTunes Library
Now that you've transferred the music files from your iPod to your computer, open iTunes. Go to "File" > "Add Folder to Library" and select the folder where you saved the music files. iTunes will import the music into your library.
Congratulations! You've successfully transferred your music from your iPod to your Windows PC using iTunes, and it didn't cost you a cent. This method allows you to back up your music collection or transfer it to a new computer easily. You can also transfer your iTunes Library to your new Mac in this way.
If you're a Mac user and you want to get a way of transferring music from iPod to computer free, iCloud can be a handy tool. iCloud allows you to sync your music seamlessly between your Apple devices. Here's how to do it:
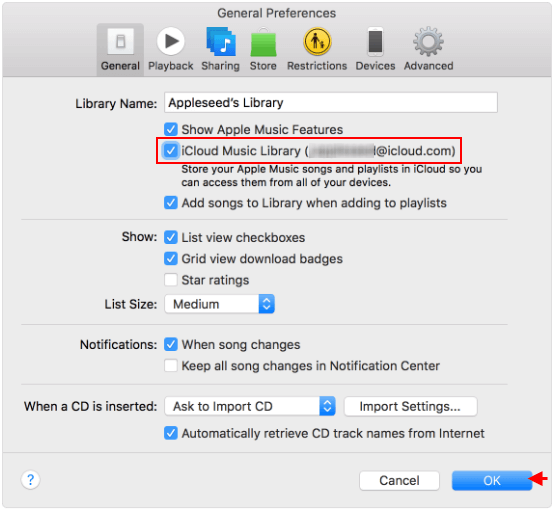
Step 1: Ensure iCloud Music Library is Enabled
Before you begin, ensure that iCloud Music Library is enabled on both your iPod and your Mac. To check this:
Step 2: Connect Your iPod to Wi-Fi
Make sure your iPod is connected to a Wi-Fi network. This is essential for syncing your music with iCloud.
Step 3: Sync Your Music
Your iPod will automatically sync your music with iCloud when it's connected to Wi-Fi and charging. If you want to initiate a manual sync, follow these steps:
Step 4: Access Your Music on Your Mac
Once the sync is complete, you can access your music on your Mac. Open the Music app, and you should find all your iPod music in your library. You can now play and manage your music on your Mac.
Keep in mind that this method works if you have an active iCloud account and enough storage space to accommodate your music library. It's a convenient way to transfer your music between your Apple devices without any additional costs.
With these steps, you've successfully transferred your music from your iPod to your Mac using iCloud sync, all without spending a dime. Enjoy your music library on your Mac hassle-free!
Any other method of transferring music from iPod to computer free? Another solution is by using the Finder application. This method allows you to manually copy music files from your iPod to your Mac. Here's how to do it:
Step 1: Connect Your iPod to Your Mac
Use a USB cable to connect your iPod to your Mac computer. Make sure your Mac recognizes the iPod.
Step 2: Open Finder
Open a Finder window on your Mac. You can do this by clicking the Finder icon in the Dock or using the keyboard shortcut Command (⌘) + N.
Step 3: Locate Your iPod in Finder
In the Finder window, you should see your iPod listed under "Locations" in the left sidebar. Click on your iPod's name to access its contents.
Step 4: Enable Hidden Files
To access your iPod's music files, you'll need to reveal hidden files and folders. Click on the "View" menu in the Finder menu bar and select "Show Hidden Files." This will display hidden folders, including the one containing your music.
Step 5: Access the Music Folder on Your iPod
Now that hidden files are visible, you'll see a folder named "iPod_Control" or "iTunes_Control" on your iPod. Open this folder.
Step 6: Copy Music Files to Your Mac
Within the "iPod_Control" or "iTunes_Control" folder, you'll find a folder named "Music" or "iTunes." This is where your music is stored. Select the music files or folders you want to transfer and drag them to a location on your Mac, such as your desktop or a specific folder.
Step 7: Wait for the Transfer to Complete
The transfer process may take some time, depending on the size of your music collection. Once it's done, you'll have a copy of your iPod's music on your Mac.
Step 8: Import Music to Your Mac's Music Library
If you want to add this music to your Mac's Music app, open the Music app and go to "File" > "Import" and select the folder where you copied the music files. iTunes will import the music into your library.
That's it! You've successfully transferred music from your iPod to your Mac using Finder, and you can now enjoy your music collection on your Mac without any additional cost. This method gives you more control over the transfer process and doesn't rely on iCloud synchronization.
What is the best method of transferring music from iPod to computer free? Are you looking for a user-friendly and efficient way? FoneDog Phone Transfer is a versatile software solution that makes this process a breeze. In this section, we'll provide an overview of FoneDog Phone Transfer, highlight its key features, and outline the steps to transfer music from your iPod to your computer using this tool.
FoneDog Phone Transfer is a trusted iPhone 15 supported data transfer and management tool designed to facilitate the seamless transfer of music, photos, videos, and more between iOS devices (including iPods) and computers. It offers a hassle-free and free-of-charge way to move your cherished music collection from your iPod to your computer, whether you're using a Windows PC or a Mac.
Phone Transfer
Transfer files among iOS, Android and Windows PC.
Transfer and backup text messages, contacts, photos, video, music on computer easily.
Fully compatible with the latest iOS and Android.
Free Download

Here are steps on transferring music from iPod to computer free with this best file-transferring tool:
Step 1: Download and Install FoneDog Phone Transfer
Download and install FoneDog Phone Transfer on your computer. It's available for both Windows and Mac platforms.
Step 2: Launch the Program
Launch the FoneDog Phone Transfer software on your computer.
Step 3: Connect Your iPod
Connect your iPod to your computer using a USB cable. Ensure that your iPod is detected and recognized by the software.
Step 4: Select Music to Transfer
In the FoneDog Phone Transfer interface, select the "Music" category from the list of data types you can transfer.
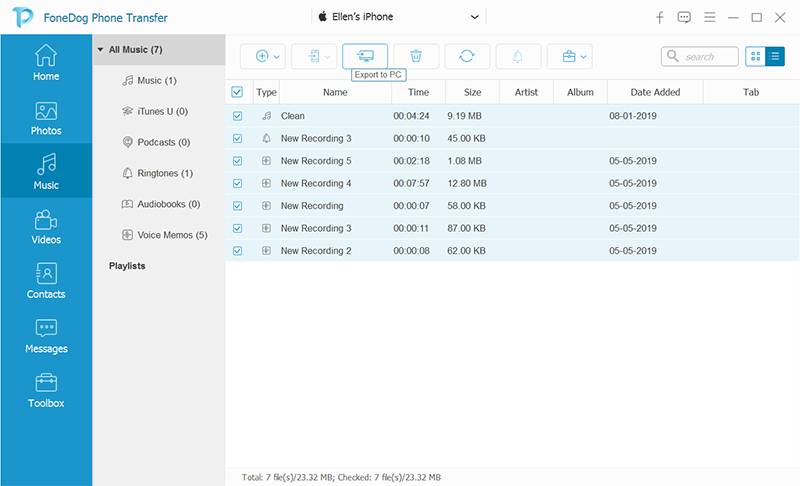
Step 5: Start the Transfer
Click the "Start Transfer" button to begin the music transfer process. FoneDog Phone Transfer will start copying your music from your iPod to your computer.
Step 6: Complete the Transfer
Once the transfer is complete, you will receive a notification. You can now access your transferred music on your computer.
FoneDog Phone Transfer simplifies the task of transferring music from your iPod to your computer and provides a reliable, free-of-charge solution. Whether you're migrating your music library or creating a backup, this software ensures that your music is safe and sound on your computer, ready for your enjoyment.
FoneDog Phone Transfer is a powerful yet user-friendly tool that offers a seamless method for transferring music from your iPod to your computer for free. With its impressive features and straightforward process, it's a go-to solution for iPod users seeking an efficient and reliable data transfer solution.
In this comprehensive guide, we've explored various methods of transferring music from iPod to computer free. Whether you're a Windows PC user, a Mac enthusiast, or seeking a versatile tool, there's a method for everyone.
From using iTunes to iCloud synchronization, and even utilizing the FoneDog Phone Transfer software, you have options that cater to different preferences and scenarios. These methods allow you to preserve your music library, create backups, or simply enjoy your favorite tunes on your computer.
No matter which method you choose, the ability to transfer music from your iPod to your computer free of charge empowers you to maintain control over your music collection. You can explore new playlists, create backups for peace of mind, or seamlessly integrate your music with your computer's library.
Remember that the choice of method ultimately depends on your specific needs and preferences. Whether you opt for the simplicity of iCloud sync, the manual control of Finder on Mac, or the versatile FoneDog Phone Transfer, the goal remains the same – to enjoy your music on your computer hassle-free and without spending a dime.
So, go ahead and choose the method that suits you best, and start enjoying your iPod music on your computer today. Transferring music from your iPod to your computer is easier than ever, ensuring that your music remains an integral part of your digital life.
Phone Transfer
Transfer files among iOS, Android and Windows PC.
Transfer and backup text messages, contacts, photos, video, music on computer easily.
Fully compatible with the latest iOS and Android.
Free Download
Leave a Comment
Comment

iPhone/Android Devices’ Maintenance Expert
Staying home, listening to music, writing tech articles
Many people asked me to repair their mobile phones so I have a lot of experience in mobile phone repair, and I know a lot about Android or Apple phones.
Phone Transfer
Transfer data from iPhone, Android, iOS, and Computer to Anywhere without any loss with FoneDog Phone Transfer. Such as photo, messages, contacts, music, etc.
Free DownloadHot Articles
 /
/
INTERESTINGDULL
/
SIMPLEDIFFICULT
Thank you! Here' re your choices:
Excellent
Rating: 4.8 / 5 (based on 108 ratings)
