FoneDog Screen Recorder
FoneDog Screen Recorder
Special Offer
Special Offer


By Adela D. Louie, Last updated: March 17, 2021
Do you have tons of data stored on your iTunes? Planning to get a new Mac but wondering if how you can transfer iTunes library to new mac from the old Mac? If so, then this post is for you. We are going to show you here how to transfer iTunes Library to New Mac in easy ways so keep on reading this post until the end.
If you have a large file saved on your iTunes library on your old Mac and you wanted to have them transferred over to the new Mac that you are going to have, then this could be a little complicated thing to do, but this annoyance will be solved after you had read this guide. Or you get a new iPhone and want to transfer the important contacts to the new one, the article in the link may help you.
But no worries, because in this post, we are going to show you some easy ways on how to transfer iTunes Library to a new Mac. So, read through this post and see which of the methods that we are going to give you will best suit what you need.
Part 1. Different Ways on How to Transfer iTunes Library to New MacPart 2. A Great Tool to Transfer iTunes Library to New Mac
For you to transfer your iTunes library from your old Mac to the new one that you are going to have, here are some of the easiest ways on how you can do this.
One way on how you can transfer iTunes library to a new Mac is by merely using your external hard drive. As we all know, an external hard drive tends to accommodate a large capacity of storage that you can use for you to be able to save all of the data that you have on your iTunes library and transfer them over to your new Mac. Plus, you can buy an external hard drive that will fit your needs at a low price.
So, in order for you to make use of this method to transfer the iTunes library to a new Mac, you just have to make sure that you have enough space to carry all of your data from your iTunes and transfer them over to your new Mac. Here is how you can do this method.
Step 1: Connect your external hard drive to your old Mac and then launch your iTunes program.

Step 2: And then, go ahead and look for your iTunes media folder. You can do this by clicking on iTunes from the menu bar and then click on Preferences. From there, all you have to do is to choose the Advanced option and you will be able to find your iTunes Media folder from your Mac.
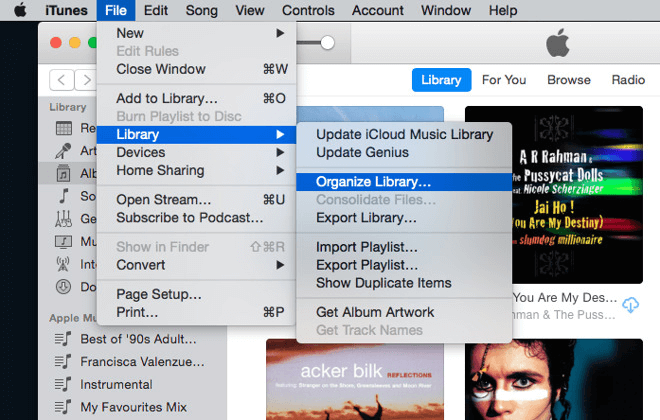
Step 3: And then, go ahead and click on the File option and then choose Library. From there, go ahead and click on Organize Library and then put a checkmark beside the option Consolidated File. Then click the OK button.
Step 4: After that, go ahead and close your iTunes program on your old Mac.
Step 5; And then, launch the iTunes media folder using step part 2 above and then drag the folder over to your external hard drive.
Step 6: Then, go ahead and launch your iTunes program and then click on the Choose Library option. And from here, all you have to do is to choose the iTunes library that you have saved on your external hard drive.
Step 7: Then, on your new Mac, go ahead and have your external hard drive connected to it and then click on the Finder tool.
Step 8: Now click on the Music folder and then have it dragged over to your iTunes library folder in your external hard drive and move it over to the music folder of your new Mac.
Step 9: And then, go ahead and launch the iTunes program on your new Mac. Then press and hold the Option button from your keyboard while launching the iTunes program.
Step 10: Then go ahead and click on the option Choose Library from the pop-up box on your screen and then choose your music folder from your external hard drive.
Step 11: After that, go ahead and click on your iTunes library folder and then click on the Open button.
NOTE: In this method, the speed of transferring over your iTunes library to your new Mac will depend on the size of the backup file that you have made earlier. So, this means that it will take some time to finish if you have a really huge size of your iTunes library. This is the first way to transfer iTunes library to new mac.
In this method, all of the data from your iTunes library will be backed up except for those audiobooks that you got from Audible.com. This method will require you to use either a blank CD or a DVD. Also, this can be done if you are using iTunes 7 to iTunes 10.3 version.
So, here is a quick guide on how you can do this method.
Step 1: On your old Mac, go ahead and launch your iTunes program.
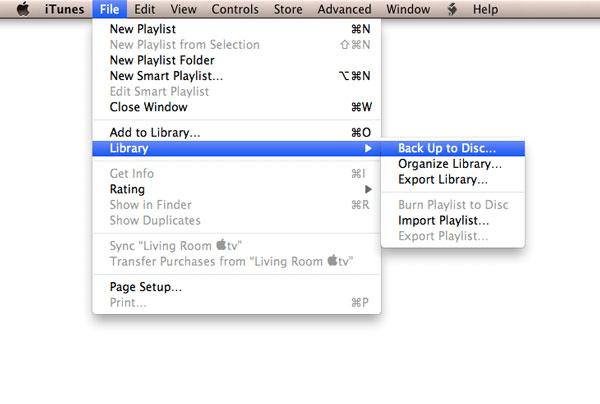
Step 2: And from there, go ahead and click on File from the menu bar of iTunes and then choose Library. Then click on the Back up to Disc option.
Step 3: From there, go ahead and simply select the data that you wanted to transfer over your blank disc from your old Mac. In this step, there are two options that you can choose from. One is “Backup entire iTunes library and playlist”, or you can choose “Back up only iTunes store purchases”. So, go ahead and choose from those two options.
Step 4: Once that you have chosen an option, go ahead and click the Backup button.
Step 5: And then, go ahead and insert your blank disc into your Mac. Then, the backup will start until such time that it fills up the storage capacity of your blank disk. If in case that one CD or DVD cannot accommodate all of your data from your iTunes, then you can just simply insert a new one to continue.
Step 6: Then, on your new Mac, go ahead and restore your iTunes library that you have saved on your CD or DVD. All you need to do is to insert one disk to your new Mac until it finishes up restoring all of your library from that disk and insert the other disc that you have once that you are done.
In this process, in case you have a large amount of library, then you may be needing about 10 pieces of CD if you have a CD burner. This means that this could not be an efficient way for you to transfer your iTunes library to your new Mac. However, if you have a DVD burner, then you can use about 4 DVDs for every 15GB of iTunes library. This is the second way to transfer iTunes library to new mac.
Using your Mac, one of the easiest ways for you to transfer iTunes Library to a new Mac is by using the Migration Assistant. This is a tool that you can use in order for you to have your old Mac re-created to the new Mac by transferring over your data, files, and your settings. This tool is said to be able to transfer most of the files that you have on your iTunes library. Plus, using this tool can also save you more time.
This tool is said to be offered when you try to set up your new Mac. If in case that you were not able to choose this tool the first time that it appeared on your set up, then you can look for it in your Application folder which can be found from your Utility folder on your Mac.
Then, you will be needing to have either a Thunderbolt or Firewire cable which will depend on the Mac that you have for you to connect your old Mac to your new Mac. Once that you are done with the process, then you can go ahead and have your old Mac reboot and then hold the “T” button. Then, you will be able to see Thunderbolt or Firewire on your screen. When you see those icons on your screen, go ahead and launch Migration Assistant on your new Mac and then simply follow the instructions that you see on your screen. This is the third way to transfer iTunes library to new mac.
This method can actually take up a lot of time to finish and has the possibility that it will not be able to transfer all types of files that you have from your iTunes library, it is still considered to be one great option for you to transfer iTunes Library to new Mac. Though you have to keep in mind that using this method, you will not be able to transfer your apps, videos, playlist, or your books.
But, if you still want to try this method, then here is a quick guide that you can follow.
Step 1: You have to subscribe to the iTunes Match.
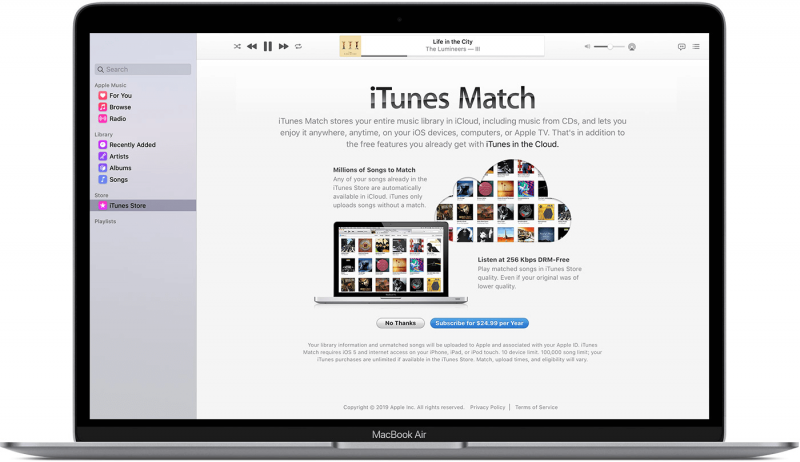
Step 2: Then, your iTunes library will then be synced over to your iCloud and then have your songs that do not have any matches uploaded to it.
Step 3: Once that the upload is already complete, use your new Mac and then sign in to your iCloud account.
Step 4: Then, go ahead and launch the iTunes program on your new Mac as well.
Step 5: Then, go ahead and choose the Store menu.
Step 6: From there, go ahead and click on the Turn on iTunes Match option.
Step 7: Then, you will be able to see a list of music from your iCloud account and then have it downloaded to your iTunes library on your new Mac.
Step 8: And then, go ahead and follow the guide on your screen so you can download your songs from your iTunes Match.
The time that the transfer will consume depends on the size of your iTunes library that you are trying to transfer. This method is also said to be ideal for those people who only have a basic iTunes library and for those who do not need to transfer other files aside from the ones it can transfer. This is the fourth way to transfer iTunes library to new mac.
Since we are talking about basically transferring data from one device to another, let us give you a quick recommendation that is definitely can be a help for you in the future. When it comes to transferring data from one device to another, there is also another tool that you can use and that can accommodate to transfer of any data that you have such as your photos, videos, music, messages, and contacts. And that is the FoneDog Phone Transfer.
Phone Transfer
Transfer files among iOS, Android and Windows PC.
Transfer and backup text messages, contacts, photos, video, music on computer easily.
Fully compatible with iOS 13 and Android 9.0.
Free Download

The FoneDog Phone Transfer is one effective, efficient, and very safe tool that you can use in order for you to transfer different types of data from one device to another. You can transfer from any iOS device, Android device, Windows, and as well as from your Mac.
This tool is very easy to use as well, plus, it gives you the freedom to choose the data that you want to transfer from your old device to the new one, for example, the data transmission between old iPhone and new iPhone. This is one of the best and most recommended tools by many users because of its capability of doing its function smoothly and quickly.
We have had mentioned almost all of the possible ways on how to transfer the iTunes library to the new Mac above so all you need to do now is to choose which of those that we have mentioned can suit what you needed to do. And whatever that you choose from the solutions that we have mentioned above, rest assured that you will be able to transfer iTunes library to new Mac in no time.
People Also ReadHow to Sync iPhone with New ComputerHow to do An Android to iOS Transfer
Leave a Comment
Comment

Tech Website Writing /Content Optimization
Singing, smiling, surprising every day!
So as a technical writer, it is my duty to gather effective and reliable solutions to answer questions on how to deal with the issues they are having with their devices.
Phone Transfer
Transfer data from iPhone, Android, iOS, and Computer to Anywhere without any loss with FoneDog Phone Transfer. Such as photo, messages, contacts, music, etc.
Free DownloadHot Articles
 /
/
INTERESTINGDULL
/
SIMPLEDIFFICULT
Thank you! Here' re your choices:
Excellent
Rating: 4.8 / 5 (based on 96 ratings)
