FoneDog Screen Recorder
FoneDog Screen Recorder
Special Offer
Special Offer


By Vernon Roderick, Last updated: August 28, 2020
Since the time iTunes was released by Apple, it’s been one of the most commonly-used music platforms out there, to the point that it even found its way into Windows. However, iTunes is also known by many as a despised music software, much of this is due to the fact that there are lots of errors on this platform.
One of those errors is the issue with iTunes not working on Windows 10. Despite this, we still can’t stop using it. Fortunately, there are ways to solve such issues, and that’s what this article will be all about. But before that, why did this problem occur in the first place?
Part 1: Why is iTunes Not Working on Windows 10?Part 2: Solutions for iTunes Not Working on Windows 10Part 3: Conclusion
There are many reasons for iTunes to suffer from damages and errors. iTunes not working on Windows 10, in particular, can happen in many ways. These are just some of the common causes of this problem in Windows 10 desktops:
If you happen to encounter the issue with iTunes not working on Windows 10, then expect that it was caused by either of these three. Regardless of the cause, however, there will always be a way to fix the problem. With that said, let’s start with our first solution.
Obviously, the first solution we’re going to tell you should be the easiest, and that’s what this solution is all about. This involves using specialized software designed to restore your operating system. There may be lots of them out there, but not all are as powerful as FoneDog iOS Data Backup & Restore.
iOS Data Recovery
Recover photos, videos, contacts, messages, call logs, WhatsApp data, and more.
Recover data from iPhone, iTunes and iCloud.
Compatible with latest iPhone 11, iPhone 11 pro and the latest iOS 13.
Free Download
Free Download

FoneDog iOS Data Backup & Restore is a software that allows you to create a backup of your iOS device including its apps, and that would mean creating a backup of iTunes as well. It allows you to restore iTunes in case any issues occur.
Without further ado, here’s how you can use the software. Let’s start by discussing the steps on how to create a backup of your operating system and restore from that backup the app data including iTunes.
First of all, install the FoneDog iOS Toolkit on your desktop. Once that’s done, launch the software. On the first screen, you’ll see, select the iOS Data Backup & Restore option. This should be the step of preparing the data and recovery process. Next is the creation of the backup.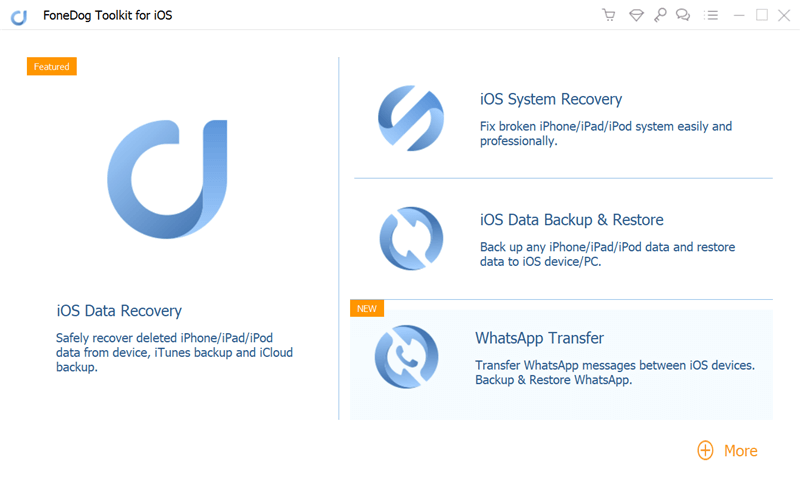
The option you select in Step 1 would lead you to the selection of options wherein you should select iOS Data Backup. Here, select the mode which should either be Standard Backup or Encrypted Backup. They are almost the same, except that Encrypted Backup requires a password to access. Next, click on the Start button. There will be a list of data that you can back up. Select the data types then click Next. The backup process should start after this point.
Now you’re in a situation that you need to restore your Windows 10 apps because of iTunes not working on Windows 10. First, do what you did in Step 1. Next, select iOS Data Restore instead of iOS Data Backup. Then you will see a list of backups. Simply select the one you created in Step 2 where iTunes is still fully functional. You can click View Now to check if iTunes really will be affected just to be sure.
Click on Select after confirming the selected backup. It should then start scanning for files. Just wait for it to finish. Once that’s done, click on Restore to PC to restore the files into your Windows 10. This should include iTunes 10.
These four steps should be sufficient for you to solve most issues that occur on your macOS or Windows, including the issue with iTunes not working on Windows 10. If it didn’t then perhaps another solution would be more suitable for your kind of problem.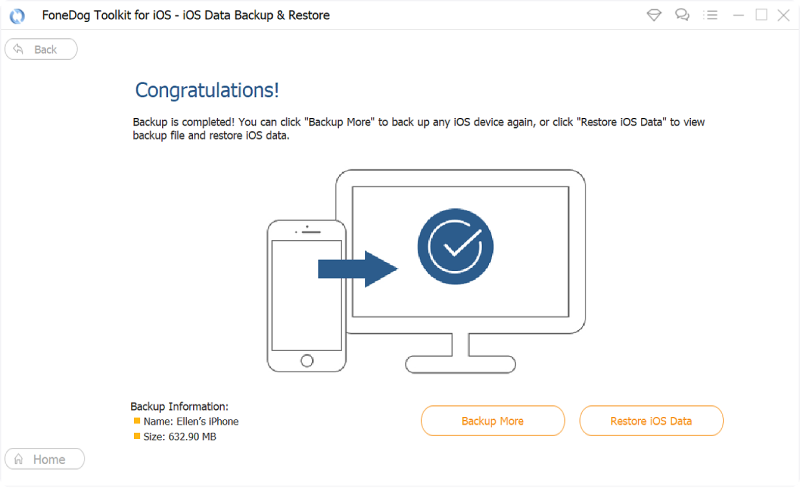
iOS Data Backup and Restore
One click to backup the whole iOS device to your computer.
Allow to preview and restore any item from the backup to a device.
Export what you want from the backup to your computer.
No data loss on devices during the restore.
iPhone Restore Won't Overwrite Your Data
Free Download
Free Download

It’s important to remember that there is a tendency for apps to stay resident on the memory of the operating system. For that reason, closing the iTunes by force is recommended before you can restart it. To do this, you have to follow these steps:
On your Windows 10, right-click on your taskbar then select Start Task Manager. If your computer is not responding, then simply press Ctrl + Alt + Del on your computer then select Start Task Manager.
On the Task Manager, go to the Processes tab. Here, select the iTunes app then click on the End task button located at the bottom-right corner of the window.
This should force close iTunes. Now all you have to do is open the iTunes app again in whichever way you like. In case this didn’t fix the iTunes not working on Windows 10 issue, then perhaps a more extreme solution is required. With that said, we suggest restarting your Windows 10 altogether. If this still didn’t fix your problem, then we have yet another solution for you.
As we’ve said before, after force closing iTunes, you will have to start it again. However, simply launching it again would mostly not suffice. You have to launch it in special ways. And one of those ways is to choose the option ‘Run as Administrator’ when opening iTunes:
Now iTunes should launch properly unlike before. This should also fix the iTunes not working on Windows 10 issue. The only downside is that you have to do this every time you want to open the app. Fortunately, you can set it by default to make it easier:
This will allow the system to automatically run the program with administrator privileges. This would be by default so you won’t have to do every time over and over again if you follow these steps. Now let’s head to yet another way to run iTunes so that iTunes not working on Windows 10 issue can be avoided.
Before, we discussed how to use the Run as administrator option. However, there’s another way to run iTunes in a special mode. This involves using Safe Mode. Safe Mode allows you to boot your computer without any extensions or plugins. In short, it’s like cooking a dish without any preservatives that can ruin the taste. To do this, you have to follow these steps carefully:
These steps will lead to the launching of an app in Safe Mode. This can be done to any apps, though you should only use this if it’s an emergency, iTunes not working on Windows 10 for example. Of course, that doesn’t end this list of ways to run iTunes in special ways. There is another method of launching which involves using Compatibility Mode.
Using ‘Run as administrator’ grants you access to the app and can bypass most issues related to privileges. Safe Mode, on the other hand, can remove extensions and plugins that might be causing the iTunes not working on Windows 10 issue. Finally, Compatibility Mode will fix compatibility issues. This is especially helpful with Windows 10.
Since there aren’t many apps that are compatible with the latest updates of Windows 10, there will often be compatibilities issues. So to fix this, you have to enter Compatibility Mode with the following steps:
This is the third method for opening iTunes that will reduce your chances of encountering the issue with iTunes not working on Windows 10. If neither of the three worked, then perhaps it’s not about the bootup of iTunes, but because of a component.
Why is my iTunes not working on my computer? There are tons of requirements for iTunes to run on your Windows 10. We call these requirements the components, and most apps have these. While there are other components, most of them are installed by default and rarely doesn’t suffer from problems.
QuickTime is one of the components of iTunes required for Windows 10, and it is perhaps the most problematic component of iTunes. Fortunately, you can easily fix any problems inflicted to QuickTime by reinstalling it, and here’s how you can do that:
This should solve any problems regarding QuickTime. Unfortunately, as we’ve said before, there are other components. With that said, let’s proceed to another component of iTunes.
Many people might not know what iTunes libraries are, but it is fairly important to iTunes. That’s all you need to know about it to understand that you need to fix problems related to it. With that said, here’s how you can restore iTunes libraries:
With this, you will be able to open iTunes once again since most issues should be fixed by fixing the libraries. However, if using this solution still didn’t solve the iTunes not working on Windows 10 issue, then it must either be due to other components or the iTunes app itself. Coincidentally, there’s a way to solve both these problems.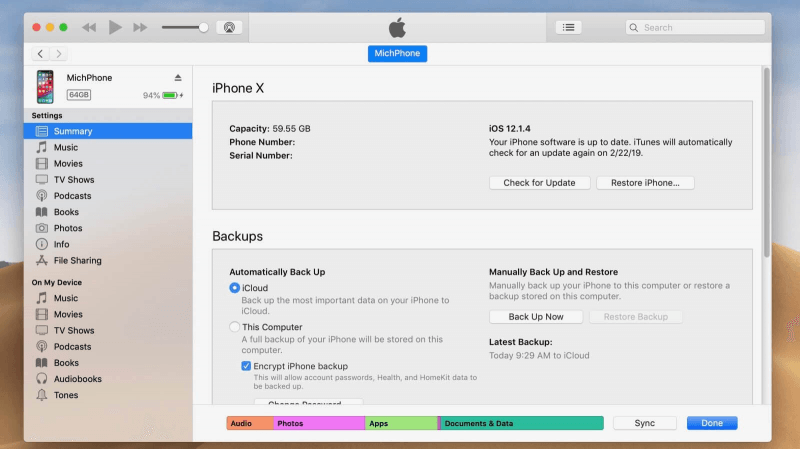
Configuring iTunes means changing it in any way. This can be through reinstalling a component just like we did before, uninstalling the whole app, or even downgrading it. Either way, most of the methods for configuring iTunes can solve issues that Solution #5 wasn’t able to solve. Without further ado, let’s start with our first configuration.
It’s important to understand that iTunes is undergoing frequent updates. So if you want to avoid compatibility issues, not only do you need to find the compatible operating system to use like what you did in Solution #5, you also have to make your iTunes compatible.
Usually, in order to update iTunes, you simply have to click on the notification shown by iTunes. After that, just follow the onscreen instructions shown since it should be different every time.
However, if there’s no alert, you can do it yourself by using Apple Software Update which should come pre-installed along with iTunes. This tool normally does the update automatically by first searching for an update, downloading it, then installing the update.
Updating will solve compatibility issues, but what if your iTunes app is really not functional. This often occurs when there is a virus or a bug that cannot be solved with an update. In that case, you have to repair iTunes, and you can do that with these steps:
This should be easy since you already know how to use the Control Panel’s Programs and Features. Now we head to our third configuration.
Repairing iTunes might solve the iTunes not working on Windows 10 issue, but it’s not as thorough that it can solve most issues. Even after repairing apps, there will be leftovers of the issues that existed before. If you don’t want that, then reinstalling might be more suitable. This will be easier now since you already know how to repair.
The only thing you have to do is do what you did for repair, but instead if selecting Repair on the Modify window, select Remove. Once iTunes is deleted, install it again by downloading the setup file from Apple’s official website, then just follow the instructions as you go.
We’ve gone through lots of fixes through configuration, but there is one configuration that most people don’t know about. It is given that updating can solve bugs, so downgrading was never an option for many when solving issues with iTunes not working on Windows 10. However, there are actually lots of perks with downgrading.
Either way, you can downgrade iTunes by doing what you did with reinstalling, except that you just have to select an older version of iTunes after you uninstall it. That’s the last one in this solution and hopefully, this would be enough.
Many people wonder why they are facing issues with iTunes not working on Windows 10. However, this is actually something that every old user have experienced, much of this is attributed to how sloppy the staff of iTunes is. Fortunately, you can solve such issues in many ways, and that’s enough for us to be grateful.
We’ve discussed seven solutions for the aforementioned issue, but it is still important to take care of your iTunes even before such issues occur. After all, prevention is better than the solution.
Leave a Comment
Comment

Technical Expertise for PC/Website Optimization
One of my passion is to develop software of my own
I write articles to share knowledge about IT technology and some experience in developing my own software, and developing my own software is one of my passions for work.
iOS Data Backup & Restore
Back up your data to PC and selectively restore iOS data from backups.
Free Download Free DownloadHot Articles
 /
/
INTERESTINGDULL
/
SIMPLEDIFFICULT
Thank you! Here' re your choices:
Excellent
Rating: 4.4 / 5 (based on 106 ratings)
