FoneDog Screen Recorder FoneDog Screen Recorder
Special Offer Special Offer
Only Only
$4.49 $4.49
to get a ONE-month license to get a ONE-month license
Sale ends in xx days Sale ends in xx days
Buy Now
sale

Mastering the Art on How to Transfer iPod Music to iPod

By Nathan E. Malpass, Last updated: October 10, 2023

The iPod remains an iconic device that has brought the joy of music to millions around the world. Whether you're a fan of the classic iPod models or have embraced the modern iterations, one challenge remains constant: the seamless transfer of iPod music to iPod (another device).

Whether you're upgrading to a new iPod, replacing a device, or simply looking to share your cherished tunes with a friend, mastering the art of transferring iPod music is a valuable skill.

While Apple has introduced various new devices and platforms for music consumption, the process of transferring your carefully curated playlists and melodies from one iPod to another might not always be as intuitive as we'd like.

Fear not, in this article, we'll guide you through tried-and-true methods to ensure that your music library remains uninterrupted during the transition. From utilizing built-in features to exploring third-party tools, we'll cover a range of techniques tailored to different preferences and needs.

So, whether you're a tech-savvy enthusiast or just embarking on your musical journey with iPods, get ready to discover how to effortlessly transfer iPod music and keep the rhythm of your collection alive.

Part #1: How to Transfer iPod Music to iPodPart #2: Top Tool to Transfer iPod Music to iPod: FoneDog Phone TransferSummary

Part #1: How to Transfer iPod Music to iPod

Method #1: Through iCloud Syncing

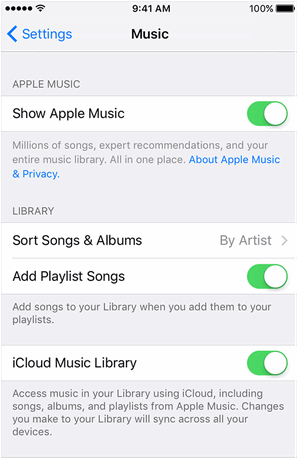
In the digital age, where music accompanies us on all our devices, keeping our playlists in sync is essential. Apple's ecosystem offers a variety of seamless solutions and one of the most convenient methods to transfer iPod music to iPod through iCloud syncing.

This method ensures that your music collection effortlessly flows from one device to another, making your listening experience uninterrupted and enjoyable. Here's how to do it:

  1. Ensure iCloud Music Library is Enabled: On both the source and target iPods, ensure that the iCloud Music Library feature is enabled. This can be done by going to “Settings”, tapping on “Music”, and then toggling on “iCloud Music Library”.
  2. Connect to Wi-Fi: For successful syncing, both iPods need to be connected to a Wi-Fi network. This allows them to communicate and transfer data over the cloud.
  3. Wait for Syncing: Once the iCloud Music Library is enabled and the iPods are connected to Wi-Fi, your devices will automatically start syncing. This process might take some time, depending on the size of your music library and the speed of your internet connection.
  4. Verify Music on Target iPod: After the syncing process is complete, check the target iPod to ensure that all your music has been transferred successfully. Open the “Music” app and browse through your playlists, albums, and songs.

Transfer iPod Music to iPod through iCloud Syncing

Pros of Using iCloud Syncing:

  • Seamless and automatic transfer of music.
  • No need for a computer or additional software.
  • Changes and additions made on one device reflect on the other.

Cons of Using iCloud Syncing:

  • Requires an active internet connection.
  • Limited storage space on iCloud (additional storage might incur costs).
  • May not be suitable for users with large music libraries.

iCloud syncing provides a hassle-free way to transfer your beloved music to an iPod. This method is particularly beneficial if you value automation and want your music to stay synchronized across devices effortlessly.

However, for those seeking alternatives or with larger music collections, exploring additional methods might be advantageous. In the next section, we'll delve into another technique: using iTunes to transfer music between iPods.

Method #2: Using iTunes

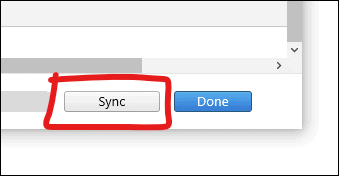
While iCloud syncing offers a convenient way to transfer music between iPods, using iTunes provides a more hands-on approach, allowing you greater control over your music transfer process. Whether you prefer a wired connection or simply want to manage your music library manually, iTunes offers a robust solution.

Here's how to transfer iPod music to iPod using iTunes:

  1. Update iTunes: Make sure you have the latest version of iTunes installed on your computer. This ensures compatibility and access to the latest features.
  2. Connect the Source iPod: Connect your source iPod to your computer using a USB cable. Launch iTunes if it doesn’t open automatically.
  3. Authorize the Computer: If prompted, authorize the computer to access your iPod’s content. This step might require your Apple ID and password.
  4. Backup Your Source iPod (Optional but Recommended): Before proceeding with the transfer, consider creating a backup of your source iPod’s music library. This safeguards your music in case of unexpected issues during the transfer process.
  5. Transfer Music from Source iPod: In iTunes, select your source iPod from the device menu. Navigate to the “Music” tab within the iPod’s settings. Check the box next to “Sync Music” and choose whether you want to sync your entire library or specific playlists, artists, albums, or genres.
  6. Apply Changes: After selecting the music you want to transfer, click the “Apply” or “Sync” button in the bottom-right corner of the iTunes window. This will initiate the music transfer process from your source iPod to your iTunes library on the computer.
  7. Disconnect Source iPod and Connect Target iPod: Once the music is successfully transferred to your iTunes library, disconnect the source iPod and connect the target iPod to your computer.
  8. Transfer Music to Target iPod: In iTunes, select your target iPod from the device menu. Navigate to the “Music” tab and choose to sync the music you transferred to your iTunes library. Click “Apply” or “Sync” to initiate the transfer to the target iPod.
  9. Verify Music on Target iPod: Eject the target iPod from your computer and open the “Music” app to ensure that all transferred music is available.

Transfer iPod Music to iPod Using iTunes

Pros of Using iTunes:

  • Allows manual selection of music for transfer.
  • No reliance on an internet connection.
  • Offers a backup option before transferring music.

Cons of Using iTunes:

  • Requires a computer and USB cable.
  • More involved process compared to iCloud syncing.
  • Potential for errors if not done carefully.

Using iTunes offers a more hands-on approach to transferring music between iPods, making it a suitable option for users who prefer greater control over their music library management. This method is especially useful when an internet connection isn't readily available or if you want to keep your music transfer separate from cloud services.

Method #3: Using Apple Music

Apple Music, a subscription-based music streaming service offered by Apple, provides an alternative method for transferring and accessing your music collection across multiple devices, including iPods. This method is particularly advantageous if you're subscribed to Apple Music and want to enjoy your entire library seamlessly on different iPods.

Here's how to transfer iPod music to iPod using Apple Music:

  1. Subscribe to Apple Music (If Not Already): Ensure you have an active subscription to Apple Music. This service offers access to a vast library of songs and allows you to upload and access your personal music collection.
  2. Enable iCloud Music Library: On both your source and target iPods, make sure the iCloud Music Library feature is enabled. This ensures that your music is available across devices.
  3. Upload Your Music to Apple Music: On your computer, open iTunes (or the Apple Music app on macOS Catalina and later). Upload your personal music collection to your Apple Music library. This step might involve selecting the folders or playlists you want to upload.
  4. Access Your Music on iPods: On your target iPod, open the Music app and sign in with the Apple ID associated with your Apple Music subscription. Your uploaded music, as well as the songs available through Apple Music, will be accessible on this iPod.
  5. Download Music for Offline Listening (Optional): If you want to have your music available for offline listening, you can download songs, albums, or playlists directly to your iPod. Simply tap the Download button next to the content you want to save offline.
  6. Enjoy Seamless Music Playback: With Apple Music, your music collection will remain in sync across all your devices, including your iPods. You can switch between devices and continue listening to your favorite tunes without interruption.

Pros of Using Apple Music:

  • Seamless integration with an Apple Music subscription.
  • Access to a vast library of songs.
  • Music remains synchronized across devices.

Cons of Using Apple Music:

  • Requires an active Apple Music subscription.
  • Dependent on an internet connection for streaming (offline listening option available).
  • Limited control over the organization of your personal music collection.

Using Apple Music provides an all-encompassing solution for transferring and accessing your music collection across iPods and other devices. This method is especially useful if you're already a subscriber to Apple Music, as it seamlessly combines your personal music with the vast streaming library available.

However, for users who prefer managing their own music libraries or those without an Apple Music subscription, alternative methods like iCloud syncing or using iTunes might be more suitable.

Part #2: Top Tool to Transfer iPod Music to iPod: FoneDog Phone Transfer

While Apple's ecosystem provides several methods for transferring iPod music, you might find yourself seeking a versatile and efficient third-party solution. This is where FoneDog Phone Transfer, an iPhone 15-supported tool, comes into play.

Phone Transfer Transfer files among iOS, Android and Windows PC. Transfer and backup text messages, contacts, photos, video, music on computer easily. Fully compatible with the latest iOS and Android. Free Download FoneDog Phone Transfer

This powerful tool offers a straightforward way to transfer your music collection from one iPod to another, regardless of the model. Let's delve into why FoneDog Phone Transfer stands out as a top choice for you to transfer iPod music to iPod:

Why Choose FoneDog Phone Transfer:

  • Cross-Platform Compatibility: FoneDog Phone Transfer supports various iPod models and iOS versions, ensuring seamless compatibility and effortless transfers between devices.
  • Easy-to-Use Interface: The user-friendly interface makes the transfer process intuitive for users of all tech levels. You don’t need to be a tech expert to successfully transfer your music.
  • Comprehensive Transfer Options: FoneDog Phone Transfer allows you to transfer not only music but also other data like photos, videos, contacts, messages, and more between iPods.
  • Quick and Efficient: With FoneDog Phone Transfer, you can transfer your music collection between iPods quickly and efficiently, saving you time and effort.
  • No Data Loss: The tool ensures that your music and other data are transferred securely without any loss or corruption.
  • Offline Transfer: Unlike cloud-based solutions, FoneDog Phone Transfer allows you to transfer your music offline, making it an ideal option when internet connectivity is limited.

How to Transfer iPod Music using this top iPod music transfer software:

  1. Download and Install: Download and install FoneDog Phone Transfer on your computer.
  2. Launch the Tool: Launch FoneDog Phone Transfer and connect both source and target iPods to your computer using USB cables.
  3. Select Music: Choose the “Phone Transfer” option from the main menu. Select the “Music” category from the available data types.
  4. Start Transfer: Click on the “Start Transfer” button to initiate the music transfer process. The tool will begin copying your music from the source iPod to the target iPod.
  5. Completion and Verification: Once the transfer is complete, verify the transferred music on the target iPod’s “Music” app.

Top Tool to Transfer iPod Music to iPod: FoneDog Phone Transfer

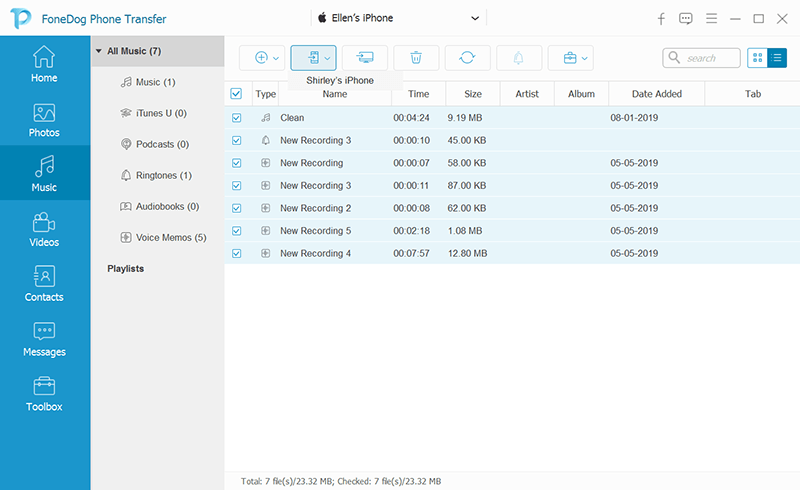
FoneDog Phone Transfer serves as a top-notch solution for transferring iPod music to another iPod, offering compatibility, efficiency, and versatility. Whether you're looking to switch iPod models, upgrade devices, or simply share your music, this tool streamlines the process while maintaining data integrity.

While Apple's methods are convenient, FoneDog Phone Transfer presents an alternative approach for users seeking an efficient and user-friendly option. With FoneDog Phone Transfer, you can effortlessly ensure that your music collection remains harmoniously in sync across your iPods.

People Also ReadHow to Delete Music from iPod: Things That We Need to Learn2023 Guide: How to Delete Podcasts from iPod?

Summary

Transferring music between iPods has evolved with the advancement of technology, offering users a variety of methods to choose from. Whether you're an advocate of Apple's ecosystem, a hands-on iTunes user, or interested in third-party tools, there's a solution that aligns with your preferences to transfer iPod music to iPod.

Each method caters to different needs and preferences, ensuring that you can choose the most suitable way to transfer your cherished music collection. Whether you prioritize automation, manual control, or third-party convenience, the choice is ultimately yours.

With these options at your disposal, you can confidently transfer iPod music to another iPod while preserving the rhythm of your music journey.

Whichever method you opt for, the joy of seamless music enjoyment across your devices awaits. If you choose to grab FoneDog Phone Transfer, don’t forget to visit the official website and grab the tool today!

Leave a Comment

Comment

Comment ()
author image

Nathan E. Malpass

iPhone/Android Devices’ Maintenance Expert

Staying home, listening to music, writing tech articles

Many people asked me to repair their mobile phones so I have a lot of experience in mobile phone repair, and I know a lot about Android or Apple phones.

Phone Transfer logo

Phone Transfer

Transfer data from iPhone, Android, iOS, and Computer to Anywhere without any loss with FoneDog Phone Transfer. Such as photo, messages, contacts, music, etc.

Free Download

How Do You Like This Article?

Check icon/ Check icon

INTERESTINGDULL

Check icon/ Check icon

SIMPLEDIFFICULT

Thank you! Here' re your choices:

Rate This Article: Excellent

Rating: 4.5 / 5 (based on 101 ratings)

Phone Transfer logo

Phone Transfer

Transfer data from iPhone, Android, iOS, and Computer to Anywhere without any loss with FoneDog Phone Transfer. Such as photo, messages, contacts, music, etc.

Free Download

FoneDog uses cookies to ensure you get the best experience on our website. Click here to learn more.