FoneDog Screen Recorder
FoneDog Screen Recorder
Special Offer
Special Offer


By Adela D. Louie, Last updated: March 8, 2021
Are you an iPhone user who is wondering how you can transfer music from iPhone to Android since you are planning to switch over to using an Android device? Don’t worry, because we are going to show you all that in this post.
We know the struggle of switching from an iPhone device to an Android especially when it comes to transferring your iPhone data over to your Android device. And we must say that one of the most struggles of iPhone users is knowing about how they can transfer their music over to their Android device.
Well, worry no more. Because we have here the answer to your problem. We are going to show you some quick and easy ways on how you can transfer music from iPhone to Android. So, if you want to know more about it, keep on reading this post.
Part 1.The Best Way to Transfer Music from iPhone to AndroidPart 2. Transfer Music from iPhone to Android Via Google Music MangerPart 3. Transfer Music from iPhone to Android Without Accessing a ComputerPart 4. Conclusion
Here, one of the most recommended and the best way for you to be able to transfer music from iPhone to Android is by using a third-party application that can work on both iPhone and Android devices. And with that being said, we have here the which is the most recommended tool by many.
By using the FoneDog Phone Transfer, you will be able to easily transfer music from iPhone to Android. This is definitely an effective, easy-to-use, and very safe tool that you can use in order to have your iPhone music be transferred over to your Android device.
And aside from the fact that it can transfer your music from your iPhone to Android device, it also can work on some other data from your iPhone device. It can also transfer your contacts , messages, videos, and your photos without worrying about losing any of your existing data.
Plus, this tool can work on all kinds of devices that you wish to do a transfer process. It works on Android devices, iOS, and even on your Windows. This means that you can do a transfer among those devices we have mentioned.
And, to show you how the FoneDog Phone Transfer is being used to transfer music from iPhone to Android, here is a quick guide that you can use to follow.
Tip: If you want to know how to transfer music from a computer to iPhone, you can do so by visiting their post here.
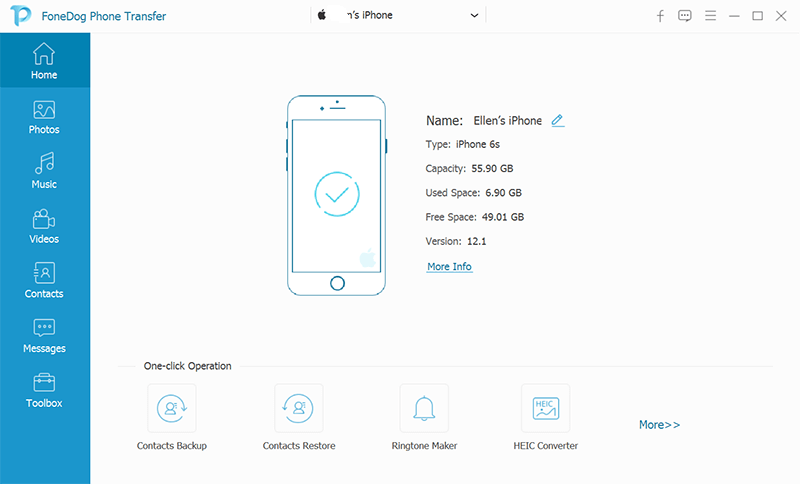
After you have downloaded and installed the FoneDog Phone Transfer on your computer, go ahead and launch the program. Then, have both your Android and your iPhone device connected to your computer using their USB cable. Then wait for the program on both of your devices. You will then see a preview of both your Android and your iPhone on the main screen of the program.
Then, still, on the main screen of the program, go ahead and select your iPhone device first because this is where you will be getting the music that you want to transfer. Also, you will be able to see a list of data types that the FoneDog Phone Transfer supports the transfer. From here, all you have to do is to choose the Music category.
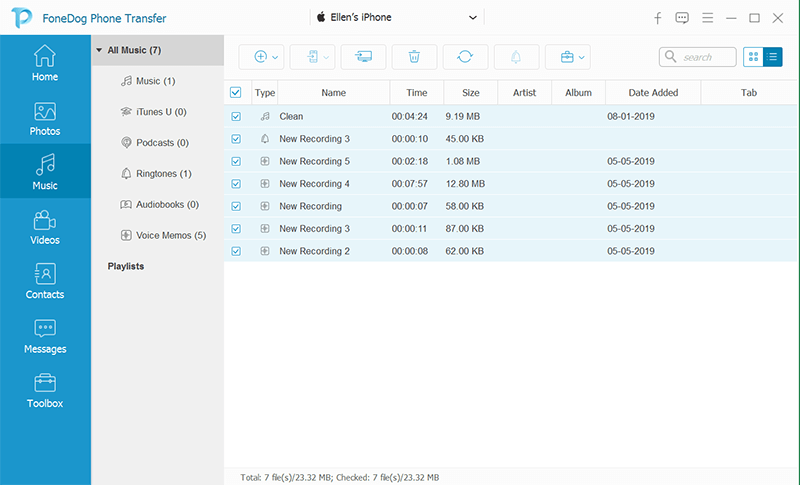
After that, you will be able to see on your screen all of the music that you have stored on your iPhone device. From there, all you need to do is to select all of the music titles that you want to transfer over to your Android device. You can selectively choose your music, or you can simply click on the Check All box above your screen to select all of the music at once and if you want to transfer all the songs to your Android.
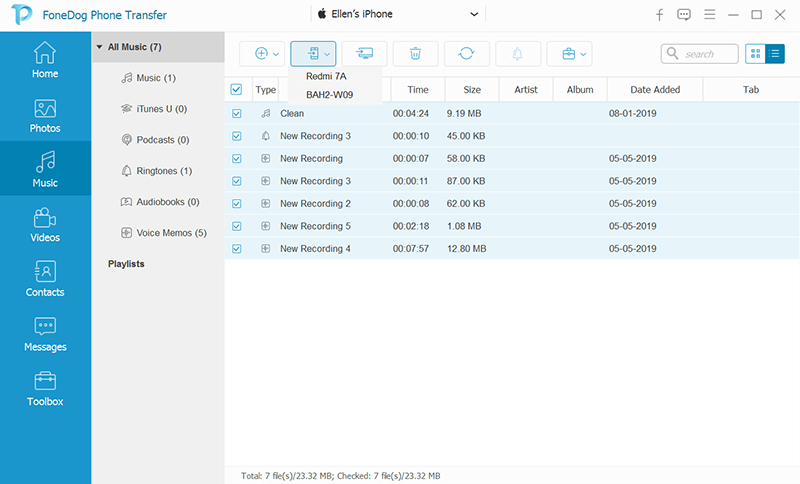
And then, once that you are okay with all of the songs that you want to transfer to your Android, all you need to do now is to click on the Export to Device option which is located at the menu bar of your screen. And then select on your Android device. Then the process of transferring your music from your iPhone device to your Android will start so all you need to do now is to wait for it to finish.
People Also ReadHow to Transfer Videos from iPhone to AndroidHow to Transfer Photos from iPad to Computer
Another way for you to be able to transfer music from iPhone to Android is by using the Google Music Manager. However, not just like the first solution that we have mentioned above, using this tool can be a bit complex. It is because you will be needing to have your iPhone device synced with your iTunes program.
Then, that is the time that you can import your backup file over to the Google Music Manager. And that, it can be accessed by your Android device using the application.
To show you more on how you can work with this tool, here is a guide that you can follow.
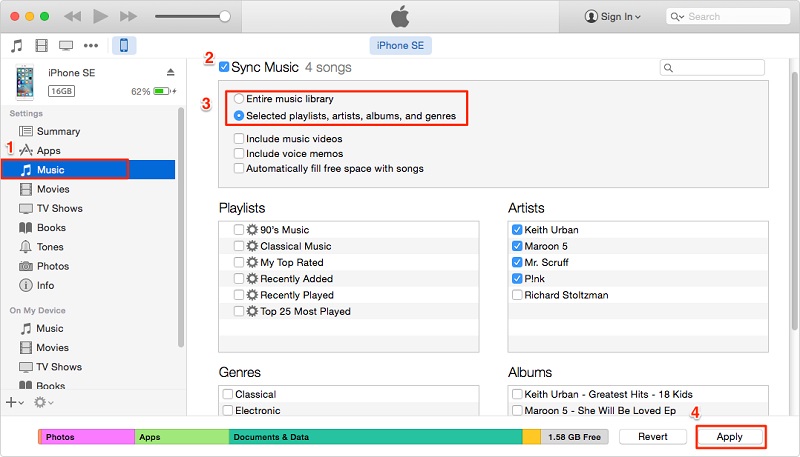
Step 1: The first thing that you need to do is to have your iPhone device be synced with your iTunes program. So, you have to make sure that you have updated your iTunes to the latest version. And then launch it and connect your iPhone to your computer.
Step 2: And then, choose the iPhone icon and then head to the Music tab. And then, have your iPhone synced to your iTunes. After that, go ahead and hit on the Apply button and it will start to sync your iPhone to your iTunes.
Step 3: After syncing your music to your iTunes, you can now go ahead and unplug your iPhone from your computer.
Step 4: And then, go ahead and navigate to the website of Google Music and then have the Google Music Management be downloaded.
Step 5: And once that you have installed the program, go ahead and launch it and then choose all of the songs that you want to upload to your Google Play.
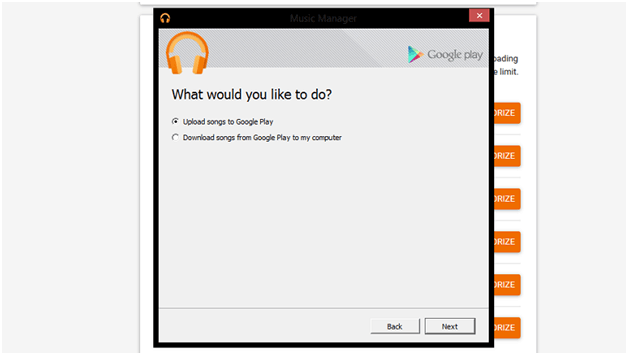
Step 6: Then, go ahead and choose iTunes as the source and then click on the Next button.
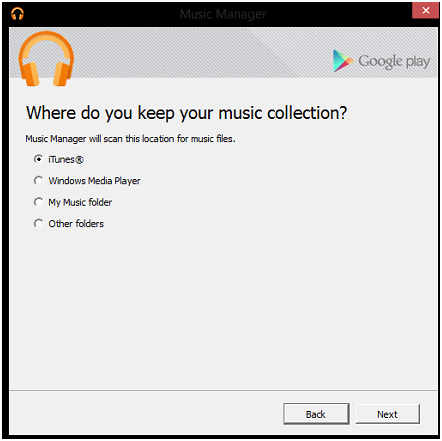
Step 7: And then, the Music Manager app will then sync your iTunes library automatically and will show you all of the songs available. So, you can simply choose all of the songs that you want to transfer or you can simply choose your entire library if you wish to do so.
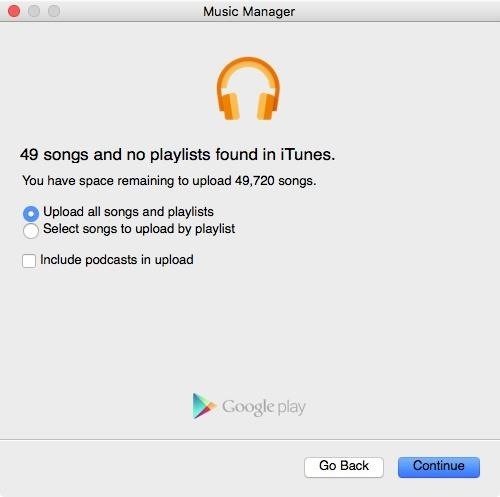
Step 8: And then, simply wait for the songs you have chosen earlier to be uploaded to your Google Music Manager.
Step 9: And once that you are done, you now simply download the Google Music tool from your Android device. Then you will have automatic access to those songs that you have recently transferred over.
There are instances wherein some users do not have access to a computer, that is why they will not be able to transfer music from iPhone to Android. That is why a lot of people are wondering if there is a way for them to transfer their music without the need of having access to a computer.
Worry no more because there are some applications that you can use in order to transfer music from iPhone to Android. And that is by using one application called SHAREit. And to know how you can do this to transfer music from iPhone to Android, here is a quick and easy guide that you can follow.
Step 1. Go ahead and install the SHAREit application on both your iPhone and your Android device.
Step 2.And then, open the application on both your iPhone and Android phones and then connect them to both Wi-Fi as well. It is because the SHAREit application works when both devices are connected to Wi-Fi.
Step 3.And then, from the iPhone device, go ahead and tap on the Send button. And then select all of the songs that you want to transfer.
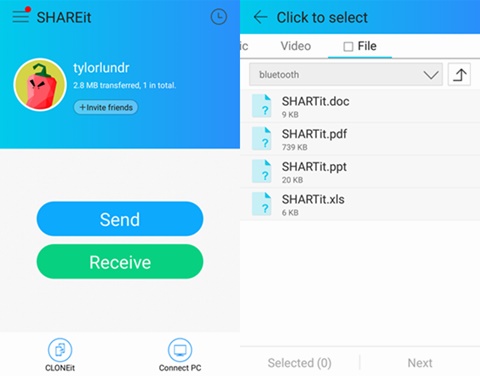
Step 4. Then on the other device, go ahead and tap on the Receive button to get the music that you are going to send from your iPhone device.
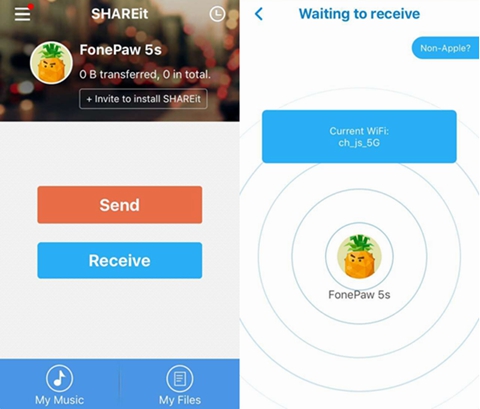
Step 5.Then on your iPhone, go ahead and initiate to send the music that you have chosen. And then receive it from your Android device. The process of transferring your music from your iPhone to your Android will then start so all you have to do is to wait for it to finish.
As you can see, there are so many ways on how to transfer music from iPhone to Android. Even though they are completely different and as well as the processes, there is always a way for you to have your data transferred over from your iPhone to your Android device. But if you want to make sure that you are going to do this in a safe, easy, and efficient way, then the FoneDog Phone Transfer should be your very first choice.
Leave a Comment
Comment

Tech Website Writing /Content Optimization
Singing, smiling, surprising every day!
So as a technical writer, it is my duty to gather effective and reliable solutions to answer questions on how to deal with the issues they are having with their devices.
Phone Transfer
Transfer data from iPhone, Android, iOS, and Computer to Anywhere without any loss with FoneDog Phone Transfer. Such as photo, messages, contacts, music, etc.
Free DownloadHot Articles
 /
/
INTERESTINGDULL
/
SIMPLEDIFFICULT
Thank you! Here' re your choices:
Excellent
Rating: 4.5 / 5 (based on 99 ratings)