FoneDog Screen Recorder
FoneDog Screen Recorder
Special Offer
Special Offer


By Vernon Roderick, Last updated: March 8, 2021
Music has always been part of the lives of many people. It is what inspires them and brings out the best of us, regardless of the kind of music.
Now, with the ever-growing technology, it became very crucial to understand how music works in our gadgets. And one of the things that you might be wondering about right now is how to transfer music to iPhone. Here is another example of the opposite, which is transferring music from iPhone to computer free, if you want to learn about it, you can click on it.
Now if you use your iPhone for music purposes, then this guide would be very helpful to you. With that said, let us start with the first method to transfer music to iPhone.
Part 1. Transfer Music to iPhone without iTunesPart 2. Transfer Music to iPhone with iTunes: PreparationsPart 3. Transfer Music to iPhone AutomaticallyPart 4. Transfer Music to iPhone ManuallyPart 5. Tips to Transfer Music to iPhone with iTunes
As we’ve said, there are different methods to transfer music to iPhone. However, we found that the quickest way to do it is through the use of specialized software. That is why we recommend FoneDog Phone Transfer.
To begin with, FoneDog Phone Transfer supports the transfer of different kinds of files including videos, photos, and most importantly, music. It also supports the latest versions of iOS up to iOS 17. And if that’s not enough, may we remind you that there is a built-in converter in the tool.
Now that you’ve come to understand how effective this tool is when trying to transfer music to iPhone, it’s time to know how you can actually use it.
Tip: You can use this tool to solve the above-mentioned problem of how to transfer photos from iPhone to pc.
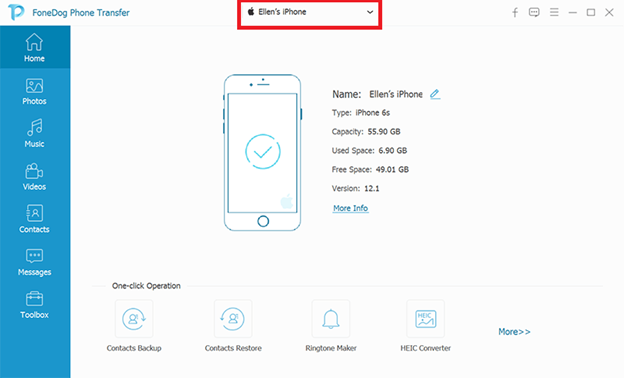
First of all, you have to ensure that there is a stable connection between the computer where the music will come from and the iPhone where you’ll be transferring it to. You can do this by connecting your iPhone to the computer with a USB cable. Once you’re done with this, you will see an interface with information about the iPhone in the FoneDog Phone Transfer window.
To the left of the window, you will see that there is a list of data types including Photos, Music, Videos, and more. Now just select the Music option and the tool will automatically scan for music files.
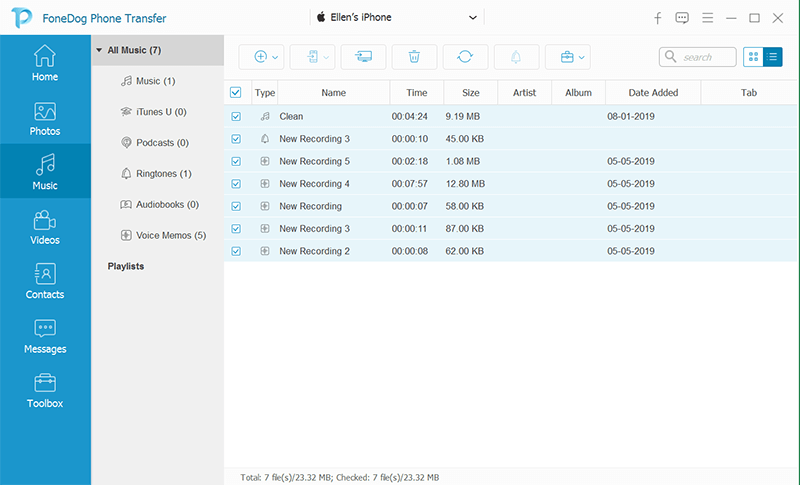
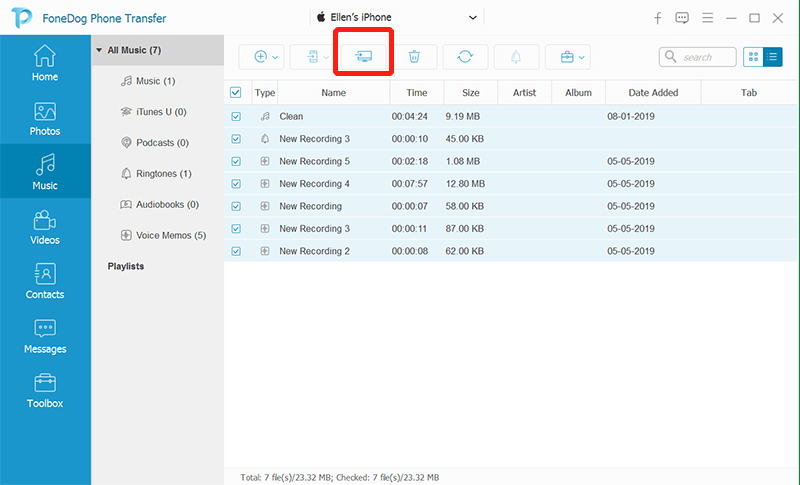
You will be taken to another interface with a selection of music files. Simply select the ones that you want to transfer by clicking on their respective checkboxes. Now once you’re done selecting, just click on the Export to PC button at the top to transfer music to iPhone.
That sums up everything you need to know in order to transfer music to iPhone using the said software. Of course, some people will be skeptical about using such a tool, so we have yet another method for you.
You may have heard of iTunes at least once. To summarize, iTunes is a built-in function available on Apple products. Thus, it can be used by iPhone users. However, it can also be installed in the Windows PC operating system instead of just on Mac.
While we can understand that you want to transfer music to iPhone as soon as possible, you will have to make sure you fulfill the conditions first. Here are the things you have to check:
Once you satisfy these conditions, you still have one more thing to do, and that would be to ensure that the two devices are interconnected. Here are the steps to do this:
Once you’ve done all of this, you are now prepared to transfer music to your iPhone using iTunes. There are generally two ways to do this, the manual and the automatic method. Let us start with the automatic method to transfer music to iPhone.
If you want the easier way out, then learning how to transfer music to iPhone automatically using iTunes would be your best choice. Here’s how you can do this:
That sums up all the things you need to know for the automatic process. Since it is automatic, it’s only natural that it would be this easy. The only downside to this is that it won’t be as accurate as when you do it manually.
Now if you prefer a more accurate way to transfer music to iPhone, then don’t expect it to be as easy as what we did before. This will be a harder and longer method.
On the other hand, it gives you more freedom and control over which music will be transferred and which won’t be included. Here’s how you can do it:
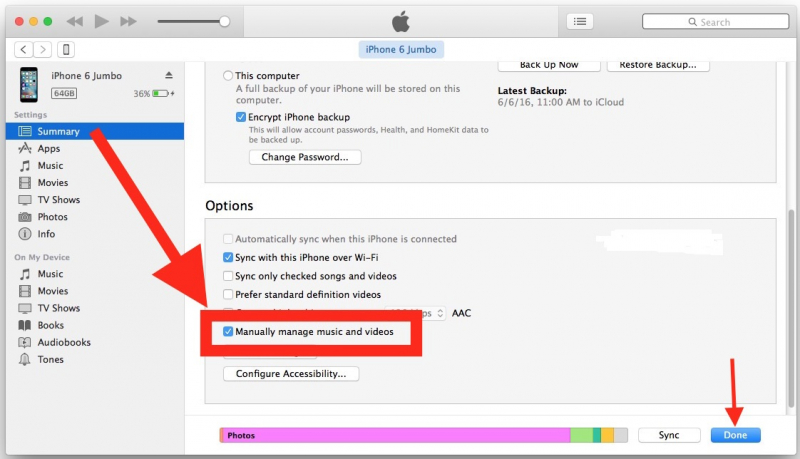
This would allow you to access the manual transfer method of iTunes. Otherwise, you won’t be able to manually transfer music to your iPhone. That’s only the beginning, now here’s how you can actually do the manual transfer:
No matter how hard it is to transfer music to iPhone, it is still worth a shot, considering how you’ll be able to pinpoint which music would be transferred and which of them will stay within the source device.
Now you might be thinking, you now have everything you need in order to transfer music to iPhone. Apparently, that is not the case for you as you still have something to discover.
For one, there are going to be issues occurring from time to time. What you have to do is to make sure those issues do not interfere with the transfer process. As luck would have it, it is fairly easy to solve such issues.
One of our tips for you is to reinstall your iTunes immediately if you ever encounter issues. This will allow you to clarify issues that might be causing some serious problems.
Another tip is to constantly check the storage of your iPhone or the device where iTunes is connected. This is so that you can ensure that you actually have sufficient storage to transfer music to your iPhone.
Lastly, if you can’t decide whether to use the automatic method or manual method to transfer music to iPhone, just remember that the automatic method was made to make things easier. On the other hand, the manual method was made for more accurate results.
People Also ReadHow to Transfer Music from iTunes to iPhoneHow to Transfer Music from Android to Android
Music is very crucial to many people. It is what keeps them going, but sometimes it can be very difficult to acquire music. However, it shouldn’t be that way when you’re just trying to transfer music to iPhone.
Fortunately, we have different methods to do that here in this article, and hopefully, it helped you with your ultimate goal of listening to music on your iPhone. In addition, you should also remember to keep backups of your music if it’s all that important to you.
Leave a Comment
Comment

Technical Expertise for PC/Website Optimization
One of my passion is to develop software of my own
I write articles to share knowledge about IT technology and some experience in developing my own software, and developing my own software is one of my passions for work.
Phone Transfer
Transfer data from iPhone, Android, iOS, and Computer to Anywhere without any loss with FoneDog Phone Transfer. Such as photo, messages, contacts, music, etc.
Free DownloadHot Articles
 /
/
INTERESTINGDULL
/
SIMPLEDIFFICULT
Thank you! Here' re your choices:
Excellent
Rating: 4.6 / 5 (based on 79 ratings)
