FoneDog Screen Recorder
FoneDog Screen Recorder
Special Offer
Special Offer


By Nathan E. Malpass, Last updated: April 12, 2019
I am a graphic designer and I work with multiple images and image formats every single day. One of the things I do involves working with large image files and editing them. One of the most used file formats is JPEG. Now, I want to learn more about how to optimize and compress JPEG especially for the web. Can you help me with it?
~Anonymous Graphic Designer
Part I: IntroductionPart II: Stop Yourself From Saving At A Hundred Percent (100%)Part III: Options For CompressionPart IV: A Variety Of Media Types For The WebPart V: Tool To Compress JPEG ImagesPart VI: Conclusion
Image compression is a very popular concept nowadays. It is used in almost every aspect of life as images have been a vital role in business, work, and even in our personal lives. Image compression can be done in different file formats such as GIF, JPEG, and PNG.
The difference between these image file formats is on how compression is done and displayed within the screen. There are a lot of guides that tell you how to publish great media within the Internet. However, a lot of designers still do not comprehend the fundamentals when it comes to images and media in general.
In this article, we will tell you and give you ideas when it comes to properly implement compression of JPEG files. You should be optimizing and compressing your images in order to speed up the loading times of your web pages while still maintaining a certain level of quality for your images.
The trick here is to find the balance between the size of the file and its depiction on screen. There is no actual solution that is perfect. It takes quite a little bit of practice to get used to. But once you know more about compression of JPEG files, development of websites will be easier in the long run.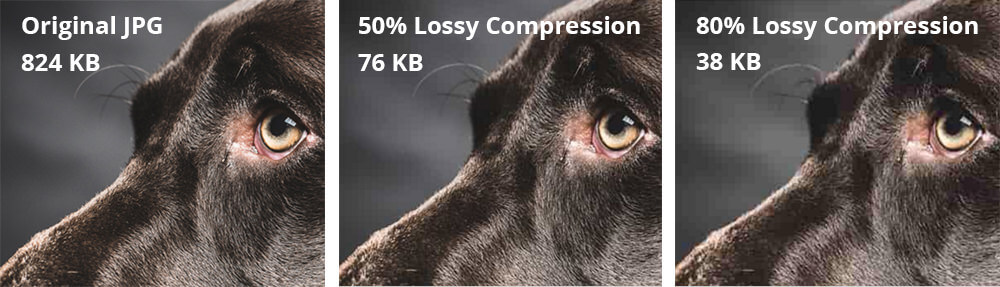
Avoid saving your JPEG images using a hundred percent (100%) quality. Of course, this won’t result in an image that is optimized. The higher the quality of the image, the larger the file size will be.
Check something out. If you try to save the image at 90% to 95% quality, you will notice that the file size will be reduced significantly. There are times when you have to save your images with a quality that is lower than 90%.
If you use Photoshop, you’re in luck. If you try to check out the dialog box “Save For Web,” you can see that Photoshop actually allows you to select from a number of different preset values. Possible values for JPEG can be seen below:
* Maximum Quality is at 100%.
* Very High Quality is at 80%.
* High Quality is at 60%.
* Medium Quality is at 30%.
* Finally, Low Quality is at 10%.
Adobe Photoshop even considers 60% as an image with high quality. For web developers, it is best to stick to approximately 50% towards 70%. This is a safe range you can vouch for when developing your websites.
So what is the actual value where you can actually state that an image quality is actually low? Well, the value that you actually use for optimization depends on the actual project or image you’re working on.
You have to take into consideration the different graphics types that will result in the largest file sizes. These images will need the most compression possible. We would suggest that anything below 30% would result in a low-quality image. Other designers and developers would only set their limit to 50% because they really do not want to compromise quality.
But what’s the best advice? Well, you actually have to try the best settings for you. Try a couple of optimization or compression levels and check out which ones look best in terms of quality and in relation to file size. You will be amazed to find out that a few tweaks here and there can help you optimize your JPEG files to its maximum compression rate without the need to compromise its look and feel. 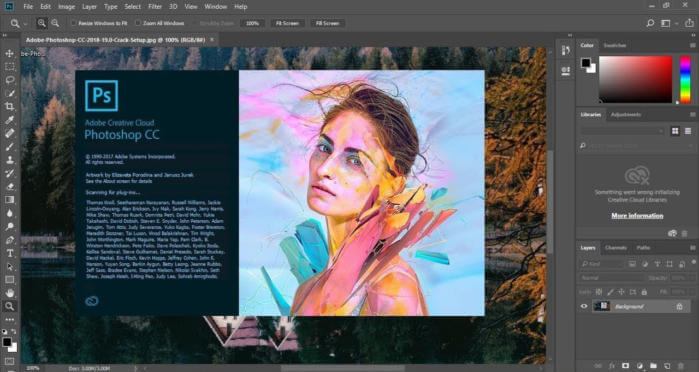
First, we would like you to know more about quality and compression. These two terms are actually inversely correlated with each other. This means that if you save a particular JPEG image at a 30% compression rate, you get a result of 70% quality. If an image is not compressed, it has a 100% quality.
These are actually options you can use that are one of the most basic. And actually, it should be more than enough when you save for the World Wide Web. Most users do not delve much deeper into a variety of customizations. Subsampling gets people into issues that are much more complicated where, for example, you are in the conversion process from that of RGB images to that of YCbCr (Chroma Red, Chroma Blue, and Luminance).
The brightness setting is called the luminance. During compression of JPEG images, luminance is always set within the value that is possibly the highest. The brightness value is placed within a separate channel. And because of this, individual values of color (e.g. Blue and Red) becomes easier to actually optimize. This is referred to as the process of chroma subsampling. Designers who are very meticulous would love to know more about this type of compression algorithm.
However, you might not know this but Adobe Photoshop usually doesn’t use subsampling as a method for compression. If you use Adobe Photoshop and chose to Save For Web, images saved using this feature would utilize chroma subsampling that is below a quality value of 50%.
The World Wide Web is very diverse. It is filled with a variety of image media. For example, you have the icons, badges, buttons, photographs, and other types of graphics files. But you might want to consider this: Comparing the quality of two different types of graphics (e.g. a button vs. a product image) is actually not that meaningful.
You might want to try out linking towards a separate JPEG file that is less compressed when utilizing detailed images or photographs. After which, setting up thumbnails that has a relatively higher compression ratio and much-reduced file size can be done within your site.
What’s the disadvantage of this? Well, it will be necessary for you to give two different sets of these images for your media gallery. You have to take every graphics file you have placed within your website into consideration. After which, you have to device which techniques for compression or optimization you have to implement for each file.
It is best for you to implement an organized system of files that allows you to easily search through the files. There is a webmaster who opts to host their images outside of their web hosts such as in Picasa or Flickr.
Even if this is the case, it might still be better for you to utilize a tool for compression in order to minimize the size of the images. However, the way you actually display these compressed images within your site will still vary. This is true nowadays due to the increasing use of mobile devices that helps people access the Internet from anywhere within the world.
The image compressor tool that we recommend for you to compress images is FoneDog’s Free Online Photo Compressor. The said tool has the following advantages:
* It allows you to compress image files (e.g. JPEG or PNG) which will result to a reduction in size without losing much of the image’s quality.
* It allows you to save more space on your device. Thus, you can use this space for other photos, videos, and important documents.
* It results in the image using less bandwidth especially if you want to use it inside a website. Thus, you can save a lot of bandwidth and accommodate more users especially if the web hosting package you availed has a limited amount of data transfer available.
* It results in faster loading times within devices and for web hosting service providers. Users of your website won’t be bored by slow loading times. Because your images take up less space, it will load faster and provide a better user experience.
Here’s how to use FoneDog’s Free Online Photo Compressor step-by-step:
Step 01 - Go to the Photo Compressor page in FoneDog’s website here.
Step 02 - Upload your image or images. You can upload a maximum of 20 images with about 5MB per image in maximum size.
Step 03 - After the photos are compressed, download the compressed image file within the said platform.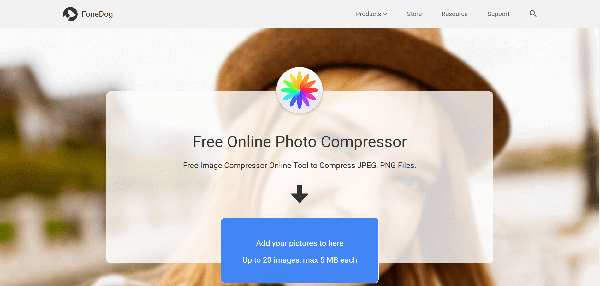
Compression of JPEG images can be tricky. This is because you need to balance out quality with that of substance. Even though people have fast Internet connection nowadays, reduction of image sizes is still necessary. This is because people are becoming more and more impatient.
There are a lot of JPEG compression or optimization tools out there. One tool you can use is FoneDog’s Free Online Photo Compressor. The said tool can help you reduce the size of your images without compromising much of its quality.
Leave a Comment
Comment

iPhone/Android Devices’ Maintenance Expert
Staying home, listening to music, writing tech articles
Many people asked me to repair their mobile phones so I have a lot of experience in mobile phone repair, and I know a lot about Android or Apple phones.
Free Online Photo Compressor
Hot Articles
 /
/
INTERESTINGDULL
/
SIMPLEDIFFICULT
Thank you! Here' re your choices:
Excellent
Rating: 4.6 / 5 (based on 70 ratings)
Free Online Photo Compressor
