FoneDog Screen Recorder
FoneDog Screen Recorder
Special Offer
Special Offer


By Vernon Roderick, Last updated: August 10, 2021
The Android operating system has been one of the most popular products for users nowadays. Sometimes, you have to wonder why that is so. In reality, the reasons are simple, there are just so many features available for the users as an Android user. One such feature is the Android Device Manager.
Many talk about how the camera is great, or how the processor performs well, but no one talks about the Android Device of Manager. This feature can be more important than you think, and that’s what we’ll be talking about. MMS messaging is also an important function in Android devices. Here is an article about it. You can also learn about it if you are interested. To start with, do you know what the Android Device of Manager is?
Part 1. What Is The Android Device Manager?Part 2. How To Set Up Your Android Device Manager?Part 3. How To Use Android Device Manager?
First, of foremost, the Android Device of Manager is a feature that is offered not directly by Android, but by Google. However, this feature, as the name suggests, focuses on helping Android users. By helping Android users, we mean it in many ways. Here are just some of the ways Android Device of Manager can help you in your daily life:
This is very helpful when you lost your phone inside your home and you’re just trying to look for it without putting in much effort.
In the case where you lost your phone outside of your home, you can always use the Google Map synchronized in the Android Device Manager.
There’s no shame in admitting that you forgot the passcode of your device, and that’s when Android Device of Manager comes in handy.
If you’re 100% sure your phone was stolen, you can protect your data by wiping it out completely away from the culprit's hand. Simply put, the Android Device of Manager was made to help you manage your device virtually. It is also known for being the first feature that users lean on when they lose their phones or when their situation belongs to one of the four that we discussed.
But as helpful as it may be, there’s a disadvantage to this as well. The first one is that it would require you to connect your Android device to the internet and sign in to your Google Account. By doing so, you’ll be able to access the Android Device of Manager. But that’s just the easy part. The hard part comes once you start setting up the Android Device of Manager on your phone.
The Android Device of Manager was originally available on the Google Play Store for free. However, considering the perks of such a feature, many manufacturers decided to include the feature immediately once a phone was bought. That’s why almost every Android device already has Android Device of Manager installed on the system. All you have to do is gain access to this by setting your account and verify that you’ve gained access to it. Here are the steps that you need to follow to do this:
First, you have to verify if you have the latest version for Android. To do so, go to your Setting, head to About Phone (About Tablet for tablet devices), then check if the Android version is up-to-date. There should be an automatic update option if it isn’t updated. Now if you’re done with this, then let’s proceed on how you can get Android Device of Manager.
While it may not be very common, sometimes there are Android devices with Android Device of Manager still unavailable. This can be because it was second-hand, or the manufacturer isn’t very eligible. Regardless, you can easily install the aforementioned app from Google Play Store.
It should go without saying that Android Device of Manager is not a built-in feature. Thus, it is crucial to first enable it. To do so, you have to head to your Settings. Here, select Security followed by Device Administrators.

There should be a list of items including Android Device of Manager. Sometimes it can appear as Find My Device. Make sure this option is checked or marked, and that’s it.
Once it is enabled, you should see the Android Device of Manager option on your homepage. Now launch the corresponding app and you’ll be taken to a login page. Login using your Google account.
If you are already syncing that account, it should automatically show up on your list of options on the Android Device of Manager login page.
Note: Make sure you have a stable internet connection when doing this.
Your final task is to complete the setup by granting all the permissions needed. First, you need to grant Location access, which is very important for Android Device Manager. Just go to Settings, then Location, then make sure it is turned on. The next permission is granted on the Device Administrators page, but you’ve already done that in Step 2.
With this, you are already set up for your Android Device of Manager. While it may not be a simple task, it’s also not that hard. But what if you already lost your phone and now you’re planning on looking for it with Android Device of Manager?
In that case, it might be better to learn how to set up Android Device of Manager on your computer. Here are the steps to do so:
At this point, there is no reason for you not to be able to use Android Device of Manager, and that takes us to our next topic.
Once you lost the Android device you love so much, it would be much easier to use the Android Device of Manager feature. As previously said, there are different functions available for this feature. There are steps that you need to take in order to use the different functions. Let’s start with the most basic function.
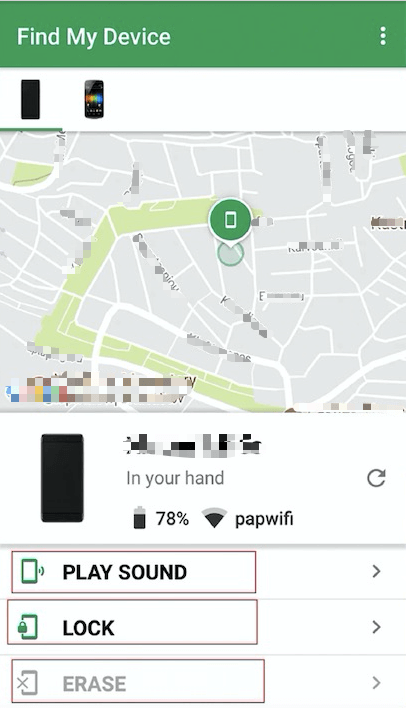
We’ve said this before, but pinpointing the location is very crucial when you just lost your phone and you can’t find it in your home.
That is the time when you will have to use the Google Maps associated with the Android Device Manager to pinpoint the location of your device.
Here’s how you can use this function:
The only downside to this is that the location shown in Google Maps covers a huge area. That is why it’s not great for finding phones if it’s on your home since it would only show that it is located in your area and not the exact location. For that situation, we use a different function.
Surely you have experienced losing your phone inside your home. While it can be relieving to know that it won’t be lost for good, it’s also frustrating knowing that it’s just within your household, but you are still not able to find it. One of the many things we do to fix this is calling our phone with another device to make it ring.
However, you’d be wasting your load balance if that’s the case. There are also cases where the phone is in silent mode so the phone won’t ring. To avoid wasting your load or ring the phone even in silent mode, we use this function of Android Device of Manager through these steps:
The Ring function isn’t that simple either. Simply put, it allows the user to ring the phone, but it ensures that the process would be really helpful. For that reason, the volume is automatically turned to full and it lasts for 5 minutes. While these are, without a doubt, useful functions, there are other more useful uses for the Android Device of Manager.
Among the options that you’ll see along with Ring, there’s also Lock and Erase. A lock is easier to explain, and thus we will discuss it first. The lock does exactly what you’d expect from it, it locks your device. All you have to do to access this is do the steps you did for Ring, except you’ll have to choose Lock this time. This function was made so that you can prevent someone from accessing the information within it.
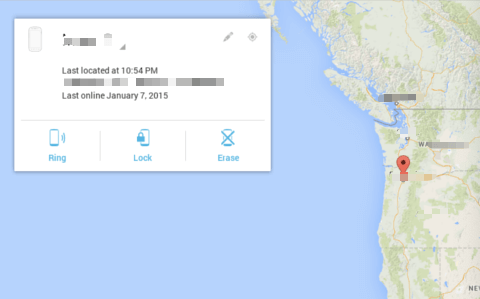
However, there are actually two functions of Lock. It was also made to help you bypass your Android lock screen in case you forgot what the passcode was. By selecting this function on the Android Device Manager, you can either simply lock the device, or set a new PIN or password. Once you select this, there should be a message on the device asking to set a new passcode. That’s how simple the Lock function is. Now we head to our last function.
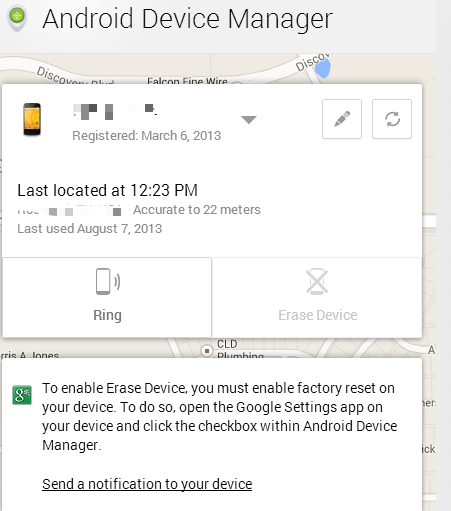
The Erase option on Android Device Manager is perhaps the most crucial function of all. As the name suggests, it erases the data from your phone. Accessing this function can also be done like how you did for locking or ringing the device, by selecting Erase from the list of options. This is most useful in cases where you lost your device and are worried about people finding all your personal data within the device.
There’s also the case where you just want to reset your phone to its factory settings. Regardless, once the Erase function is used, there should be a message popping up asking for confirmation. You can also set it up so it won’t ask for confirmation.
The best thing about this is that you can still use this even when the phone is turned off. However, the downside to all these four functions of Android Device of Manager is that you have to make sure it is connected to the internet. Either way, there’s no denying that these functions will prove to be useful in the future, and that concludes our discussion about Android Device Manager.
Tip: If you want to recover erased data, such as messages data, you can get the solution from the link article.
People Also ReadQuick Guide On How To Transfer Photos From iPhone To MacRoot Guide: How To Root Android Device With Kingo Root
We’ve always believed that third-party apps can’t do much for us in times of need. However, we believe that these apps are actually our biggest hope in such cases.
The Android Device Manager is the exact manifestation of this belief. Not only will it help you retrieve your phone, but it can also help with both minor and major problems.
You just have to make sure you have a source of internet connection and you’ll be able to access the full potential of the Android Device of Manager.
Leave a Comment
Comment

Technical Expertise for PC/Website Optimization
One of my passion is to develop software of my own
I write articles to share knowledge about IT technology and some experience in developing my own software, and developing my own software is one of my passions for work.
Android Toolkit
Recover deleted files from your Android phone and tablet.
Free Download Free DownloadHot Articles
 /
/
INTERESTINGDULL
/
SIMPLEDIFFICULT
Thank you! Here' re your choices:
Excellent
Rating: 0 / 5 (based on 0 ratings)
