FoneDog Screen Recorder
FoneDog Screen Recorder
Special Offer
Special Offer


By Nathan E. Malpass, Last updated: October 12, 2018
I have an Android smartphone that I use to take a lot of pictures and videos. I have an SD card within it to expand its memory. Most importantly, I save my documents and other files within my SD card so my apps can freely roam inside the internal storage. Now, I want to back up my Android device SD card. How do I do it?
~Anonymous Android Smartphone User
Here is a quick guide on how to backup SD card on Android with FoneDog Android Data Backup & Restore. Follow the easy steps below:
Quick Guide: How to Backup SD Card on AndroidPart I: Introduction: Why You Need to Backup Your Android Device’ SD CardPart II: Backup Your Android Device’ SD Card With FoneDog ToolPart III: Utilizing Android File Transfer To Backup SD Card Of Your Android DevicePart IV: Backing Up Your Android Device’ SD Card To Your Computer By Utilizing A USB CablePart V: Backing Up Android Data To That Of The SD Card Without Using Any ToolPart VI: Conclusion
People Also ReadSamsung SD Card Recovery Guide: Recover Data from Samsung SD CardHow to Recover Deleted Photos from Memory Card
You might wish to back up your SD card on your Android phone for a lot of reasons. We will list out some of these reasons here. These reasons might be enough for you to back up your Android device SD card.
First, you might wish to format your Android device (e.g. smartphone or tablet). However, you don’t want your files to be deleted and wish for them to be kept within your SD card.
Second, you might wish to root your Android device but you are worried that your files might be deleted after the process of rooting your Android smartphone or tablet.Third, you regularly back up the SD card of your Android device in order to make these data secure all the time.Finally, you might wish to upgrade the firmware of the Android device. This will lead to the removal of every data you have on your Android device. That’s why you might want to back up your SD card.
These are only four reasons that might lead you to back up your SD card on your Android device. There are a lot more out there. Whatever reason you might have, you’re lucky you’re in this guide. We will be telling you how to back up the SD card of your Android device through various methods. Let’s get started.
You can try out the tool made by FoneDog called Android Data Backup & Restore in order to back up the data on your SD card located within your Android device. The tool doesn’t necessarily back up data on SD card alone. It can back up your entire Android device as well and restore it when necessary.
Here are the advantages and the steps to use the tool in order to back up your SD card:
* You can select which data to backup and restore easily with a few simple clicks.
* It backs up both your applications and the data contained within it.
* You can preview the backup and its content.
* You can restore the backup selectively to any Android device.
* Supports over 8000 Android devices.
* It is 100% secure. Only you have access to your data.
* Data is always safe and will not be overwritten.
* You are given a 30-day free trial. With this means, you can experience the benefits of Android Data Backup & Restore without the need to pay out of your pocket.
* Android data is backed up in lossless quality.
Here’s how to use it step by step:
Step 01 - Downloads the FoneDog toolkit from their official website. It’s up to you if you want the free trial or if you want to purchase it immediately.
Step 02 - Launch the FoneDog toolkit on your computer device.
Step 03 - Ensure that no other backup tool is operating alongside with FoneDog.
Step 04 - Choose Android Data Backup & Restore.
Step 05 - Connect the Android device towards the computer device by utilizing the USB cable. Ensure that debugging mode is activated on your Android device. If you have a version of Android 4.0 and higher, a pop-up window will appear and confirm if you wish to accept USB Debugging Mode. Press OK.
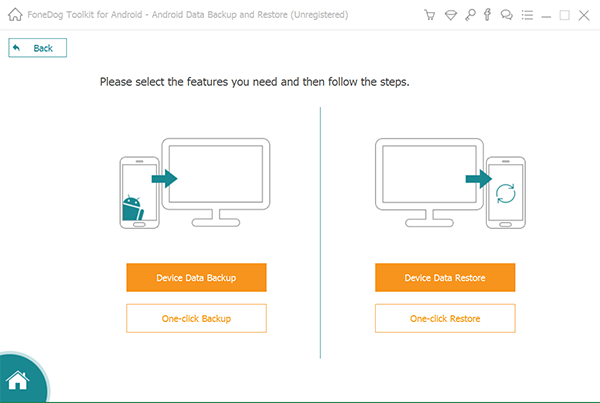
Step 06 - Now, FoneDog should have detected your phone. If this is the case, press the button labeled Device Data Backup. Usually, FoneDog is set by default to scan all types of files for you. However, you still have the option to select which type of data you wish to backup.
Step 07 - After you have chosen various data types, press Start. This will start the process of backing up your Android device. Do not disconnect the Android device. Do not use your device during the process or even transfer or delete data while it is happening.
Step 08 - Once the entire backup process is completed, click the button labeled OK. You will now be able to view the content of your backup file. Or, you can wish to restore it to another device.
Now, you have backed up your data using FoneDog’s Android Data Backup & Restore. Here’s how to restore it to another device.
Step 09 - Select Android Data Backup & Restore.
Step 10 - Select Device Data Restore.
Step 11 - FoneDog will display backup files. You can choose a specific backup file to restore.
Step 12 - Select the type of data you wish to restore. After which, choose the files you wish to restore.
Step 13 - Press Restore to start the process.
Step 14 - Confirm the process in order for it to start by pressing OK.
Step 15 - Wait for the process to finish. Do not disconnect your Android device or open any phone management tool for Android. Once it is finished, FoneDog will give you a notification of the completion of the process.

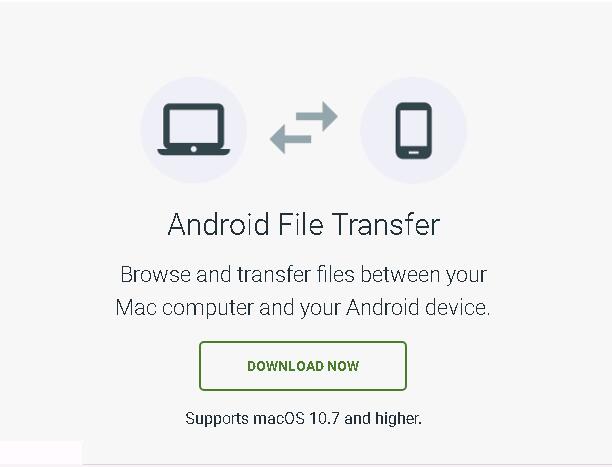
One software that allows you to easily access your Android device’ SD card is called Android File Transfer. Here’s how to use it step by step:
Step 01 - Download Android File Transfer on your Mac device.
Step 02 - Install the said software on your computer.
Step 03 - Run the said software within your Mac device.
Step 04 - Connect your Android device to that of your Mac.
Step 05 - Android File Transfer detects the Android device instantly. The said tool will launch the folder of the SD card automatically.
Step 06 - Back up the data (e.g. files and folders) you wish to that of your Mac device.
This is a free method of backing up your data on your SD card. It simply uses a USB cable for mounting your Android device and letting it act as an external hard disk drive. The usual steps to do it are included below. However, some variations might occur for different devices:
Step 01 - In order to create a back up of your SD card, find a USB cable and connect your computer device to that of your Android device using that cable.
Step 02 - Go to your computer. Find the Android device external hard drive. Open this folder.
Step 03 - Find the folder of the SD card. Open this one too.
Step 04 - Scan the said folders of your SD card. Find the corresponding photos, documents, music, videos, etc. Usually, these are saved in folders named like DCIM, Video, Music, Photos, etc.
Step 05 - Copy the said folders or their contents.
Step 06 - Paste them on a specific location of your computer.
Remember that if you wish to backup everything within your Android device SD card, you can simply copy all the folders and all the files of the SD card to that of your computer. However, once you restore them or copy them back to your SD card next time, some files may be UNABLE to use. These include folders like that of App folders.
The advantages of this method are a lot. First of all,it is easy to implement. Plus, you can backup media files such as photos, videos, and music. You can also backup contacts and documents using this method. Plus, it is free of charge.
The disadvantage of this method is that it does not allow you to back up your apps and the application data as well. Plus, it can only be done on Windows PCs.
You can easily put your music files, video files, and image files to that of your SD card on Android. Sometimes, these can be saved directly to the SD card as well. However, your contact (address book) and SMS are not placed within your SD card.
For reasons such as safety and security of data, you might wish to back up some of these data towards your SD card. When you are able to do this, you are also able to save these types of data to that of your computer like the one stated in Part IV of this guide.
Fortunately, we have found a way to back up your contacts (Address Book) to that of the SD card. However, with text messages (SMS), applications, and application data, you would need the help of third-party tools.
Below are the steps you can follow in order to back up your contacts on your Android device to that of the SD card.
Step 01 - On your Android device, press the application Contacts.
Step 02 - Press the tab of Contact in order to display the list of contacts within your Android device (e.g. smartphone or tablet).
Step 03 - Go to the left side of the menu button. After which, press the virtual button.
Step 04 - Press Import/ Export.
Step 05 - Select Expert To USB Storage (this refers to the internal memory SD card) or select Export to SD card (this is the external memory SD card).
Step 06 - Finally, wait for the process to be complete. Every contact you have will be saved. This will be as a .vcf file. It will be located on your SD card.
There are multiple methods you can implement in order to back up your data to that of your SD card. Whatever your reason might be for doing this, it is always a great way to keep your data secure. You can do it with a USB cable, a third party tool, or other means. One great tool you can use to back up your data to that of the SD card is FoneDog’s Android Data Backup & Restore tool.
This tool is not limited to backing up your data to that of the SD card. It can back it up to your computer as well. Plus, it can back up different data types including messages, contacts, videos, photos, calendar, etc. You can have a free trial of the tool as well. This will help you experience the tool first before purchasing it.
Leave a Comment
Comment

iPhone/Android Devices’ Maintenance Expert
Staying home, listening to music, writing tech articles
Many people asked me to repair their mobile phones so I have a lot of experience in mobile phone repair, and I know a lot about Android or Apple phones.
Android Data Backup & Restore
Back up your Android data and selectively restore to Android
Free Download Free DownloadHot Articles
 /
/
INTERESTINGDULL
/
SIMPLEDIFFICULT
Thank you! Here' re your choices:
Excellent
Rating: 4.4 / 5 (based on 98 ratings)
