FoneDog Screen Recorder
FoneDog Screen Recorder
Special Offer
Special Offer


By Nathan E. Malpass, Last updated: January 23, 2024
In the ever-evolving landscape of Android devices, managing deleted files is a topic that often perplexes users. The question that frequently arises is whether there is a universal solution for an Android Recycle Bin that seamlessly accommodates the diverse range of Android platforms. As we navigate the digital realm, the need for a consistent and reliable method to recover deleted files becomes increasingly vital.
In this article, we embark on a journey to demystify the concept of Recycle Bin. We will explore the existing solutions, shed light on the challenges users face in managing deleted files across various Android devices, and ultimately answer the burning question: Is there a universal Recycle Bin? Join us as we unravel the complexities of file management in the Android ecosystem and seek clarity on the existence of a one-size-fits-all solution.
Part #1: What Is An Android Recycle Bin?Part #2: Which Apps on Android Have Recently Deleted Or Recycle Bin Folders?Part #3: How to Recover Deleted Files If There’s No Universal Android Recycle Bin?Part #4: No Android Recycle Bin? You Can Use FoneDog Android Data Recovery to Retrieve Lost Files
The Android operating system, known for its flexibility and diverse ecosystem, lacks a system-wide Recycle Bin akin to that found in desktop environments like Windows. Unlike desktop platforms where deleted files often find refuge in a dedicated Recycle Bin before permanent removal, Android typically bypasses this step, immediately freeing up storage space.
So, what happens when you delete a file on your Android device? Instead of being sent to a Recycle Bin, the file is promptly marked as "deleted" and its space is considered available for new data. The Android system employs a Trim operation, which optimizes storage by releasing space occupied by deleted files. While this approach aids in efficient storage management, it can pose challenges when users wish to recover accidentally deleted items.
However, the absence of a universal Recycle Bin doesn't mean all hope is lost for recovering deleted files on Android. Some Android devices and third-party applications offer solutions that mimic the functionality of a Recycle Bin.
In the next sections, we will explore these alternatives, shedding light on how users can navigate the absence of a system-wide Recycle Bin on their Android devices. Stay tuned as we uncover the diverse methods and tools available for managing deleted files and exploring the possibility of a universal Android Recycle Bin.
While Android doesn't come with a native Recycle Bin, some third-party apps fill this void by providing features that mimic the functionality of a Recycle Bin or Recently Deleted folder. These applications are designed to help users find those deleted photos on their Android phones. Let's explore some popular apps that offer this functionality:
While these apps offer solutions for managing deleted files on Android, it's important to note that their effectiveness may vary. Additionally, not all Android devices may have the same built-in features or compatibility with these apps. In the next section, we'll delve deeper into the challenges and considerations associated with finding a universal Android Recycle Bin solution.
When it comes to recovering deleted files on Android in the absence of a universal Recycle Bin, Google Drive emerges as a powerful tool. Google Drive not only serves as an Android Google Cloud storage solution but also provides a safety net for your files. Follow these steps to recover deleted files using Google Drive:
Many Android device manufacturers provide their own cloud platforms, offering users a way to back up and recover data seamlessly without an Android Recycle Bin. Samsung, for instance, has its Samsung Cloud service. If your device manufacturer provides a similar service, follow these steps to recover deleted files using the manufacturer's cloud platform:
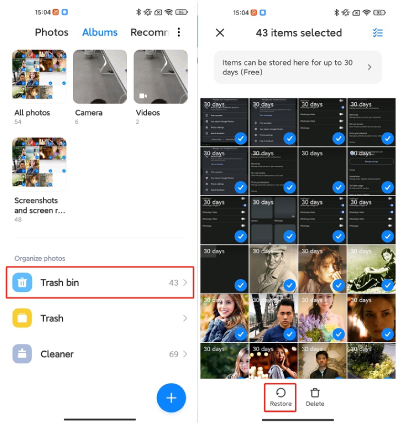
For photos and videos, especially on devices with a native gallery app, there's often a "Recently Deleted" or similar album where deleted media files are temporarily stored before permanent removal. Follow these steps to recover deleted photos and videos using the "Recently Deleted" album:
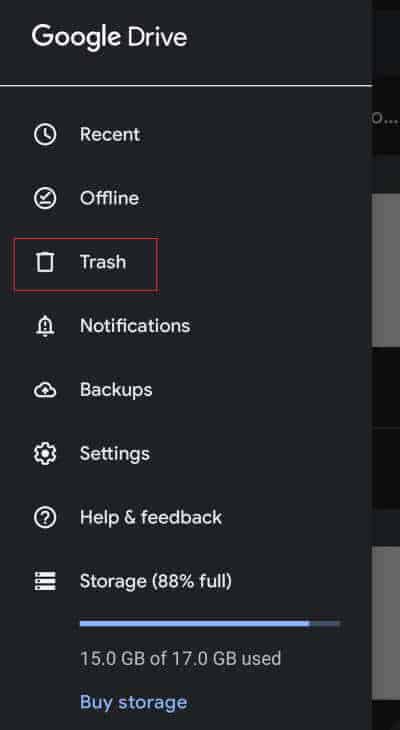
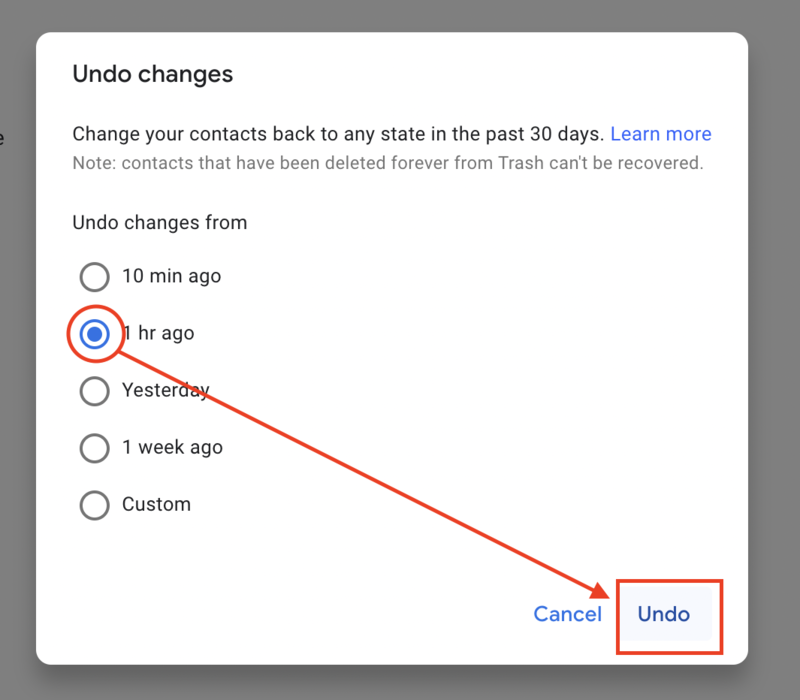
Losing important contact information can be a significant concern, but if you've been using Google Contacts to manage your address book, there's a good chance you can recover deleted contacts without an Android Recycle Bin. Follow these steps to restore deleted contact information using Google Contacts:
If you've accidentally deleted text messages or conversations on your Android device, there's a chance you can recover them using the archive feature in the Messages app. Follow these steps to retrieve deleted messages using the archive function:
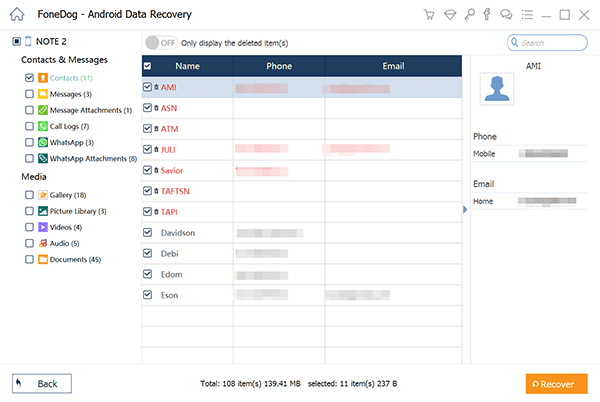
In the absence of a universal Android Recycle Bin, FoneDog Android Data Recovery emerges as a robust solution to recover lost files on your Android device. Whether it's photos, videos, documents, or contacts, this third-party tool provides a comprehensive approach to data recovery. Let's delve into the steps to effectively retrieve lost files using FoneDog Android Data Recovery.
Android Data Recovery
Recover deleted messages, photos, contacts, videos, WhatsApp and so on.
Quickly Find Lost and deleted data on Android with or without root.
Compatible with 6000+ Android devices.
Free Download
Free Download

Steps:
Download and Install FoneDog Android Data Recovery:Begin by downloading and installing FoneDog Android Data Recovery on your computer. Ensure that you choose the appropriate version for your operating system (Windows or Mac).
Connect Your Android Device:
Use a USB cable to connect your Android device to the computer. Make sure USB debugging is enabled on your device. If not, follow the on-screen instructions to enable it.
Select File Types and Scanning Mode:
Launch the FoneDog Android Data Recovery software. Select the types of files you want to recover (e.g., photos, videos, contacts) and choose the appropriate scanning mode – "Standard Mode" for regular scanning or "Advanced Mode" for deeper analysis.
Follow the on-screen prompts on your Android device to grant the necessary permissions for the software to access and scan your device.
Initiate the Scanning Process:
Click on the "Next" button to start the scanning process. The software will analyze your device for lost or deleted files.
Preview and Select Files for Recovery:
Once the scanning is complete, preview the recoverable files. Select the items you want to recover and click on the "Recover" button.
Choose Recovery Location:
Specify a location on your computer to save the recovered files. Avoid saving them to the same location from where they were lost to prevent overwriting.
Complete the Recovery Process:
FoneDog Android Data Recovery will complete the recovery process, and you'll receive a confirmation when it's done. Access the designated recovery location to view your retrieved files.
In the absence of a universal Android Recycle Bin, FoneDog Android Data Recovery serves as a reliable alternative for recovering lost files. Its user-friendly interface, coupled with powerful scanning capabilities, makes it a go-to solution for users seeking an efficient and comprehensive data recovery process.
By following the outlined steps, you can regain access to crucial files and documents on your Android device, ensuring a hassle-free experience even in the absence of a native Recycle Bin.
Remember to act promptly when you realize data loss to increase the chances of successful recovery. As a precaution, regularly back up your Android device to prevent the permanent loss of important files.
People Also ReadHow to Export Text Messages From Android To PDFBest File Recovery Software for Android in 2024
Leave a Comment
Comment

iPhone/Android Devices’ Maintenance Expert
Staying home, listening to music, writing tech articles
Many people asked me to repair their mobile phones so I have a lot of experience in mobile phone repair, and I know a lot about Android or Apple phones.
Android Data Recovery
Recover deleted files from Android phone or tablets.
Free Download Free DownloadHot Articles
 /
/
INTERESTINGDULL
/
SIMPLEDIFFICULT
Thank you! Here' re your choices:
Excellent
Rating: 4.5 / 5 (based on 109 ratings)
