FoneDog Screen Recorder
FoneDog Screen Recorder
Special Offer
Special Offer


By Nathan E. Malpass, Last updated: November 3, 2018
I use Chrome for surfing every single day. I love this browser. I think its the best of all the browsers out there. It’s not that others are not that good. It’s just my preference. Now, I want to know how to save my bookmarks by backing them up. Plus, how do I manage these bookmarks?
~Google Chrome User
Part I: IntroductionPart II: How To Add Bookmarks Within Google ChromePart III: Clearing Up Bookmarks Within Google ChromePart IV: Exporting Bookmarks From Google ChromePart V: Importing Bookmarks To Google Chrome (Windows Or Mac)Part VI: Best Applications To Help You Back Up Your Bookmarks Within Your Android PhonePart VII: Bonus Tip: How To Speed Up Your Access To Your BookmarksPart VIII: Conclusion
People Also ReadHow to Export or Sync Chrome BookmarksHow to Export Google Chrome Bookmarks to Safari
Every single person out there accesses different sites for information and for recreational purposes. The best thing about our technology today is the fact that you don’t have to remember and enter the same URL every single time you want to open it.
Bookmarks allow you to save and store your desired URL within your web browser and be able to access them whenever you need to.
It makes your surfing experience easier, faster, and seriously manageable. Even if it is a complex URL that has a lot of punctuation marks, slashes, and numbers, bookmarks will remember the URL for you.
A lot of people don’t actually take advantage of bookmarks. However, they are missing out a lot when it comes to this feature. In this article, we’ll tell you a whole lot about bookmarks.
We will tell you how to add and delete bookmarks. We’ll include how to back up or export bookmarks and how to import them as well. We’ll also tell you some tools you can use to back up bookmarks.
Finally, we’ll end with a bonus to help you make your bookmarking journey more manageable.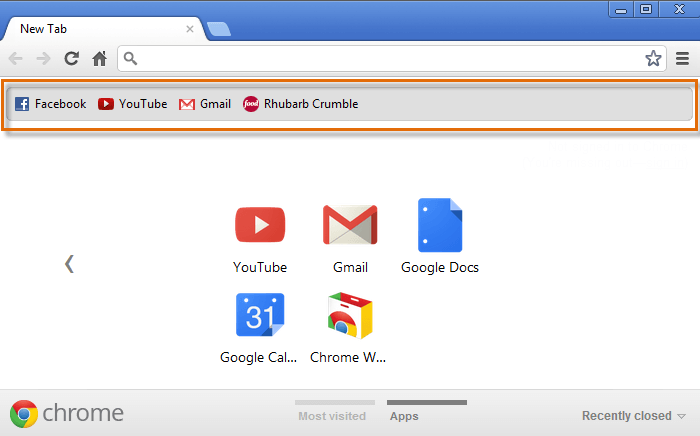
There are multiple methods you can implement in order to bookmark web pages within Chrome. Let’s get started with the first one below:
Method 1: Pressing The Star Icon Within The Address Bar
Open the URL you would like to bookmark. Press the start icon located to the right of the address bar of Chrome. A window will appear giving you the option to input your desired name for the bookmark.
Plus, you can select which specific folder you would like the URL to be put into storage.
Usually, the default folders are the Bookmarks bar. In this folder, your URL is stored by default. Plus, Google Chrome usually puts into memory the folder that was last used to save bookmarks.
If you wish to organize the folder for bookmarks, first select the specific folder by utilizing the drop-down menu. Press on the option called New Folder in order to make a new folder where your bookmarks will be stored.
It is best to place a name for your bookmark for you to remember it easily. After which, press on the button Done or Save in order to finish adding your URL bookmark within Google Chrome.
Method 2: Utilizing Bookmarks Bar
Step 01 - Launch Google Chrome.
Step 02 - Press Control + Shift + B (For Windows PCs). Or, Press CMD + Shift + B (For Mac Devices). Pressing these keys will launch the bookmarks bar.
Step 03 - Right-click the said bookmarks bar.
Step 04 - Press Add Page. This is located within the context menu.
Step 05 - A dialog box will appear. Place your desired bookmark name.
Step 06 - Select the folder where you want the bookmark to be saved.
Step 07 - Press Save button in order to complete the process.
Method 3: Dragging And Dropping
Go to the URL you want to bookmark within Google Chrome. Select the address of the site. Drag it and then drop it towards the bookmarks bar.
If you wish to save a specific bookmark in a particular folder, dragging the URL and hovering it over the folder is what you should do. Wait until the said folder expands. After which, drop the said URL within it.
You should take note that dragging and dropping any URL or site address within a page towards the bookmarks bar is possible. This is allowed. It can be done through this method and not through the address bar only.
Have you used bookmarks for years? Then, you’ve probably accumulated thousands of these bookmarks and you need to clean up your browser for a more organized bookmarks folder.
Sometimes you simply want to delete a bookmark because a specific URL is not working anymore or you don’t need it anymore. Well, you can follow the methods below to be able to delete bookmarks within Google Chrome.
Method 1: Clicking The Blue Star
Have you bookmarked a specific page within Chrome? Then simply visit that site. You will notice that the star located to the right of the address bar is colored blue.
What you have to do is to open a specific bookmark from the bookmarks list. Press the blue star. After which, a dialog box will be displayed. Press the button Remove.
Method 2: Utilizing the Bookmarks Manager
Step 01 - Launch Google Chrome.
Step 02 - Press Control + Shift + B (For Windows PCs). Or, Press CMD + Shift + B (For Mac Devices). Pressing these keys will launch the bookmarks bar. Or, you can launch it through Settings. And then going through Bookmarks. Finally, press Bookmark Manager.
Step 03 - Select the specific bookmark you wish to remove.
Step 04 - Press the delete key located on your keyboard. Or, you can right-click on the said bookmark. After which, press Delete option.
This section of this article will tell you how to download your bookmarks from Google Chrome. It will be saved as a file on a Mac computer or a Windows PC.
Once you have exported the bookmarks into a file, you can simply upload it on Firefox (or any other browser) in order to open the bookmarks within that other browser.
However, you have to know that exporting bookmarks within Chrome cannot be done within the mobile application of this browser.
Step 01 - Launch Google Chrome within your Mac computer or Windows PC.
Step 02 - Click the three horizontal lines within the window’s top-right side. This will open a drop-down menu.
Step 03 - Choose Bookmarks. This is located within the top part of the drop-down menu. When you press it, a menu that pops out will appear.
Step 04 - Press Bookmark Manager. This is located within the window that pops out. This will launch the Bookmarks Manager within a new tab.
Step 05 - Launch the menu called Bookmarks. Simply click the icon that looks like three short horizontal lines. You can find it by first looking at the blue banner located at the Bookmarks window’s top part. After which, the three horizontal lines are located within the right side of the previously stated blue banner. After pressing this, a specific drop-down menu is displayed.Take note that doesn’t click the three horizontal lines that’s located on the right side of a specific bookmark. Don’t click the three horizontal lines located in the grey section of Chrome’s upper right part as well.Clicking the wrong icon will not give you the right options.
Step 06 - Press Export Bookmarks. It’s located within the drop-down menu. With Windows PCs, it will launch a File Explorer. With Mac devices, it will launch a Finder Window.
Step 07- Input a specific name for the bookmark file you are about to save.
Step 08 - Select a location where you want it to be saved.
Step 09 - Press Save. This is located in the window’s bottom right part.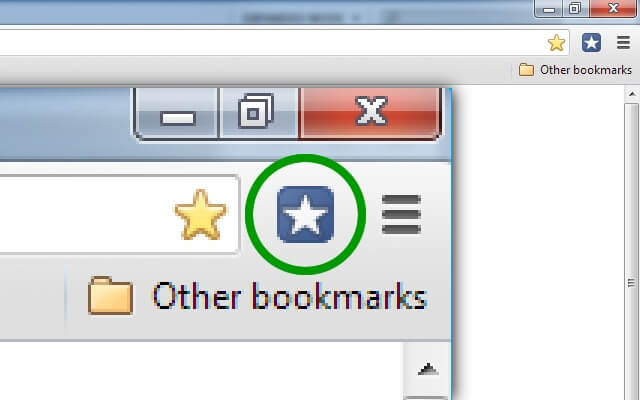
Step 01 - Launch Chrome.
Step 02 - Click the three horizontal lines located within the top-right part of the screen. This will display a drop-down menu.
Step 03 - Go to Bookmarks. A pop-up submenu will appear.
Step 04 - Press Import Bookmarks and Settings. This is located at the top part of the submenu Bookmarks. It will launch the window that will allow you to import bookmarks within a new tab.
Step 05 - Select the file you wish to import. You can also select a browser you wish to import bookmarks from. You can actually import bookmarks from another web browser that is inside your computer device.
Or, you can also select Bookmarks HTML File and select a specific HTML file from your device that has all the listed bookmarks you wish to import.
Step 06 - Check the box labeled Favorites/ Bookmarks. The said option allows you to import every bookmarked and favorited website.
Step 07 - Press Import.
Step 08 - Press Done. This button is colored blue and is located within the corner at the bottom right. The pop-up window will now be closed after pressing this button.
Google Chrome doesn’t allow you to export bookmarks within its mobile application. However, there’s one great thing called technology. Apps have been developed to help you back up your bookmarks on your Android phone easily.
Let’s take a look at 3 applications that will help you back up your bookmarks from within your Android device (e.g. smartphone or tablet).
After which, we will be looking at 3 apps to help you back up your browser’s bookmarks to that of cloud storage or your PC.
Three (3) Apps To Help You Back Up Your Bookmarks On An Android Device
App 01: Bookmark Sort & Backup
This is a small Android application that allows for backing up of bookmarks within your Android device and restoring them whenever necessary.
Plus, it enables you to sort bookmarks so you do not have to fret over having too many bookmarks that are messed up. You will easily find what you want with its sorting feature.
Also, you can position any bookmark you wish up and also down. Options are available and you long press a bookmark. If you utilize bookmarks of Google Chrome on a specific device that runs on Android versions 3 or 4, this app can be of real use.
App 02: Maxthon Add-on: Bookmark Backup
This is also a little nice Android app for bookmarks. Using this tool can help you back up every bookmark you have to that of your memory (SD) card. Plus, it can be used to import bookmarks located within other browsers of Android such as Skyfire. The disadvantage of Maxthon is that it cannot be utilized as one of a single application.
App 03: Bookmarks Manager
This tool is very useful to help you back up your bookmarks on your Android browser to that of the memory or SD card. You can also use it to restore the bookmarks that have been saved from that of the memory card.
Do you have thousands of bookmarks? Then, you don’t have to worry about organization. You can utilize this application in order to sort the bookmarks by the date it was created or by alphabetical order.
You can do this either manually or automatically. Bookmarks that are stock locked can also be deleted through this app. The only disadvantage to this application is that it can only be utilized for Android versions 2.1 to that of 2.3.7.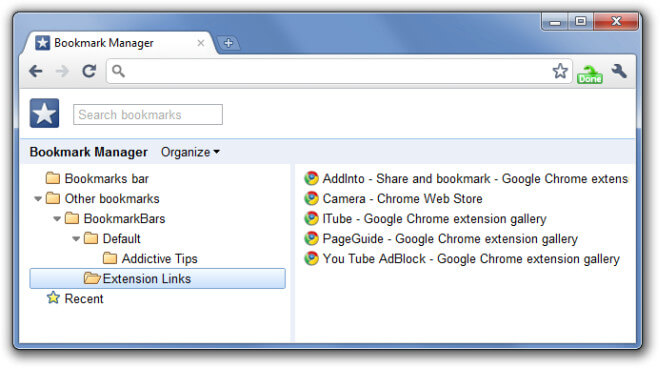
Methods To Help You Back Up Your Bookmarks To PC Or Cloud Storage
Besides having your bookmarks within your Android phone or your memory card, you might want to include your bookmarks to your PC or to cloud storage.
In this way, you can easily restore them if you want to. Let’s take a look at 3 methods you can implement to sync your bookmarks within your browser.
Syncing With Google Chrome
Do you have Google Chrome on both your Android device and computers? Then, you can actually back up your bookmarks from your Android device to that of your computer.
Your browser bookmarks can be backed up using your very own account with Google.
Here are the steps to help you set up the sync feature in your Chrome browser:
Step 01 - Launch Chrome.
Step 02 - Press menu option of Chrome.
Step 03 - Choose Sign In To Chrome.
Step 04 - Launch Settings.
Step 05 - Press Advanced Sync Settings after you sign in. You have control over the data you wish to sync. You can sync history, apps, autofill information, ID password, themes, settings, and bookmarks.
You can also do the following:
Step 06 - Press the Chrome menu located on the corner (upper right).
Step 07 - Select Bookmarks.
Step 08 - Press Bookmark Manager.
Step 09 - Press Organize.
Step 10 - Click Export Bookmarks to HTML file.
Step 11 - Save the bookmarks as that of a file in HTML format.
Step 12 - Go to another browser and import the bookmarks there.
Firefox Sync
If you have, again, Firefox on both your Android device and your PC, you can utilize Firefox Sync in order for your bookmarks to be backed up to that of your PC’s Firefox. Firefox sync can be utilized within Firefox in order to sync browser data.
To utilize it, you have to go to the Firefox browser and choose the icon called Sync. Use the options found there. With Firefox Sync, a lot of data can be synchronized including bookmarks, open tabs, history worth 60 days, IDs, and passwords.
Firefox Sync also allows you to create bookmarks and edit them, export your bookmarks to that of a file, and import bookmarks from that of your browser in Android.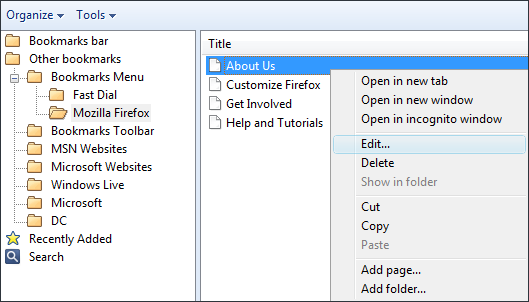
The purpose of bookmarks is defeated if it takes a long time before you can access them. Here are the steps you should follow in order to access your bookmarks faster:
Step 01 - Press the three dots at the top corner to the right.
Step 02 - Go to the Bookmark option.
Step 03 - Activate Show Bookmarks bar.
Now, your bookmarks bar will appear just below the address bar so you can quickly access it. There’s one problem though. Not all bookmarks will be shown because of space limitations. You can expand it by clicking the arrow button.
It is suggested that you classify your bookmarks into categorized folders to access them quicker.
You can simply right click any part of the bookmarks bar and select the option Add Folder. Simply input the name you want for the folder and press the button Add.
You will be able to see that the said new folder would be positioned in the last part of the section of bookmarks. After which, you can simply add or you can move the bookmark URLs you wish to put inside the new folder.
You can simply make a lot of folders on the bookmarks bar. You can also add bookmarks that can be quickly accessible.
Bookmarks are a great way to access URLs you wish to visit instantly. It is a great way to save a lot of URLs so that you don’t have to memorize them one by one.
You can manage your bookmarks by adding new URLs, deleting them, and putting them into folders. Plus, you can also speed up access to the bookmarks by making your bookmarks bar appear in Google Chrome.
Leave a Comment
Comment

iPhone/Android Devices’ Maintenance Expert
Staying home, listening to music, writing tech articles
Many people asked me to repair their mobile phones so I have a lot of experience in mobile phone repair, and I know a lot about Android or Apple phones.
Android Toolkit
Recover deleted files from your Android phone and tablet.
Free Download Free DownloadHot Articles
 /
/
INTERESTINGDULL
/
SIMPLEDIFFICULT
Thank you! Here' re your choices:
Excellent
Rating: 4.5 / 5 (based on 87 ratings)
