FoneDog Screen Recorder
FoneDog Screen Recorder
Special Offer
Special Offer


By Adela D. Louie, Last updated: March 25, 2019
Google’s Contact Manager can actually allow you to delete 250 contacts only at a time. This is because it is the maximum number of contacts that you are allowed to choose. There are also tendencies that you may have some duplicate contacts saved on your Google Contacts and this could be irritating.
And thus, you might end up sending a message to a person’s old or inactive number. But do not worry, because here, we are going to show you how to delete Google contacts in the most convenient way.
Part 1: Deleting Google Contacts Using A ComputerPart 2: Delete Google Contacts Using Your Android DevicePart 3: Recovering Deleted Contacts – FoneDog ToolkitVideo Guide: How to Recover Lost Contacts from Android?Part 4: Conclusion
It is known that the best way for you to manage your Google Contacts is by doing this on the web interface. So if you want to delete your Google Contacts, go ahead and follow the simple steps below.
Step 1: On your computer, go ahead and open your web browser.
Step 2: And then, enter https://contacts.google.com.
Step 3: After that, sign in using your Gmail account.
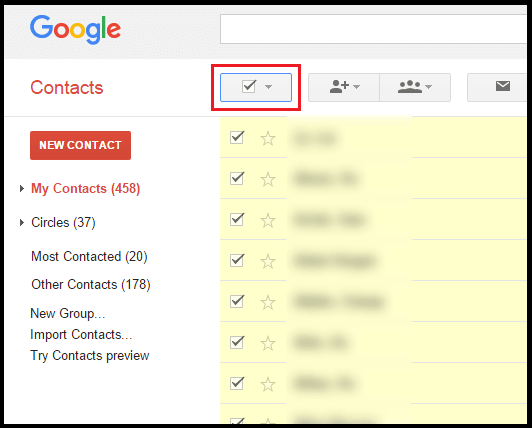
Step 4: Once that you are signed in, you will be able to see a list of contacts that will appear on your screen.
Step 5: Then, go ahead and choose all the contacts that you would want to remove from your Google contacts. You can do this by putting a check mark on the box beside each contact.
Step 6: Click on the “More” option or the three-dot icon.
Step 7: After that, go ahead and click on the “Delete contacts” for earlier or the “Delete” button if you are using the newer version.
Step 8: And then, go ahead and click on the “Delete” button for you to confirm the action. This way, you will now delete all the contacts that you have selected earlier.
Aside from using the web for you to delete your Google contacts, you can also make use of your Android device to do the same thing. All you have to do is to follow the simple guide below.
Step 1: Go ahead and launch the Google Contacts application on your Android device. If you do not have this application on your Android device, then go ahead and download Google Contacts application from the Google Play Store.
Step 2: And then, go ahead and tap on the contact that you want to delete from your Google Contact app.
Step 3: After choosing the contacts you want to delete, go ahead and tap on the three-dot icon located at the top of your screen.
Step 4: Then go ahead and simply tap on the “Delete” button for you to confirm this action. Note that once that you have deleted a contact from your Google Contact app, then you still have 30-days for you to recover them.
Now, there are some instances that doing this process may result in accidentally deleting a certain contact from your Android device that you do not really want to remove. This could be frustrating especially if that is one of the most important contacts that you have stored on your Android device. Pretty much sure that you would be feeling hopeless when you are in this kind of situation.
Luckily, we have a way for you to recover those accidentally deleted contact from your Android device. You can surely use this amazing tool for you to recover any contacts that were deleted on your Android device the easiest and the safest way possible. And this is by using the FoneDog Toolkit – Andriod Data Recovery.
The FoneDog Toolkit – Android Data Recovery is a tool that is 100% secure and will surely give you the highest success rate when it comes to recovering your deleted contacts. Not just only contacts, but it can also help you in recovering your deleted messages, photos, call logs, WhatsApp, videos, and a lot more.
Aside from that, you can also quickly find any lost or deleted data on your Android device even if it is not rooted. The FoneDog Toolkit – Android Data Recovery tool is known to be compatible with over 6,000 Android devices which include the new ones that came out of the market such as the Samsung Galaxy S9, Galaxy S9 Plus, Samsung Galaxy S8 and Note 8.
FoneDog Toolkit is known to be one of the most effective ways for you to recover any deleted data from your Android device. And the good news is that you can actually have to program downloaded for free as we offer a 30-day free trial. So if you want to know how to use the FoneDog Toolkit – Android Data Recovery Tool, here is a step by step method that you can follow.
Of course, you would be needing to download the FoneDog Android Toolkit from our official website. As what we have mentioned earlier, you can download the program for free with a given 30-day trial. Once that you have downloaded the program, go ahead and have it installed on your computer.
Once that the installation is successful, go ahead and launch the FoneDog Android Toolkit on your PC. And then have your Android device connected to your computer using your USB cable. Then the program will then detect your Android device automatically.
Then on the main interface of the FoneDog Android Toolkit, go ahead and choose “Android Data Recovery” option.
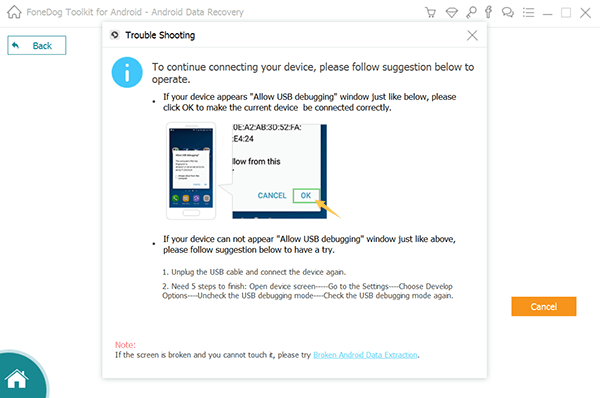
After connecting your Android device to your computer, the FoneDog Toolkit – Android Data Recovery tool will then ask you to turn on USB debugging on your Android device. For you to be able to do this, here is what you need to do.
• Android 2.3 or Earlier Version
o Go ahead and launch “Settings” on your Android device.
o And then, go ahead and tap on “Applications”.
o And then, tap on “Development”.
o Then finally, choose “USB Debugging”.
• Android 3.0 to 4. Version
o Go ahead and launch “Settings” on your Android device.
o After that, go ahead and tap on “Developer Options”.
o And then, go ahead and choose “USB Debugging”.
• Android 4.2 or Newer Version
o Launch “Settings” on your Android device.
o And then tap on “About Phone”
o Then tap on “Build Numbers” several times until you get a message that says “You are under developer mode”
o Then launch “Settings” one more time on your Android device.
o Then tap on “Developers Option”
o And then lastly, choose “USB Debugging”
NOTE: You do not have to worry about USB debugging because it is just a mode wherein it will let your Android device be connected to your computer using your USB cable.
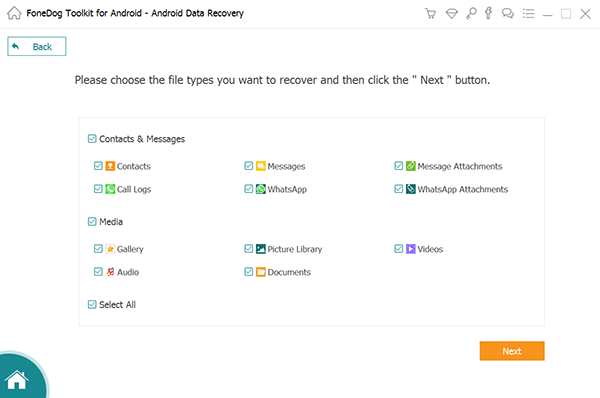
Once that your Android device is successfully detected by the FoneDog Toolkit – Android Data Recovery tool, then it will show you all the data that it supports. From here, all you have to do is to choose “Contacts” from the list. You can also choose multiple data if you are aiming to recover some other data aside from your contacts. And then click on the “Next” button to begin with the scanning process.
NOTE: Here, you have to make sure that your Android device has enough battery life or is more than 20% before the scanning process. Also, you have to make sure that you do not disconnect your device from your computer.
The scanning process might take some time, so all you have to do is to wait until it is complete. And once that the scanning process is complete, you will be able to see all the items that it contains.
From there, you can go ahead and choose all the items that you would wish to recover. One that you are done choosing all the items that you want to retrieve, go ahead and simply click on the “Recover” button. All the items that you have recovered will then be all saved on your computer.
People Also ReadHow to Backup iPhone Contacts to GoogleHow to Fix Google Drive Does Not Sync Issue?
Part 4: Conclusion
Saving your contacts to your Google account can be a good way for you to be able to back them up. However, there are instances that you might duplicate them and you would not want that to happen right? That is why we have shown you here on how you can remove your contacts from your Google Contacts the easiest way possible.
And also, if in the case that you have mistakenly deleted a contact from your Android device, then we also have the perfect solution for you. And this is by using the FoneDog Toolkit – Android Data Recovery tool. This program is very safe and very much effective to use. This will not overwrite any data that you have on your Android device.
The FoneDog Toolkit – Android Data Recovery tool cannot just recover your deleted or lost contacts but it can also help you in recovery some other important data that you have such as your messages, your photos, videos, WhatsApp, call logs, and a lot more.
Leave a Comment
Comment

Tech Website Writing /Content Optimization
Singing, smiling, surprising every day!
So as a technical writer, it is my duty to gather effective and reliable solutions to answer questions on how to deal with the issues they are having with their devices.
Android Toolkit
Recover deleted files from your Android phone and tablet.
Free Download Free DownloadHot Articles
 /
/
INTERESTINGDULL
/
SIMPLEDIFFICULT
Thank you! Here' re your choices:
Excellent
Rating: 4.5 / 5 (based on 99 ratings)
