FoneDog Screen Recorder
FoneDog Screen Recorder
Special Offer
Special Offer


By Adela D. Louie, Last updated: April 26, 2019
Samsung is known to be as one of the most leading brands when it comes to mobile devices. And over time, Samsung has made all of its device better than the last model. This way, they are able to upgrade and make everything better than it was in their previous model.
Now, Samsung as one of the most leading brand already sold millions of smartphones all over the world. And when the Samsung Galaxy S7 came out, it also comes out with another feature that is called the Samsung Device Maintenance, hence, a lot of Samsung users is eager about all things about Samsung Device Maintenance that they should know.
Tips:
Part 1: What Is Samsung Device Maintenance?Part 2: A Trick on Preventing to Lose Any Data from Samsung DevicePart 3: How Does Samsung Device Maintenance Work?Part 4: Specs of Device MaintenancePart 5: Conclusion
Since the new Android Nougat is out, the Device Maintenance also comes with it. The Samsung Device Maintenance has the ability to see the status of your Samsung’s battery, storage, memory, and as well as your device security. And with the use of the device maintenance, you can also be able to optimize your resources on your device system.
Now, if you are actually planning to have the Samsung Device Maintenance and your Samsung device is actually not capable of having it because it does not have the required operating system, then you might need to upgrade your device in order for you to have it. And with that, upgrading your device may actually cause you to lose your data as there is a tendency that the process may require to wipe it all out on your device. That is why you have to make sure that you have an already backed up all of your important data so that you can have it easily restored on your device.
There are actually a lot of ways on how you can backup all of the precious data that you have on your Samsung device. However, there is only one that we highly recommend – not just us, but also a lot of Samsung or any Android users. And that is by backing up your data using the FoneDog Android Toolkit -Backup and Restore.
The FoneDog Toolkit – Android Data Backup and Restore is one tool that you can use for you to be able to back up all types of files that you have on your Samsung device. This includes the following data.
The FoneDog Toolkit – Android Data Backup and Restore is one safe tool that you can use as it will not overwrite any other data that you have. And using this tool will also allow you to selectively choose the data that you only want to backup and restore on your Samsung device.
And now, for you to be able to know how the FoneDog Toolkit – Android Data Backup and Restore works, here is a quick and easy guide that you can follow. Just simply download and install the FoneDog Android Toolkit on your Mac or Windows PC and you are good to go.
Once that you have already downloaded the FoneDog Android Toolkit from our official website, then just go ahead and install it on your PC. After successfully installing the program, go ahead and launch it on your PC. While the program is running on your PC, you have to make sure that there is no other backup application running aside from the FoneDog Toolkit.
Once that the FoneDog Android Toolkit is launched on your PC, go ahead and have your Samsung device connected to your computer using your USB cable and wait for the program to recognize your Samsung device.
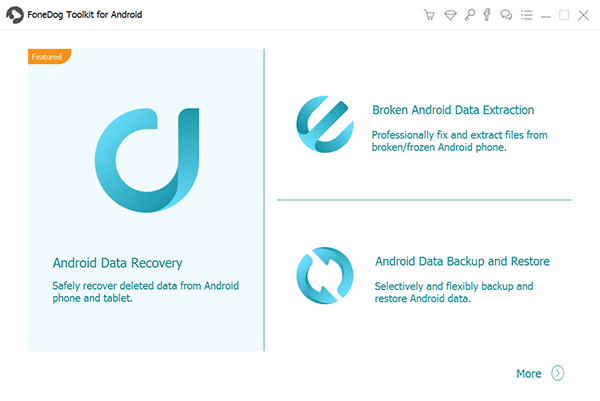
Then on the main interface of the FoneDog Android Toolkit, go ahead and click on Android Data Backup and Restore for you to begin the whole process.
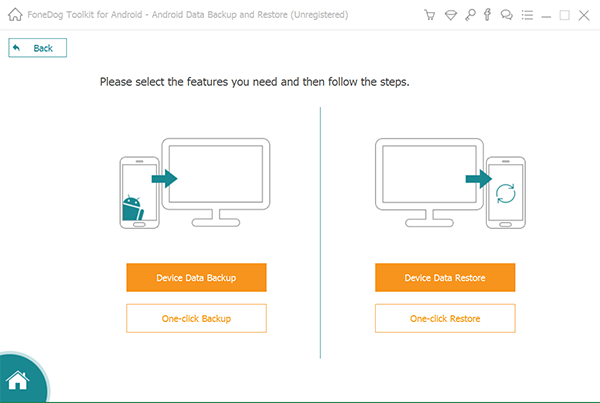
Once that the program had successfully detected your Samsung device, then all you have to do now is to click on the “Device Data Backup” option that you can see on your screen.
The after that, the FoneDog Toolkit – Android Data Backup and Restore will then show a list of file types on your screen. By default, all of the file types have actually a check mark beside it. You can actually remove all the check mark and choose the file types that you want to back up.
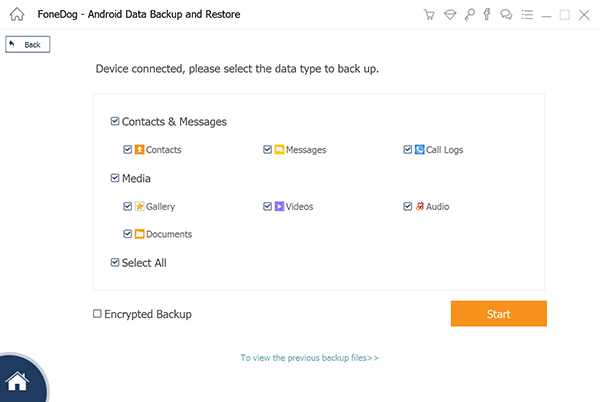
Once that you have chosen all the files types that you would want to back up, then just go ahead and simply click on the “Start” button located at the lower right part of your screen. The process of backing up all selected data will then start so all you have to do is to wait until it is complete.
Once that the backup process is done, then you can go ahead and simply click on the “OK” button. From there, you can now be able to see the content of each file that you have backed up.
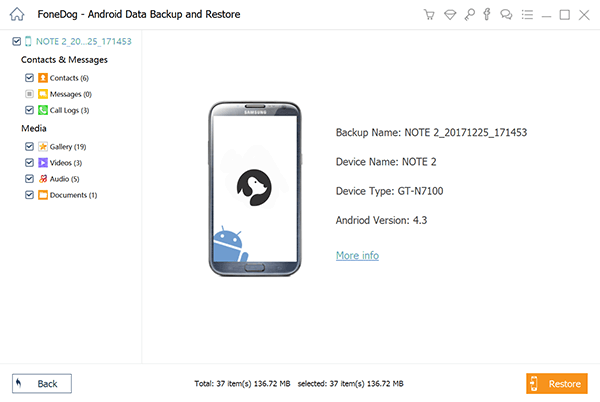
Once that you have chosen the “Device Data Restore” option from the previous page of the FoneDog Toolkit – Android Data Backup and Restore, then the program will show a list of backup files that you have. These backup files have actually the dates on when you have made the backup. From that list of backup files, go ahead and choose the most recent one that you made and click on the “Start” button below.
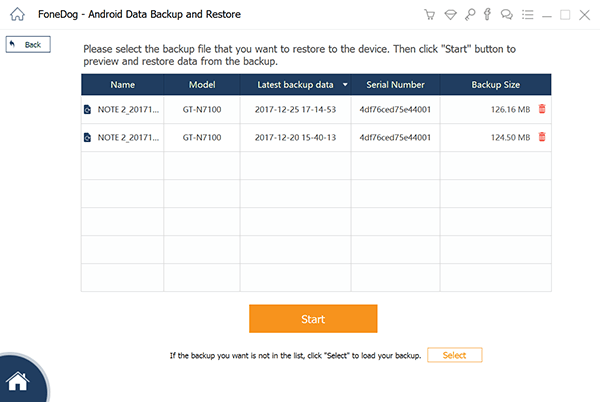
Once that the FoneDog Toolkit – Android Data Backup and Restore was able to scan your backup file, it will then show you all the file types that it contains. All the file types that are available on your backup file will be shown on the left side of your screen. And once that you click on each file type, the items that it contains will be shown on the right panel of your screen.
From there, just go ahead and choose all of the data or file types that you wish to restore on your Samsung device.
Once that you are done choosing all of the data that you would want to restore on your Samsung device, then just go ahead and click on the “Restore” button. The restoration process of all the chosen data will then start. Also, you have to click on the “OK” button for you to confirm the process. From there, all you have to do now is to wait until the program is done restoring your data.
The device maintenance, as what was mentioned earlier, you will have the ability to optimize your Samsung device using this feature. All you have to do is to tap on the optimization option. Aside from that, there are also some other things that this feature can do such as the following:
Along with the new Samsung device, maintenance tool is some features with each tool that it has.
Samsung device maintenance has the ability to monitor your Samsung’s battery life and usage. You will be able to know which of the data or application that you have on your device is consuming your battery life and it will show you its percentage as well. Aside from that, you will also be able to show on your screen the percentage of your battery life on your status bar.
Another thing is that you can also be able to use Power saving mode when you are having a low life battery charge left on your Samsung device. And with that, there are actually two modes that you can choose from. One is the MID and the other one is the MAX.
There is also a feature called the “App power monitor” wherein you will be allowed to control your applications regarding its usage consumption on your battery. But if you would want a certain application to take the energy it needs, then you can put the application under “Unmonitored apps”.
This is another feature that comes with device management maintenance. This feature will allow you to have your Samsung device set up its performance according to what you like. You can also be able to balance your device battery life and as well as your screen resolution depending on your choice.
And with that, there are actually four modes that are available underperformance monitor.
In this feature, you will be able to monitor the space that you have on your Samsung device. You will be able to see how much space you have used, how much space left on your Samsung device storage, and more. And with that, you can also be able to free up your storage as well. You will be able to clean up your cache, residual files, and advertisement files by simply clicking on the “Clean Now” button.
And for you to see your space on your internal storage, all you have to do is the following.
Step 1: Go to the Storage feature of the Device Maintenance.
Step 2: From there, go ahead and tap on the three-dot icon located at the upper right corner of your screen.
Step 3: And lastly, go ahead and tap on “Storage Settings”.
Once that you are in your Storage settings, you will be able to see there the following details.
From those details on your storage, you can go ahead and choose “Used Space” for you to be able to see the space that you have already used up on your Samsung device. And you can go to the “Cache Data” for you to be able to clean up all unwanted data from your Samsung device.
The memory feature of the device maintenance feature on your Samsung device actually refers to your RAM. This is where all of your most used programs are actually stored on your Samsung device. Here, you will be able to see the used space of the applications that you have on your Samsung device. It also has the ability to clean up your cache data with just one click.
This feature is one of the most priority features that every phone makers are aiming for. Using the device security feature on your Samsung device, you will be able to scan your device and see for yourself if it is secured or not. This way, you will also be able to check and prevent your Samsung device from any viruses, malware, and other things that may harm your device and can cause you to lose all of the important data that you have.
People Also ReadHow to Recover Deleted Contacts from GmailHow to Recover Deleted Text Messages Verizon Cell Phone
As you can see, there are a lot of ways on how the Samsung Device Maintenance feature can help you with your device. One of which is that you have the power to control the data that you have on your Samsung device and that you can eliminate all of the data that you no longer need such as your cache. This is actually one way for you to be able to have your Samsung device optimized at its best.
Leave a Comment
Comment

Tech Website Writing /Content Optimization
Singing, smiling, surprising every day!
So as a technical writer, it is my duty to gather effective and reliable solutions to answer questions on how to deal with the issues they are having with their devices.
Android Toolkit
Recover deleted files from your Android phone and tablet.
Free Download Free DownloadHot Articles
 /
/
INTERESTINGDULL
/
SIMPLEDIFFICULT
Thank you! Here' re your choices:
Excellent
Rating: 0 / 5 (based on 0 ratings)
