FoneDog Screen Recorder
FoneDog Screen Recorder
Special Offer
Special Offer


By Vernon Roderick, Last updated: January 6, 2020
With the technology that we have today, it is easier to access and store our important data such as photos, audios, videos and documents across multiple digital devices in a much more convenient and better way. Different devices can mean computers, external and internal hard drives, memory cards, USB flash drives, digital cameras, players, smartphones, and other removable devices where we can store a small or large volume of data of any type. But bad situations can happen to any of your devices. Software issues such as the device will not open, the files are missing or deleted, the device will not start, a frozen screen, application errors, the device is slow and many more which can call for device recovery.
When you have backups you can restore the system. But what if you do not have any backups at all? A data recovery program like the FoneDog Data Recovery can help you restore the data and recover your device both in Windows and Mac OS. With it comes to the features of the device recovery for any sort of data, any type of device and in any kind of situation.
Part 1: What is Device RecoveryPart 2: How to Perform Device Recovery Using Data RecoveryPart 3: How to Recover Device Using Windows Device Recovery ToolPart 4: Device Recovery Using Windows System RestorePart 5: Device Recovery Using Windows Backup and RestorePart 6: Device Recovery Using Mac OS UtilitiesPart 7: In Summary
In the event that your device experiences problems that your system will not restart or the data files are missing or deleted, then a need for you to perform device recovery. Another situation is when you have installed a new version or changes to the application or system and it fails, then you need to revert the changes and restore the settings back to the original. Causes of software issues may happen due to system crash and failures, application errors, malicious threats from viruses and malware, software corruption, human error, bad sectors, or formatting errors. All these may result in lost or deleted files from your devices and system boot errors, hence the need to do device recovery which is to restore the previous changes and data backups you have created.
If you need to recover your lost or missing data in your device, a remarkable data recovery tool is here to help you. It allows you to quickly and safely recover your various files. FoneDog Data Recovery is an easy and convenient to use tool that provides quick and deep scans of your files with the highest success rate and ensures the security of data. Choose to preview the files before performing device recovery and restore the files conveniently.
Retrieve your data from any device and restore them available for both Windows and Mac. Free trial of the installer is downloadable and a thirty-day money-back guarantee is offered should you purchase it. The additional features are: you can recover from any device such as computers including hard drive, Recycle Bin, USB, memory cards, digital camera, and removable drives in different supported file systems. It can restore any data type such as image, video, audio, email, archive, and documents and in any situation such as file recovery, hard drive recovery, memory card recovery, flash drive recovery, crashed Windows or Mac recovery, and partition recovery. This is the process on how to use the device recovery tool.
Data Recovery
Recover deleted image, document, audio and more files.
Get deleted data back from computer (including Recycle Bin) and hard drives.
Recover loss data caused by disk accident, operation system crushes and other reasons.
Free Download
Free Download

After you have downloaded and installed the FoneDog Data Recovery, open the installed software to start the device recovery. Double-click its shortcut icon located on the desktop or click its pinned icon on your taskbar (if a shortcut is created or pinned to the taskbar). Alternatively, go to the Start menu and search FoneDog Data Recovery from the Programs list.
On the main page of FoneDog Data Recovery, select the different file types to recover and the device (hard disk or removable) where you want to recover your files. Next, press the Scan button to start scanning the data files.
While scanning the data, you need to establish a stable connection between the computer and your other devices. Check all file types if you want to retrieve all your files in various data types. It can be an image, audio, video, email, document, application, etc. Then, choose the disk or drive in the Removable Drives.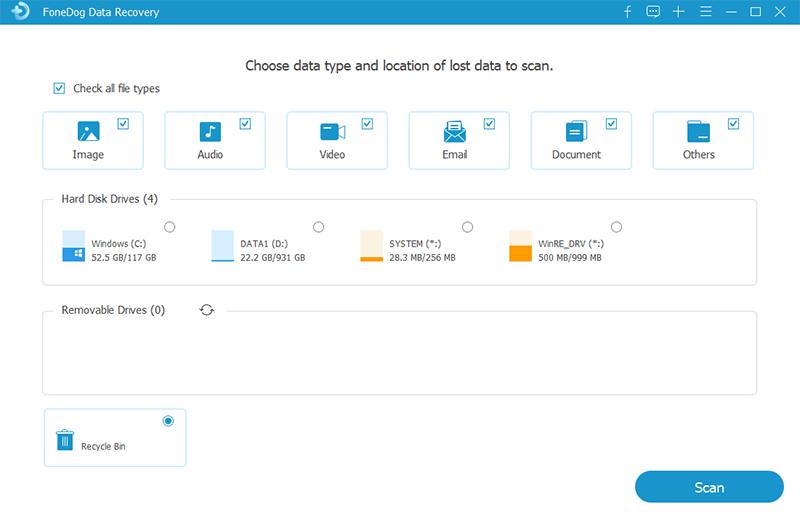
There are two scans that are available: you can choose Quick Scan or Deep Scan. The quick scan will work at a faster speed while the deep scan will display more content but will take a longer time to scan. After the FoneDog Data Recovery tool is done scanning the device, it will show the file results based on the options you have entered.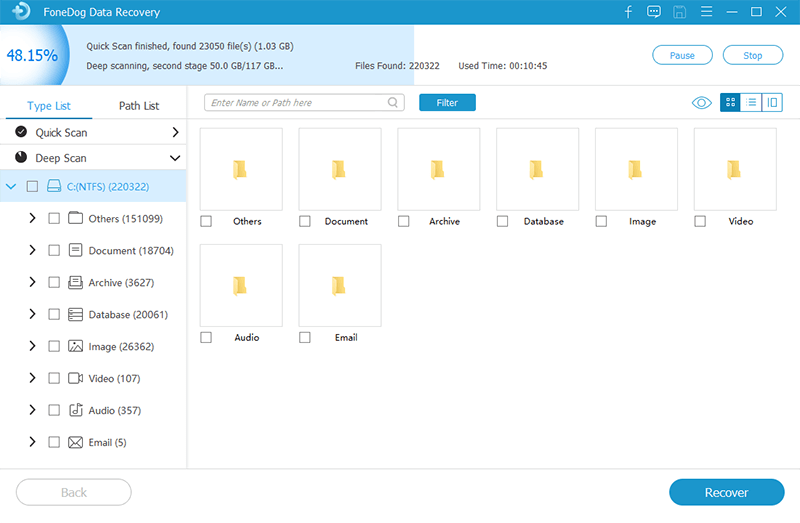
After scanning your device, choose the data files that you wish to retrieve. The results will be shown by type or by a path. To filter the results, you can quickly trace the specific files by entering the file name and file path in the search bar and click Filter. After selecting the files, click the Recover button to begin the device recovery.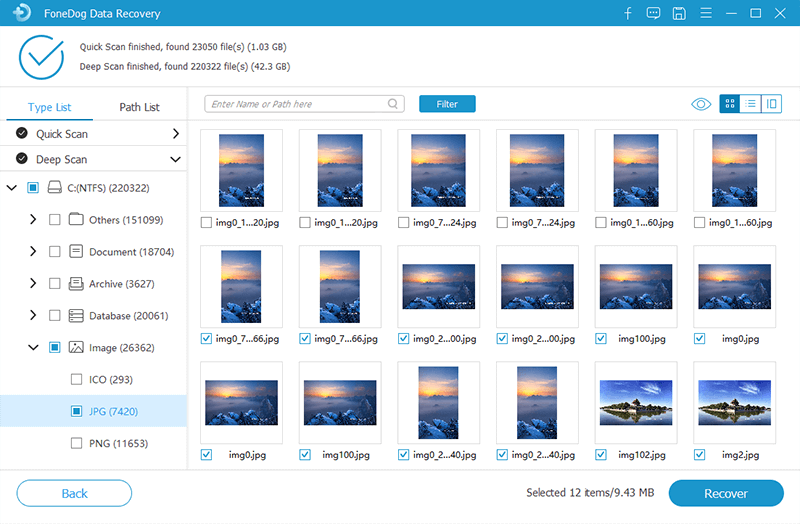
This section provides information on how to utilize the Windows device recovery tool from Microsoft to fix software issues on your device. This will work only on Windows versions 7, 8, 8.1 and 10. Make sure to create a backup first of your files before proceeding with the device recovery as it will erase all contents.
This method will teach you how to do device recovery using System Restore, a feature in Windows that will let you create a restore point that undoes your system changes. In case of software, system or disk failures, the restore point can help reinstate the settings in your device preserving your files.
To enable the System Restore (this is disabled by default):
To create the System Restore:
To reinstate the changes using System Restore:

You can also access System Restore in the Advanced Options when your computer does not start. Here are the steps for the device recovery:
This simple process will guide you on how to do device recovery by using Backup and Restore in Windows. Make sure the device where you have stored your data is backed up is connected to the computer before doing the backup and restore.
This basic method will help you on how to do device recovery in Mac using the device recovery utilities it has. Make sure to do necessary backups when possible before doing the device recovery and your computer is plugged into the power source to prevent interruptions while the restore is taking place.
The available utilities in Mac OS are the following:
Restore From Time Machine Backup: This will do Mac device recovery using a Time Machine backup.
Reinstall macOS: This will let you download and reinstall a new copy of Mac operating system.
Disk Utility: This will allow you to repair or erase a disk and storage devices.
Data Recovery
Recover deleted image, document, audio and more files.
Get deleted data back from computer (including Recycle Bin) and hard drives.
Recover loss data caused by disk accident, operation system crushes and other reasons.
Free Download
Free Download
Recovering your devices in times of problematic situations is now easier with the help of some device recovery tools. This article provides several methods on how to do device recovery for both Windows and Mac operating systems. Issues in your devices such as malicious threats from viruses and malware, system crash and failures, application errors, software corruption, bad sectors, or formatting errors, and human error will need you to do device recovery. That is why it is advisable to create regular backups of your data or system so that in case of failures, you can conveniently restore the previous settings and changes.
Another alternative is the FoneDog Data Recovery program which is a powerful and reliable tool that can also help you in device recovery. The steps to recover your data are to launch, scan, and restore. You never have to worry about how to restore important data. It has a special wizard and helps feature to guide you step by step to do device recovery.
Leave a Comment
Comment

Technical Expertise for PC/Website Optimization
One of my passion is to develop software of my own
I write articles to share knowledge about IT technology and some experience in developing my own software, and developing my own software is one of my passions for work.
Data Recovery
FoneDog Data Recovery recovers the deleted photos, videos, audios, emails, and more from your Windows, Mac, hard drive, memory card, flash drive, etc.
Free Download Free DownloadHot Articles
 /
/
INTERESTINGDULL
/
SIMPLEDIFFICULT
Thank you! Here' re your choices:
Excellent
Rating: 4.7 / 5 (based on 89 ratings)
