FoneDog Screen Recorder
FoneDog Screen Recorder
Special Offer
Special Offer


By Vernon Roderick, Last updated: March 19, 2021
Today, we do different tasks on our computers such as working on documents and applications. We also store various files in the computer’s hard drive that we can easily access later on. But there are times that issues will occur with our important data. The document files suddenly get lost or deleted and cannot be found.
To help resolve the problem, this article presents several methods that one can follow on how to recover deleted or lost data from any device. Moreover, a document recovery software such as FoneDog Data Recovery can help in the data recovery by performing a quick or deep scan on the device. Not only documents are important, but the flash drive is also important, so here is another article about flash drive recovery software recommended to you.
Part 1. How to Recover Deleted Documents Using Document Recovery SoftwarePart 2. Commons Causes of Lost or Deleted Documents Part 3. Tips for a Successful Document Recovery Software Part 4. Document Recovery Software in WindowsPart 5. Document Recovery Software in MacPart 6. Document Recovery Software Using Free Third-Party Tools
When you need help recovering your deleted and missing documents, FoneDog Data Recovery will do an amazing job. It is a safe, reliable, and secure data recovery program that can recover any type of data from any kind of device.
With its simple and convenient-to-use interface with the Help feature, it can do quick and deep scans of your devices without any data loss. You can preview each file result and select the specific files that you want to recover.
FoneDog Data Recovery can recover lost and deleted data in all situations. The tool is available in both Windows and Mac OS. It has a free trial version available and offers a 30-day money-back guarantee with full packed features upon purchase. Click on the linked article to see the detailed download tutorial of FoneDog Data Recovery.
Download and install the software on your Windows or Mac computer. Access the program on the Start menu, desktop, or taskbar. Connect to the computer your removable or mobile devices if you will recover the data from these devices.
The next step is to select the types of files to be recovered such as documents. Also, select the disk drives and removable drives that contain the deleted or lost data.
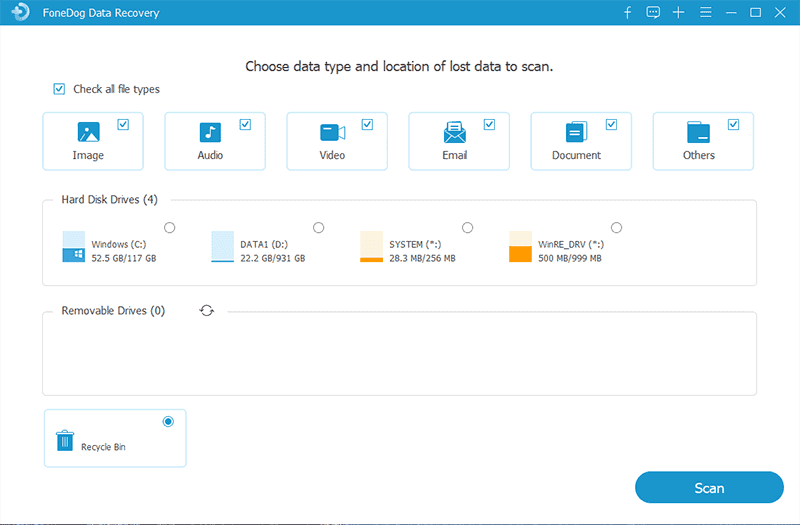
Two scan modes are available for you to select: quick or deep scan. The latter scan will take longer to finish but will return more contents. Click on the Scan button to proceed. The results will be returned by category. You can choose to preview the results after.
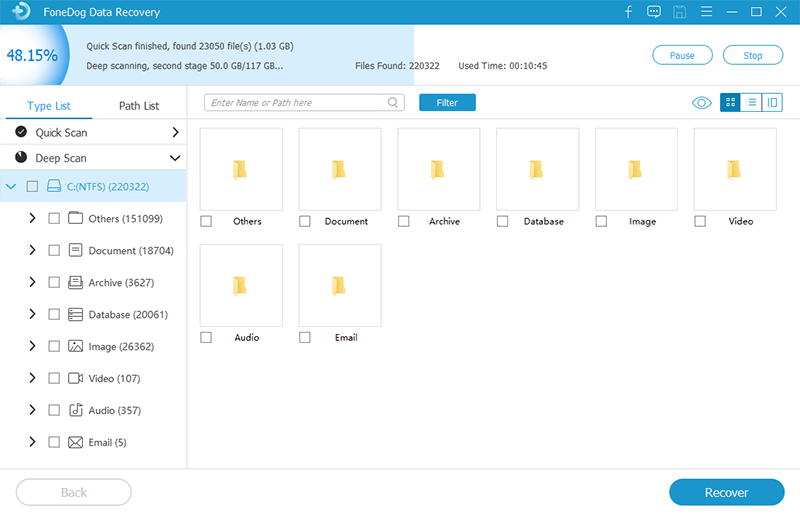
Select the specific files that you want to recover. Click the Recover button to start with the data recovery. Wait until the recovery is finished and make sure that a stable connection and power source are established.
The documents that you work on may suddenly become lost, deleted, or corrupted due to a number of reasons that vary. The most common causes of this issue happen when there is an accidental deletion, hard drive formatting, system crash, software or hardware failure, malware threats, formatting errors, bad sectors, emptying of Trash or Recycle Bin, human error, and many others.
There is a possibility that you can still recover your lost or deleted documents depending on the scenario. If there are backups created regularly, there is a big chance of recovering the data. But if there are no backups, you can utilize the built-in features in the system on restoring data, or a better alternative is to use a data recovery program such as FoneDog Data Recovery.
Upon encountering the problem of missing or deleted documents, stop immediately from writing anything onto your disk in order to prevent further damage. Do not perform any more manipulation of data.
Instead, perform data recovery immediately using the different methods discussed in this article guide. With a reliable data recovery tool such as FoneDog Data Recovery, you can easily and safely recover deleted and lost documents.
This section provides some methods that can help you on how to recover deleted or lost documents with the built-in features integrated into Windows systems.
Backup and restore is an included built-in feature in Windows operating systems that will enable you to restore certain documents that are backed up. Connect your storage media device where your backup is saved before you perform the backup and restore.
Step 01: Launch the Control Panel.
Go to the Start menu and select Control Panel from the list of programs.
Step 02: Select System and Maintenance.
Step 03: Open Backup and Restore Center.
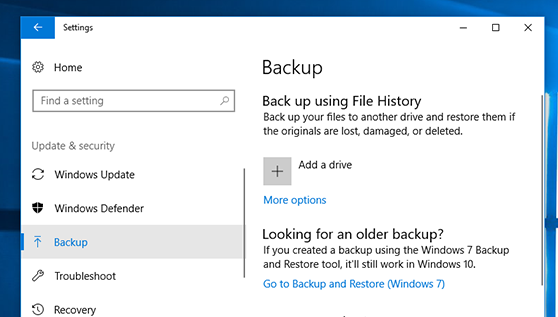
Step 04: Click Restore My Files.
Step 05: Follow the steps as stated in the wizard until the file restore is finished.
This is another feature in Windows that will allow you to restore deleted or lost documents from previous versions that are backed up. If the documents are recently deleted or there are not many deletions happening on your computer’s drive, you can utilize this feature.
Step 01: Launch This PC or My Computer.
You can go to the Start menu and select Computer from the program list or access the program on your desktop.
Step 02: Navigate to the folder location of the previously saved documents.
Step 03: Right-click on the located folder and click Restore the previous version.
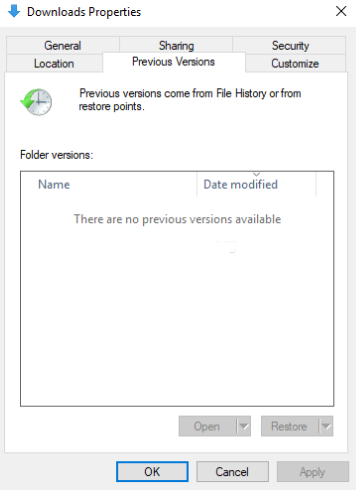
Step 04: A list of the previous versions of the folder will be displayed according to date and time. Double click to select the previous version of the folder which holds the deleted documents.
Step 05: Drag the folder which holds the previous version of the documents and drop it to a new location (recovered).
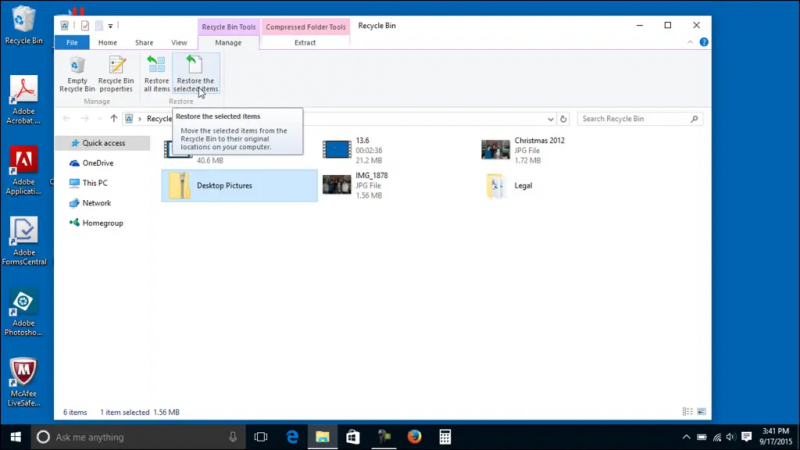
When the documents are accidentally deleted and sent to the Recycle Bin, you have the option to restore them to the original location.
Step 01: Launch the Recycle Bin located on the desktop.
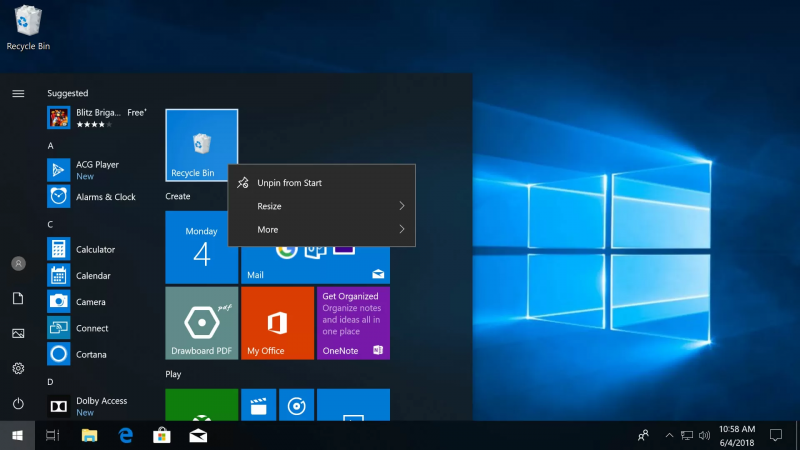
Step 02: Scroll through the list of deleted documents or search for the specific document.
Step 03: The original location of the document is shown in the details. Right-click on the document and click Restore.
Step 04: Navigate to the original location of the document and check to see if the document is restored.
To recover documents such as Word, Excel, PowerPoint, Photoshop, and others, you can try to check for the recovered and autosaved documents in the corresponding AutoSave or AutoRecover folder locations or in the Temp folder.
This section provides some methods that can help you on how to recover deleted or lost documents with the built-in features in Mac OS.
An integrated built-in backup utility in Mac called Time Machine can be utilized to restore the deleted documents. This is possible if Time Machine backups are automatically enabled on your Mac computer.
Step 01: Launch the Finder.
Step 02: Click Application and launch the Time Machine.
Step 03: Navigate to Finder and then click All My Files.
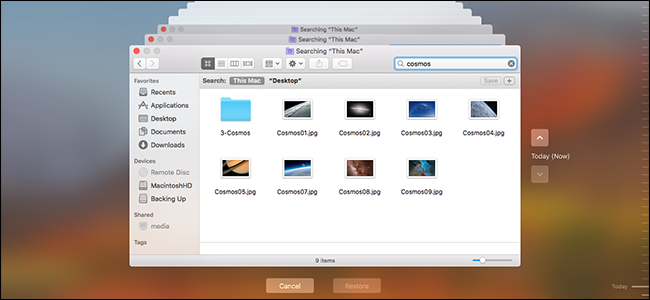
Step 04: Find the deleted document from the backups listed in the Time Machine.
Step 05: Refer to the timeline displayed on the window that corresponds to the date and time the document is worked on. To preview the document file, select it and press the Space key.
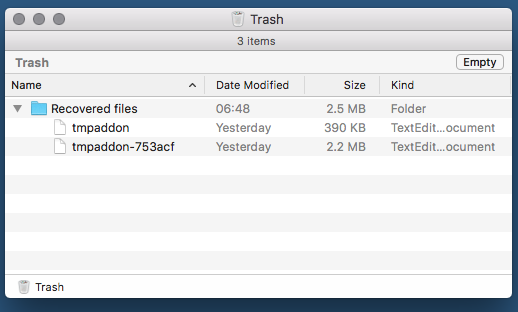
Documents that are deleted on your Mac computer are automatically sent to the Trash that allows you to restore the files should you need to.
Step 01: Go to Finder.
Step 02: Open the Trash.
Step 03: The deleted files are listed on the Trash. Right-click on the deleted document and select Put back to restore it to its original location.
When you accidentally delete a file such as a document on your Mac computer, you have the option to restore it immediately after the deletion.
Step 01: Go to Finder.
Step 02: Click Edit.
Step 03: Click Undo Move of to reverse the change.
This section provides helpful information on the various free document recovery software tools that you can utilize to restore deleted or lost documents. Each tool is presented with its own features, pros, and cons.
Recuva offers a free program that supports the recovery of data such as documents, photos, music, videos, and many more which are deleted or missing from your device. It offers quick and deep scan modes with a simple and easy interface.
Pros: Recuva lets you do a primary scan and an advanced deep scanning of your device should you not be able to find the file from the quick scan. Its interface is easy to use and securely recovers your data.
Disk Drill is a free data recovery application that supports the recovery of any sort of data such as documents, photos, music, videos, and many more which are deleted or lost from various devices. It supports Windows and Mac OS in different file systems.
Pros: Disk Drill enables you to scan the device, return the results, and preview the results. It has an easy-to-use interface and secured data recovery.
Cons: Disk Drill’s free trial version can only recover up to 500 MB of data and no support for Linux OS. Its full scan mode can be time-consuming.
Tenorshare Data Recovery is available as a free recovery software for your devices. It can support the recovery of deleted or lost documents, messages, videos, photos, and many more. It is available for Windows, Mac, and Linux.
Pros: The Tenorshare Data Recovery tool allows the recovery of any type of file and scans different types of devices. You can choose to preview the files and select specific files to recover.
Cons: The free version of the software can only recover up to 500 MB of data and it has no option for you to specify which certain location to scan but the entire drive.
recovery is available as a free recovery tool that supports the recovery of any type of deleted or lost data such as documents, images, music, videos, and many more. The tool will work both in Windows and Mac OS.
Pros: RecoverIt has several different types of recovery modes that you can select depending on the situation. It has a simple and easy-to-use interface and you can choose to preview the files.
Cons: The free trial version of RecoverIt can only recover up to 100 MB of data and scanning sometimes freezes. It also limits the number of files that you can preview.
Remo Recover tool is a free file recovery program that allows data recovery of files such as photos, music, videos, documents, and other data that are lost due to accidental deletion from your device.
Pros: Remo Recover has a simple and easy-to-use interface. You can preview the files after the scan and pick the files that you wish to restore. It supports the various devices in different scenarios.
Cons: Remo Recover’s device scanning takes much longer to finish and locating the deleted files after the scan can be difficult as searching is not available.
People Also ReadHow to Recover Deleted History on Mac (Google Chrome)How to Perform SD Card Data Recovery for Android
Unexpected situations may happen with our devices such as computers and phones which makes our work inefficient and time-consuming. Issues such as deleted or lost data can interfere with our tasks. We need to access the important documents in our devices but it suddenly becomes lost or deleted.
In this article, there are different ways to resolve the problem by following the methods discussed. Another solution is to use document recovery software like FoneDog Data Recovery to retrieve your lost and deleted data from any type of device in any kind of situation.
Leave a Comment
Comment

Technical Expertise for PC/Website Optimization
One of my passion is to develop software of my own
I write articles to share knowledge about IT technology and some experience in developing my own software, and developing my own software is one of my passions for work.
Data Recovery
FoneDog Data Recovery recovers the deleted photos, videos, audios, emails, and more from your Windows, Mac, hard drive, memory card, flash drive, etc.
Free Download Free DownloadHot Articles
 /
/
INTERESTINGDULL
/
SIMPLEDIFFICULT
Thank you! Here' re your choices:
Excellent
Rating: 4.5 / 5 (based on 93 ratings)
