FoneDog Screen Recorder
FoneDog Screen Recorder
Special Offer
Special Offer


By Vernon Roderick, Last updated: May 28, 2021
Not all USB drives can be immediately used once you take them out of the package. Sometimes, the format is incompatible on your Mac. Fortunately, there’s a format that can be used in lots of operating systems, and that is the FAT32. This is where learning how to Format USB to FAT32 on Mac comes in.
Since you won’t be able to use your USB drive unless you do this, this skill is crucial for people who often use USB drives. Additionally, the Mac operating system doesn’t format incompatible drives automatically, so you’ll have to learn how to do it manually.
But before that, what other reasons do you have for learning How to Format USB to FAT32 on Mac?
Tip: In addition to how to convert the USB format to FAT32 in this article, there is also a similar article about how to format an SD card to FAT32 on Mac.
Having spent some years coding programs, we have created a powerful tool to prevent you from data loss.
Check this tip: Download FoneDog Data Recovery to retrieve your data if you did the formatting without a backup. If you do have a backup, we have collected some useful solutions on formatting USB to FAT32 on Mac below for you.
Data Recovery
Recover deleted image, document, audio and more files.
Get deleted data back from computer (including Recycle Bin) and hard drives.
Recover loss data caused by disk accident, operation system crushes and other reasons.
Free Download
Free Download

Part 1. Why Learn How to Format USB to FAT32 on Mac?Part 2. Things to Remember Before Formatting USBPart 3. Recover Data from Formatted USBPart 4. The Method on How to Format USB to FAT32 on MacFinal Words
Most of the removable drives out on the market are USB drives. Unfortunately, such drives don’t work by default on Mac. That’s perhaps why you want to learn How to Format USB to FAT32 on Mac.
However, besides the fact that USB drives are incompatible, there are also other reasons why you need to learn this skill.
For one, the FAT32 format offers a lot of benefits to Mac users:
However, just as something possesses advantages, there are also disadvantages. The convenient FAT32 format is no exception. The most significant limitation of the great FAT32 format is that you can only store files that are 4GB in size or smaller.
This would mean that you won’t be able to use it on files larger than that. Now that that’s settled, it might be time to discuss the remedy to your problem and learn How to Format USB to FAT32 on Mac.
Since formatting will most likely affect your whole USB drive, it’s important to know about the warnings that you will have to be cautious of. First of all, you have to know that all files will be deleted once formatting is done. This would mean that you will have to create a backup of your files, one way or another.
You can either create a duplicate of your files and transfer them to another storage device, or create a backup using Mac’s Time Machine feature. Either way, you won’t go very far if you don’t know how to back up your files.
Now if you already did the formatting without a backup, there’s a chance you won’t be able to see your files ever again. Fortunately, there’s also a remedy for this, and that is by using data recovery software.
However, remember that once you recognize the data loss issue, make sure you don’t tweak your files in the meantime to avoid overwriting. The NO’s of data loss includes moving, copying, renaming, deleting, or adding files.
If this is your scenario, then we recommend using data recovery software to recover your files lost from the formatting process.
There are lots of data recovery tools out there, but among them, we find FoneDog Data Recovery to be the most reliable. FoneDog Data Recovery is software specializing in recovering all kinds of files, be it your precious family pictures, confidential documents, or embarrassing videos.
The software also supports both operating systems, just like FAT32. Lastly, FoneDog Data Recovery is not limited to any storage device. It can recover files whether it is on your hard drive, external drive, flash drive, or USB drive.
With that said, we find no reason for you not to use FoneDog Data Recovery. Here are the steps you’ll need to follow in order to use this software:
The first thing you have to do is, of course, download and install the software on your Mac. After that, run the program to get a view of the software’s interface. The first screen should show you a list of file types and the storage drive.
For the File Type, we suggest marking the Check all file types so as to not leave any data behind. For the storage drive, it would be the USB drive where the deleted file was originally located.
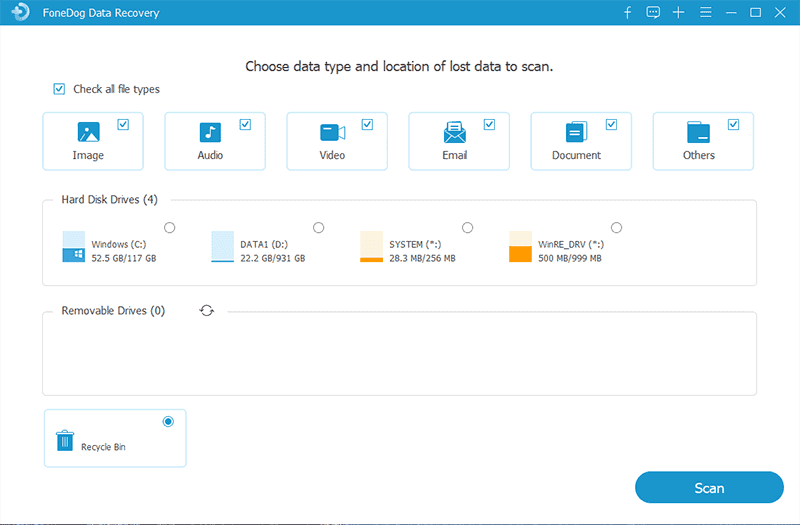
Once you’re done with the configuration for file type and storage drive, click on the Scan button. The scanning process will take some time, depending on how many files are being detected.
After the scan, you will see an option at the top of the screen to proceed to Deep Scan. This would bring in more results, but it will again take some time. Of course, you can choose to ignore this option as well.
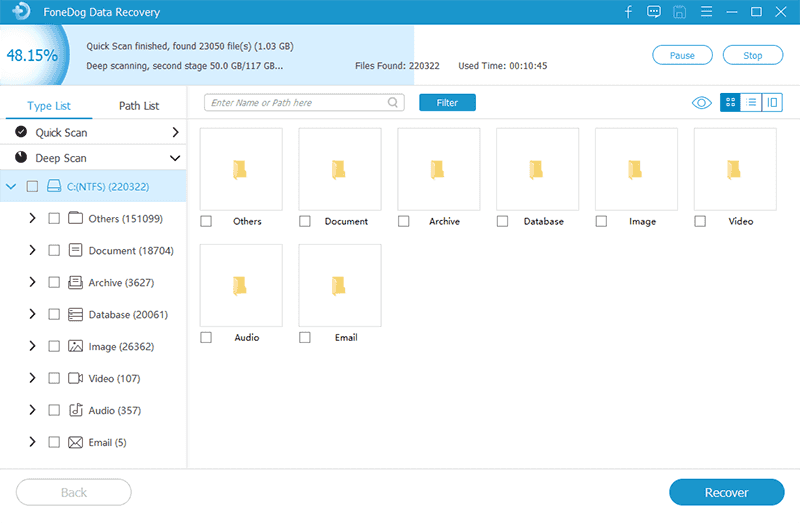
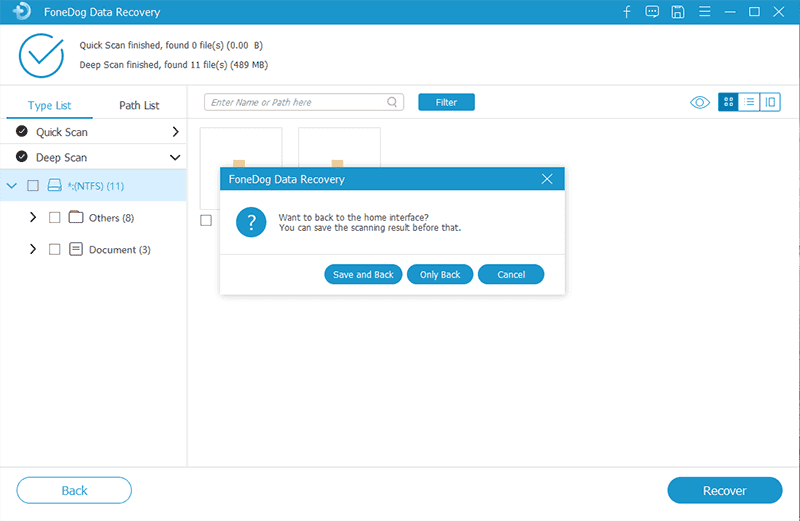
The third and the last screen will show you a selection of items. These are the files that are recoverable from your USB drive. To select an item, click on their corresponding boxes. You can search for files either through the Filter function or the Search Bar. Either way, once you’re done selecting the files, click on the Recover button.
With this, you should no longer be worried about losing your files permanently. That concludes everything you need to know before learning How to Format USB to FAT32 on Mac. Now we head to the actual methods for formatting.
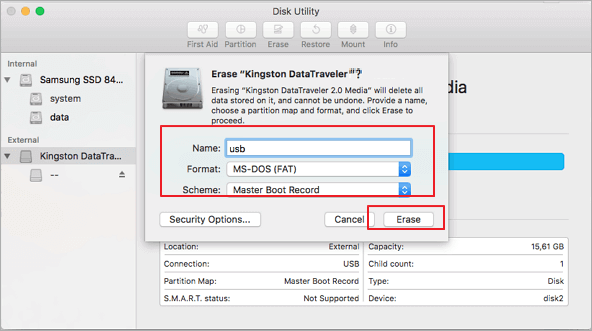
There are generally two methods on How to Format USB to FAT32 on Mac. The simpler and more common method is the use of Disk Utility.
Disk Utility is one of the many features of Mac. It allows you to configure the different disks on your operating system.
To use this method, you have to follow these steps:
After this, you should now have a FAT32 drive ready for use. However, although it’s very simple, sometimes it doesn’t work. When that happens, we usually use the second method, which is more complicated but has a higher chance of success.
This is the more complicated method that we’re talking about, the use of Terminal. You might know of the Command Prompt in a Windows PC. The Terminal is basically the Command Prompt’s Mac counterpart.
It allows you to enter commands that are normally unusable. Here’s how you can use the Terminal on How to Format USB to FAT32 on Mac:
Once you’re done with this, you have now successfully learned How to Format USB to FAT32 on Mac using the Terminal. That concludes the two methods for solving your USB drive problem.
Although you’ve learned how to How to Format USB to FAT32 on Mac, we still have a recommendation that involves one of the formats that you might’ve seen in Disk Utility.
Granted, the MS-DOS (FAT) format you used in the Disk Utility is the FAT32 file system in Mac. It can be considered as a universal file system. However, despite its benefits, we’ve said that there’s also a limitation.
You cannot store files larger than 4GB. If you need something to compensate for this, you can choose the ExFAT format. This is a newer format that gives you the perks of a FAT32 drive, except for the limitation. In short, you can store files with sizes greater than 4GB while still being a universal file system.
The only downside to this is the fact that it is a new format. For that reason, it might not work on older versions of your Mac. Either way, it’s only an additional recommendation for this tutorial on How to Format USB to FAT32 on Mac.
People Also ReadFix “You Need to Format The Disk Before You Can Use It” ErrorHow to Recover Data from Corrupted Memory Card without Formatting
One of the most troublesome tasks of Mac or Windows users is the file transfer between two different operating systems. It might be that you want to watch your movies on your Mac but can’t seem to learn how to transfer them from your Windows. You may also have files that aren’t working on your Windows, so you want to try it out on your Mac.
Either way, your USB drive can’t support both operating systems at once. Fortunately, a FAT32 drive can do that, and that’s why we learned How to Format USB to FAT32 on Mac.
Leave a Comment
Comment

Technical Expertise for PC/Website Optimization
One of my passion is to develop software of my own
I write articles to share knowledge about IT technology and some experience in developing my own software, and developing my own software is one of my passions for work.
Data Recovery
FoneDog Data Recovery recovers the deleted photos, videos, audios, emails, and more from your Windows, Mac, hard drive, memory card, flash drive, etc.
Free Download Free DownloadHot Articles
 /
/
INTERESTINGDULL
/
SIMPLEDIFFICULT
Thank you! Here' re your choices:
Excellent
Rating: 4.7 / 5 (based on 59 ratings)
