FoneDog Screen Recorder
FoneDog Screen Recorder
Special Offer
Special Offer


By Adela D. Louie, Last updated: July 23, 2021
Do you currently have a jump drive with you that you need to repair for you to access your data? Do you want to know how you can make a jump drive repair? Just like any other device, a jump drive or also known as the USB drive is very prone to be corrupted or from any virus attack.
And once that you have this, then the first thing that you might look for is a way for you to a jump drive repair. Based on the topic of this article about USB drive, another article about splitting USB drive is recommended for you.
Part 1. Jump Drive Repair: Cause of Its FailurePart 2. Different Jump Drive Repair Depending on the ReasonPart 3. Jump Drive Repair: How to Recover Lost Files from It
Once that your jump drive was damaged or once that it gets corrupted, automatically, you will get an error message that says to insert your disk to the removable disk and a lot of error messages. And with that, there are actually a lot of reasons as to why you are getting these error messages.
One reason for it is that if your jump drive was corrupted or if it was infected by a virus. Another thing is that if there are any problems with your NAND memory. It can be because you may have used it the wrong way, or because you have unmounted it often without doing the proper way of disconnecting it from your PC.
Here are different ways on how you can do a jump drive repair depending on the cause of the problem.
The very first thing that you should do when your PC does not recognize your jump drive are the following steps below.
Step 1: Navigate to Drive Manager
Go ahead and go to your Control Panel. And from there, simply click on Drive Manager.
Step 2: See List
And from there, simply hit on the plus (+) sign for you to be able to see the list under the Disk Drive option.
Step 3: Enable Drive
After that, you will then be able to see an arrow down beside the USB drive so just double-click it and then select the option Enable Device.
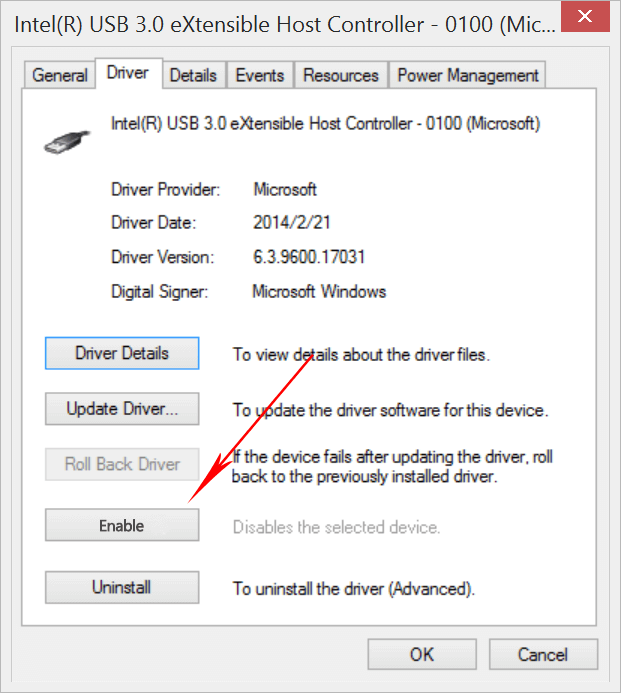
Step 4: Complete Process
And then go ahead and click on the Next button twice for you to complete the process.
After doing all of the steps above, the next thing that you should do is to assign a letter to your drive. And for you to do that, here are other steps that you can follow.
Step 1: Go ahead and click on the Start button and then choose Control Panel.
Step 2: And from there, click on the Security button and then select Administrative Tool.
Step 3: Then click on Computer Management.
Step 4: From there, go ahead and do a right-click on a USB drive.
Step 5: Then from the drop-down menu, go ahead and click on Change Drive Letter and Paths option.
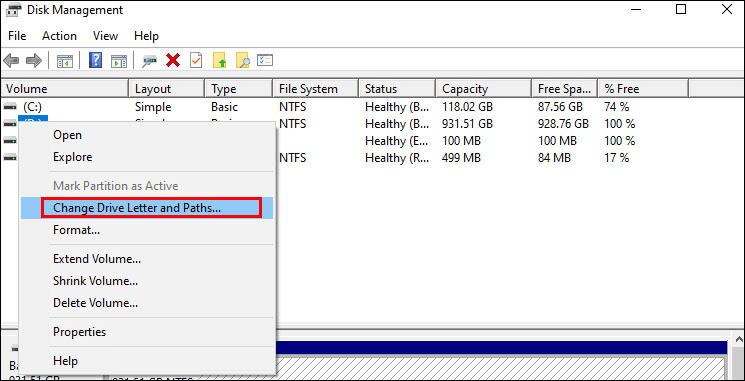
Step 6: And then, hit on the Add button and then hit OK.
Step 7: After which, assign an available letter to your drive by clicking on it.
Step 8: Then right-click on your device and then assign its online location.
Step 1: Go ahead and connect your USB drive to your Windows PC.
Step 2: And then, hit on My Computer and then select on the USB drive that will show up on your screen.
Step 3: After that, right-click on the Properties option.
Step 4: And then, click on the Tools option.
Step 5: Then go ahead and hit on the Check Now key.
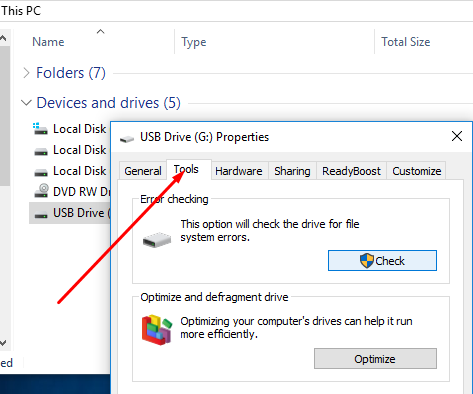
Step 6: You will now be able to see two sets of options.
Step 7: With those options, click on the box beside each of the options and then click on the Start button for you to begin with the scanning process.
Step 8: After the scanning process is complete, go ahead and hit on the close button to finish everything.
Step 1: Connect your USB drive to your PC using your USB port.
Step 2: Then go ahead and right-click on the USB drive which can be found under My Computer and then choose the Properties option.
Step 3: Then from there, simply go ahead and click on the Tools option.
Step 4: Then choose the Rebuild button.
Step 5: Then the scanning process will take place. And once that is done, go ahead and select to close the window.
Step 6: After which, right-click on your USB drive and then hit on Eject before you remove your USB drive.
Step 1: Get your USB drive and connect it to the USB port on your Windows PC and then click on My Computer.
Step 2: From there, select the Manage options.
Step 3: Then choose to select the Disk Management option.
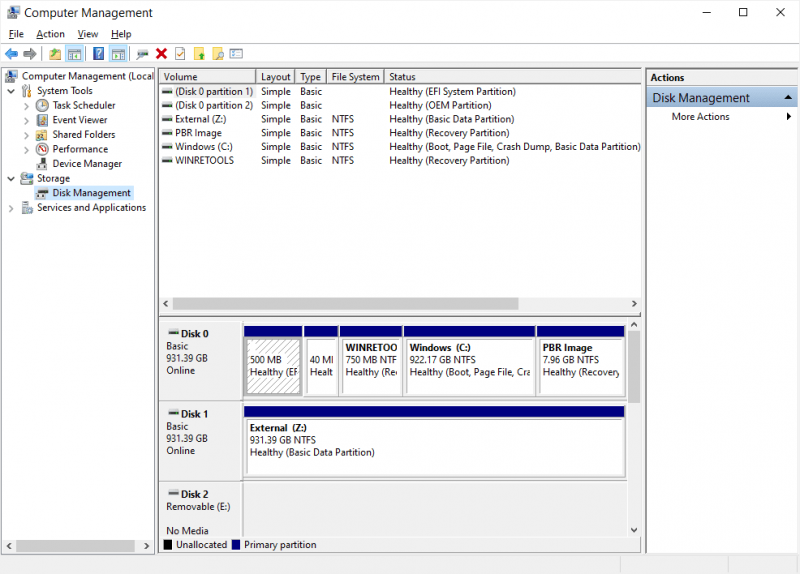
Step 4: Select on your USB drive that you are having a problem with and then check out its health and some other things that are shown on your screen.
Step 5: After that, go ahead and right-click on it and then click on the Format button for you to begin formatting your USB drive.
And those are the ways on how you can do a jump drive repair depending on the specific situation you are dealing with it.
Now, in case that you have lost your data or your files from your USB drive that you are repairing, then you have to look for a certain data recovery software that will allow you to get those back. And one of the most recommended software by many people is no other than the FoneDog Data Recovery software.
The FoneDog Data Recovery software is great at recovering file systems and some other problems that you are having with. It can recover your deleted files like your photos, videos, audios, and so much more. All you have to do is to click on it and then scan it for you to get a preview of your files that you are about to recover.
Also, this program can recover your lost data from your Windows PC, Mac computer, USB drive, memory card, and another external hard drive. It is very easy to use because it comes with an easy-to-use interface. This is also very safe to use because no other data shall harm or overwrite those existing data that you have on your USB drive.
Get the FoneDog Data Recovery and get a chance to use it for free for 30-days so you would know how this amazing data recovering software works.
People Also ReadHow to Fix Corrupted Files on Windows?How to Recover Deleted Emails in Gmail from Your Account?
There are now different ways on how you can do a jump drive repair. It is not up to your how you are going to fix it depending on the problem of your jump drive. And in case that you have lost some of your data, then make sure to use the FoneDog Data Recovery software as it is reliable and very efficient in
Leave a Comment
Comment

Tech Website Writing /Content Optimization
Singing, smiling, surprising every day!
So as a technical writer, it is my duty to gather effective and reliable solutions to answer questions on how to deal with the issues they are having with their devices.
Data Recovery
FoneDog Data Recovery recovers the deleted photos, videos, audios, emails, and more from your Windows, Mac, hard drive, memory card, flash drive, etc.
Free Download Free DownloadHot Articles
 /
/
INTERESTINGDULL
/
SIMPLEDIFFICULT
Thank you! Here' re your choices:
Excellent
Rating: 4.7 / 5 (based on 85 ratings)
