

By Nathan E. Malpass, Last updated: May 25, 2021
Secure Digital Card or commonly known as SD Card is a type of memory card that is used across digital portable devices such as smartphones, camcorders, digital audio players and cameras, etc. An SD card may be recognized as corrupted if it is not readable on any device such as your phone or computer.
Whenever you need to recover the data from your card, you can use the FoneDog Data Recovery software as an SD card repair tool to retrieve the lost data and restore it to a storage device. If you encounter other problems with SD cards, such as unable to format SD cards, you can solve them according to the steps in the linked article.
Part 1. SD Card Repair Tool : Recover Your Lost Data Using A SoftwarePart 2. SD Card Repair Tool : Check DiskPart 3. SD Card Repair Tool : Removing Bad SectorsPart 4. SD Card Repair Tool : Windows ExplorerPart 5. SD Card Repair Tool : Command Prompt
If you need to recover your lost or missing data in the SD card, a professional data recovery wizard is here to help you that allows you to quickly and safely recover your different files. FoneDog Data Recovery is easy and convenient to use as an SD card repair tool that provides quick and deep scans of your files with a high success rate and is 100% secure. You can preview the files before recovery and restore them easily. You are perfectly assured that no data is lost with this remarkable data recovery software.
Retrieve your data from any device and restore them. A free trial of the installer is available and a 30-day money-back guarantee is offered should you purchase it. You can download the data recovery software according to your computer’s operating system (OS) such as Windows or Macintosh. The features of the FoneDog Data Recovery are:
Supported Operating System: Windows, Macintosh
Supported Devices: Computers including Recycle Bin, Memory Cards, Hard Drive, USB, Digital Camera, Removable Drives
Supported File System: NTFS, FAT16, FAT32, EXT, exFAT
Supported Data Types: Image, Video, Audio, Email, Archive, Documents
Supported Situations: File Recovery, Partition Recovery, Hard Drive Recovery, Memory Card Recovery, Flash Drive Recovery, Crashed Windows or Mac Recovery
Remember just three steps to recover your lost data: launch, scan, and restore. Follow the steps below on how to use the FoneDog Data Recovery.
After you have downloaded and installed the FoneDog Data Recovery, open the installed software. Double-click its shortcut icon located on the desktop or click its pinned icon on your taskbar (if a shortcut is created or pinned to the taskbar). Alternatively, go to the Start menu and search FoneDog Data Recovery from the Programs list.
Data Recovery
Recover deleted image, document, audio and more files.
Get deleted data back from computer (including Recycle Bin) and hard drives.
Recover loss data caused by disk accident, operation system crushes and other reasons.
Free Download
Free Download

On the main page of FoneDog Data Recovery, select the different file types to restore and the device (hard disk or removable) where you want to recover your files. Next, press the “Scan” button to start scanning the data files.
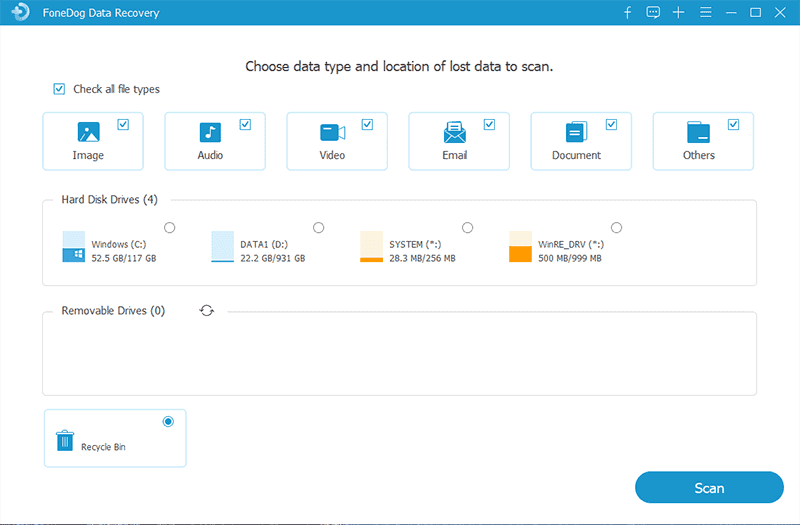
While scanning the data, you need to establish a stable connection between the computer and your SD card device. Check all file types if you want to retrieve all your files in various data types. It can be a photo, audio, video, email, document, application, etc. Then, choose your SD card drive in the Removable Drives.
There are two scans that are available: you can choose Quick Scan or Deep Scan. The first scan will work at a faster speed while the latter will display more contents but will take a longer time to scan. After FoneDog Data Recovery is scanning the device, it will show the file results based on the options you have entered.
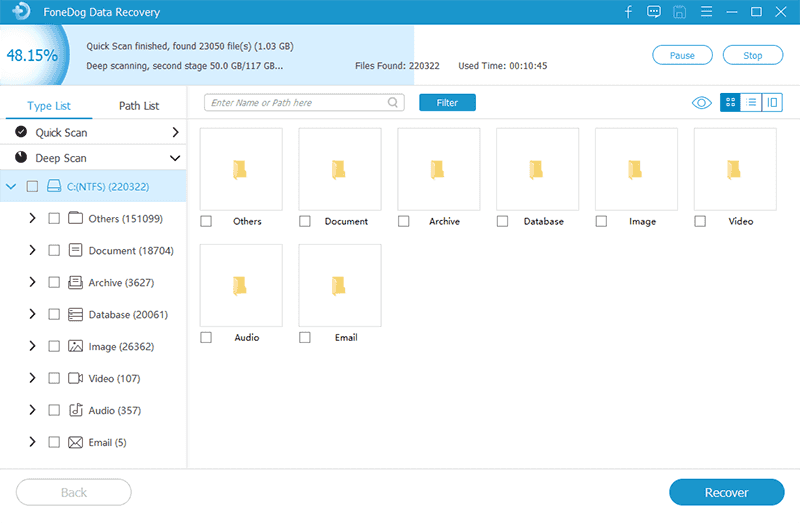
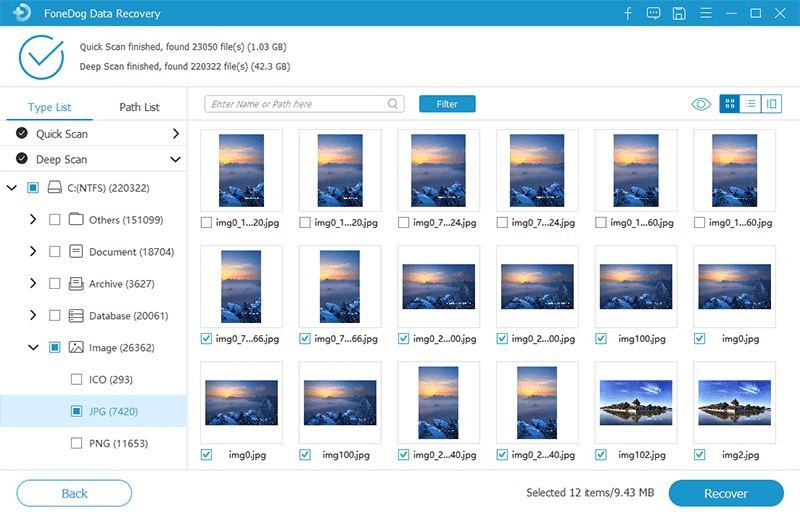
After scanning your device, choose the data files that you want to retrieve. The results will be shown by type or by the path. To filter the contents, you can quickly locate the specific files by inputting the file name or path in the search bar and click Filter. After selecting the data, click the Recover button to restore the data files.
This is a simple process on how to use the Check Disk tool as an SD card repair tool. It will scan your removable device and provide the necessary fix to the underlying problem.
Step 01: Connect your SD card to your computer. Take note of the drive letter.
Step 02: Launch the Run dialog and press Windows Logo + R keys.
Step 03: Type “cmd”, then press “Enter” or click “OK”.
You can also press Windows Logo + X keys and select “Command Prompt (Admin)” or “PowerShell (Admin)”.
Step 04: A blank Command Prompt appears. Type chkdsk C: /f (Change C to your SD card’s drive letter)
Step 05: Hit “Enter”. Wait until the scan and fix are completed.

This process provides steps on how to remove bad sectors in your SD card as an SD card repair tool in Windows. The data in your drive is stored in different sectors and when some sectors become unusable, these are known as bad sectors. These are categorized as Logical and Physical bad sectors. Logical (soft) bad sectors are caused by software issues while physical (hard) bad sectors are caused by physical damage to your SD card.
To remove the bad sectors using Windows Explorer:
Step 01: Connect your SD card to your computer. An automatic pop-up may appear with a message of “Do you want to scan and fix Removable Disk?”
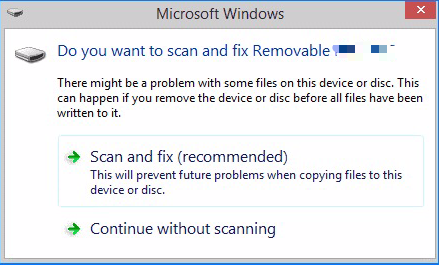
Step 02: Click “Scan and fix (recommended)”.
Step 03: Click “Repair drive”.
Step 04: Alternatively, you can go to This PC or My Computer.
Step 05: Right-click on the SD card drive and click “Properties”.
Step 06: Go to “Tools” and click “Check” under the Error Checking section.
Step 07: In the pop-up that appears, click “Start”. Wait until the error checking process is completed.
Step 08: If there are errors, two options are available to choose from: Restart or Schedule on Next Restart. The first option will immediately start the repair process while the latter will allow you to schedule the repair process. If you choose Restart, do not turn off your computer and wait until the process is completed.
To remove the bad sectors using Command Prompt as an SD card repair tool:
Step 01: Connect your SD card to your computer. Take note of the drive letter.
Step 02: Launch the Run dialog and press Windows Logo + R keys.
Step 03: Type “cmd”, then press “Enter” or click “OK”.
You can also press Windows Logo + X keys and select “Command Prompt (Admin)” or “PowerShell (Admin)”.
Step 04: A blank Command Prompt appears. Type chkdsk C: (Change C to your SD card’s drive letter) to scan the drive for any errors. Note: Make sure to use the correct drive letter so as not to affect your other hard drives.
Step 05: Type chkdsk /f C: (Change C to your SD card’s drive letter) to fix the errors found.
Step 06: A blank Command Prompt appears. Type chkdsk /f /R C: (Change C to your SD card’s drive letter) to find and remove bad sectors.
Step 07: Wait until the repair process is completed. Restart your computer after.
This is a basic method of how to fix your corrupted SD card using Windows Explorer. Formatting the SD card will erase all contents and restore the card to its original state, so before doing that, it is recommended that you use reliable data recovery software that can retrieve your lost data. This is covered in Part 1: Recover Your Lost Data Using FoneDog Data Recovery of this guide.
Step 01: Connect your SD card to your computer. Go to This PC or My Computer.
Step 02: Right-click on the SD card drive and click “Format…” from the menu.
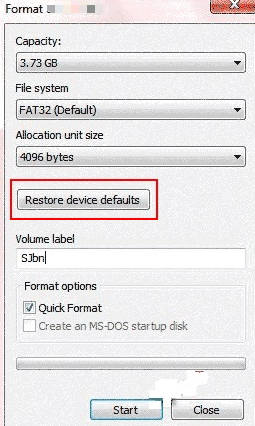
Step 03: In the pop-up that appears, click “Restore Device Defaults”.
Step 04: Click “Start” to format the SD card.
Step 05: To perform a deep scan of the SD card for errors, uncheck “Quick Format”. This will take a longer time compared to a quick scan. If the first format attempt fails, uncheck the option.
A warning will pop up. Click “OK” to proceed with formatting the drive.
This is a basic method on how to fix your corrupted SD card using Command Prompt as an SD card repair tool. The SD card will be restored to its original state and all data will be erased, so before doing that, it is recommended that you use a professional data recovery software that can retrieve your lost data. This is covered in Part 1: Recover Your Lost Data Using FoneDog Data Recovery of this guide.
Step 01: Connect your SD card to your computer.
Step 02: Launch the Run dialog and press Windows Logo + R keys.
Step 03: Type “cmd”, then press “Enter” or click “OK”.
Alternatively, you can press Windows Logo + X keys and select “Command Prompt (Admin)” or “PowerShell (Admin)”.
Step 04: A blank Command Prompt appears. Enter “diskpart“.
Step 05: Type “list disk” and hit “Enter”. This will return the list of all connected storage devices.
Step 06: Type “select disk <number of your disk>” where the number of your disk is the number of your SD card drive.
Note: Type in the correct number of your disk so as not to format your other hard drives. An asterisk * symbol is shown before the name of your selected disk. You can type the disk number again to double-check if correct.
Step 07: Type “clean” and hit “Enter”.
Step 08: Type “create partition primary” and hit “Enter”.
Step 09: Type “active” and hit “Enter”.
Step 10: Type “select partition 1” and hit “Enter”.
Step 11: Type “format fs=fat32” and hit “Enter”.
If you want your card drive to store files larger than 4GB, you can type “NTFS”. Wait until the format process is completed.
People Also Read4 Ways to Do Dead Laptop Hard Drive RecoveryHow to Find Temp Excel Files with Ease
If it cannot be fixed by the above methods and the SD card will not work on any device, then you might need to get a new card replacement. But do not worry about your data. FoneDog Data Recovery software as an SD card repair tool is here to help you. You can recover your lost data from your SD card using this data recovery program. Recover any data type in any situation. Just three steps to do this: launch, scan, and restore.
Leave a Comment
Comment
Data Recovery
FoneDog Data Recovery recovers the deleted photos, videos, audios, emails, and more from your Windows, Mac, hard drive, memory card, flash drive, etc.
Free Download Free DownloadHot Articles
/
INTERESTINGDULL
/
SIMPLEDIFFICULT
Thank you! Here' re your choices:
Excellent
Rating: 4.8 / 5 (based on 87 ratings)