FoneDog Screen Recorder
FoneDog Screen Recorder
Special Offer
Special Offer


By Adela D. Louie, Last updated: June 1, 2021
Have you ever encounter having problems with your USB drive? Did you happen to have the error message saying “the volume does not contain a recognized file system”?
This type of error can be very annoying especially if you happen to use your USB drive every once in a while. So with that, we are going to show in this post how to fix the volume does not contain a recognized file system error. And we are also going to include a way for you to recover lost data if you have any during the process.
In this post, we are going to show you solutions on how you can fix it. So, sit back, relax, and read through this post for your know-how.
In addition to the problem mentioned above, have you ever encountered the error that Windows 10 cannot unmount the boot volume? Click to see how to solve it.
Part 1. Things You Need to Know on Error Message “The Volume Does Not Contain A Recognized File System”Part 2. How to Fix The Volume Does Not Contain a Recognized File System ErrorPart 3. Other Things to Do to Fix The Volume Does Not Contain Recognized File SystemPart 4. Conclusion
So, before you proceed and know how you can fix this type of error, here are the things that you need to know first.
The first thing that you are going to get when you try to connect your external hard drive, flash drive, or your SD card to your computer is when you get an error message saying that you will be needing to format your disk before you can use it. So from here, the first thing that you might do is to cancel this.
And then after that, you will be getting an error message saying that your drive cannot be accessed and that the volume does not contain a recognized file system. These are the first errors that you can receive.
Before you can proceed and fix the error “the volume does not contain a recognized file system” without losing any of your data, then you have to know the causes of this type of error.
This type of error normally happens when the files system information is not available or has an inconsistency in many system tables. This also includes the following:
This happens when you try to disconnect your external hard drive when there is no safety removal on your device from the computer.
Now that you know about this type of error, then it is now time for you to take some action. Now, in this type of situation, what you need to do first is to recover those lost files especially if you have some files stored in it that are important. Though there are some people that say formatting your device will be the easiest way. However, the only problem when you do this is that you will lose all of your files that is why it is not a recommended thing for you to do.
So with that, the proper way for you to fix this is to recover the files that you have lost from your hard drive, then view the files you recovered and then format the file that is not accessible anymore. So let’s get started.
So the first thing that we need to do is to recover those lost data that you have. And the most effective way for you to do this is by using the FoneDog Data Recovery software. This is because the FoneDog Data Recovery software will be able to retrieve all of the data that you lost from your external hard drive. It can recover your photos, documents, emails, videos, audios, and other files.
Aside from that, the FoneDog Data Recovery also has the ability to recover not just only from your external hard drive, but as well as from your Mac and Windows computers. Plus, this software comes with an easy-to-use interface and it is very safe to use as well. We have below included how to use the FoneDog Data Recovery to get back those files that you lost.
Data Recovery
Recover deleted image, document, audio and more files.
Get deleted data back from computer (including Recycle Bin) and hard drives.
Recover loss data caused by disk accident, operation system crushes and other reasons.
Free Download
Free Download

The first thing to do is, of course, to download and then install the FoneDog Data Recovery software from the official website. And once done, you can then go ahead and run the program on your computer and connect the external device that you are working on.
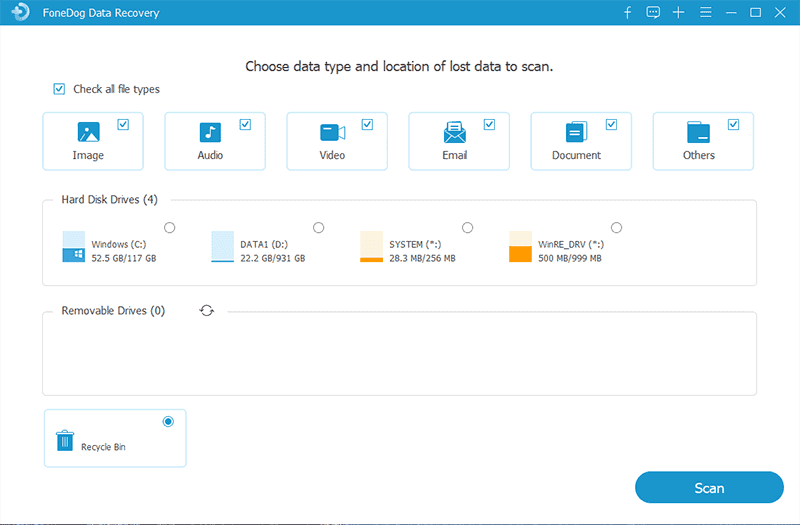
Then, on the main page of the FoneDog Data Recovery tool, you will different file types that it supports. So from there, just go ahead and choose the type of files that you want to recover. Also, you can choose the location of these file types. So just simply choose on the USB drive or external device that you are working on from the selection.
And then from there, the next thing that you need to do is to scan your external device. So just simply click on the Scan button and the FoneDog Data Recovery will show you two options you can choose from. One is the Quick Scan process, and the other one is the Deep Scan process. If you are going to do deep scanning on your device, then you have to patiently wait until the process done because this may take a longer time than the Quick Scan process.
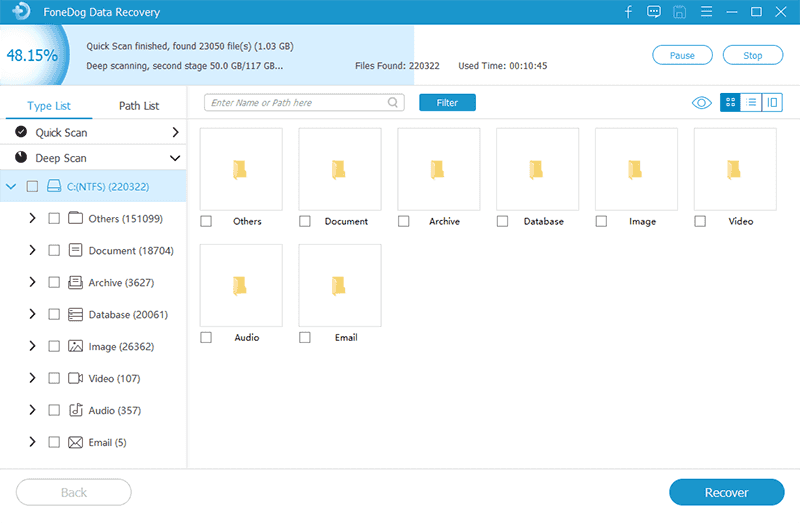
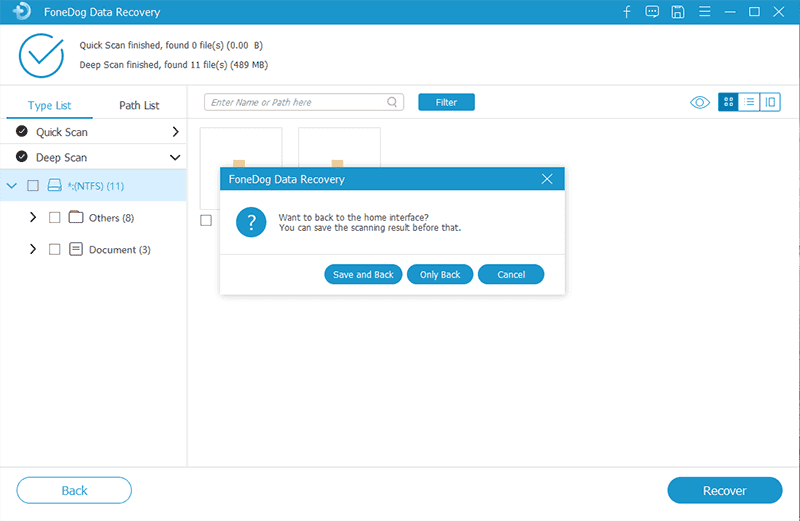
And once that the scanning process is complete, you can go ahead and preview your files. From here, also, you can go ahead and choose those files that you would want to recover. You can also use the search bar for to find your finds easily.
Then after choosing all the files that you want, you can then go ahead and start getting them back. Do this by clicking on the Recover button just below your screen and wait for the process to complete.
Now that you were already able to get back those files that are important for you, then here are some other solutions to fix the volume does not contain a recognized file system.
SFC is one of the built-in tools of your Windows that can allow you to scan your PC for any corrupted or missing file system and have it repaired. To do this, here is what you need to follow.
Step 1: Key in cmd using the search box beside the Start button. And from there, go ahead and right-click on the Command Prompt and then click on the Run as Administrator option.
Step 2: And then from the Command Prompt, go ahead and key in SFC/scannow and then hit on the Enter button.
Another way to fix it is by running your CHKDSK. And here are the steps that you need to follow.
Step 1: Go ahead and run the Command Prompt on your computer.
Step 2: Then key in the command chkdsk f:/f and then press on the Enter button.
NOTE: The f: command here will then scan the F: partition for it to look for any repair and fix it. So what you need to do is to replace it with the right letter of your drive on your PC.
Step 3: After that, wait for the whole process to finish. And once done, go ahead and restart your PC and then check for the error if it still appears on your screen.

Another thing you should do is format your partition on your Disk Management. To do that, here are the steps you need to follow.
Step 1: Go ahead and launch your Disk Management. Just go ahead and right-click on the Start menu and then select Disk Management.
Step 2: After that, go ahead and right-click on the partition that you would want to format and then click on the Format button.
Step 3: After that, select the file system and then hit on the OK button.
People Also ReadWhat Is “Other Volume in Container” And How to Avoid Them?Fix “Could Not Create A Preboot Volume For APFS Install”
So now that you know how you can fix the error “the volume does not contain a recognized file system”, then it is now up to you to apply it. Do not forget to recover your files or data first before you proceed with fixing the problem.
Leave a Comment
Comment

Tech Website Writing /Content Optimization
Singing, smiling, surprising every day!
So as a technical writer, it is my duty to gather effective and reliable solutions to answer questions on how to deal with the issues they are having with their devices.
Data Recovery
FoneDog Data Recovery recovers the deleted photos, videos, audios, emails, and more from your Windows, Mac, hard drive, memory card, flash drive, etc.
Free Download Free DownloadHot Articles
 /
/
INTERESTINGDULL
/
SIMPLEDIFFICULT
Thank you! Here' re your choices:
Excellent
Rating: 4.7 / 5 (based on 76 ratings)
