FoneDog Screen Recorder
FoneDog Screen Recorder
Special Offer
Special Offer


By Nathan E. Malpass, Last updated: September 13, 2018
Nowadays to keep your files safe from loss or theft it is highly advised that you always keep a backup of your data. May it be, your messages or contacts or even your photos, you would want to make sure that you protect such valuable information by creating a copy so in case there would be a need for it you won't need to be frustrated by not being able to retrieve whatever was lost. Creating a backup should be done regularly if not daily then you should at least do it on a schedule if you prefer it that way so that at least if ever something happens to your iPhone you have peace of mind that you would be able to get your data back. We have collated widely used methods for backing up files from your iPhone. Read on to Read on to know how to do a full backup of iPhone.
Part 1. Backing up your iPhone has never been this easy with the FoneDog ToolkitVideo Guide : How to do a full backup of iPhone by FoneDog ToolkitPart 2. Using iTunes to backup data from your iPhonePart 3. Backup files via iCloudPart 4. Other online storage used to backup iPhone dataPart 5. Conclusion
People Also ReadHow to Backup iPhone/iPad to an External Drive6 Slotuion to Fix "Phone Backup Failed"
FoneDog toolkit's created as an alternative for iTunes and iCloud that offers convenience and guaranteed success each and every time. See if you encounter errors like some items won't backup you would definitely be out of options and might even take longer to fix the problem. Well, worry no more, the toolkit provides a way for iDevice users to not only easily create a secure backup file but it would also allow you to safely restore it to your device without data loss and overwrite. You won't be limited in terms of storage like when you use iCloud. Read on to know more about the simple steps to benefit from the toolkit's iOS Data Backup and Restore feature.
Let do a full Backup of iPhone process commence.
Download the FoneDog Toolkit from the official website then complete the installation. Launch the software after plugging your iPhone (it is highly advised that you only use the original USB cable that came with your device).
Once your iPhone is detected select "iOS Data Backup and Restore" from the main dashboard.

In this step, you can select the backup mode you want. There is tow mode for you. One is "Standard backup", and another is "Encrypted backup".
For the Encrypted backup, you can backup files with one password to protect your private information. After select backup mode, click the "Start" button to continue.

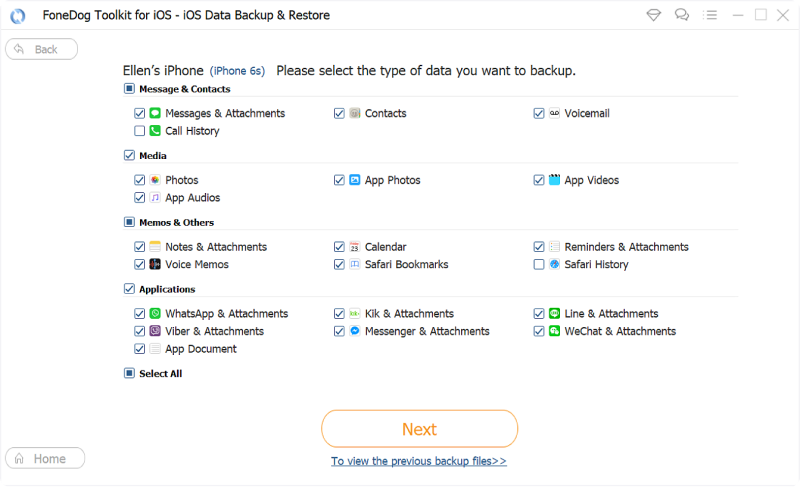
Once you have chosen the type of backup you wish to create click on "Start" which in turn will bring you to a screen where you will see available files on your iPhone that can be backed up categorized by type to make it easier for you to pick the ones you would like to keep a copy of.
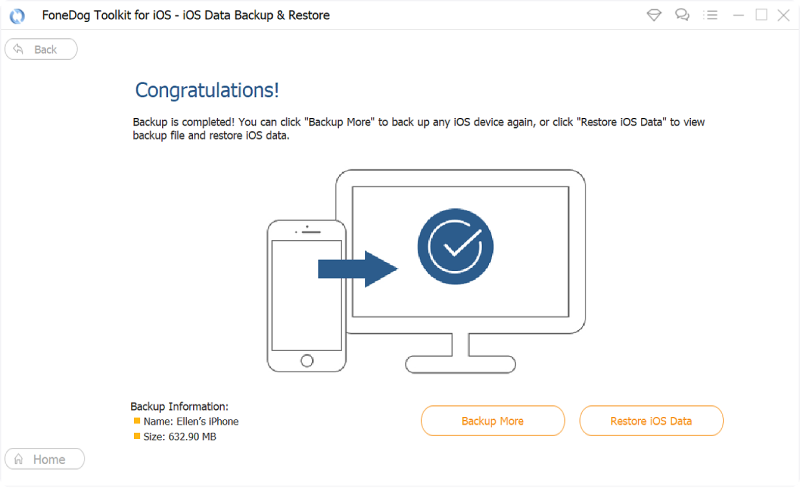
You can click on "Next" which would prompt the toolkit to initiate the backup process. Nothing else to do while it's ongoing but to wait until it's done.
There will be a notification that tells you that it has completed and will show you the name and size of the file that was created.
If you would want to add more you can select "Backup More" or if you want to have a copy on another device or have it stored on your PC you can choose to click on "Restore iOS Data".
Now let's learn about how to do a restore in case you need it.
Assuming you have completed a reset on your iPhone, will be using a new device or you would just want to save the file on your PC make sure the software is up and running and then now you would need to select "iOS Data Restore".
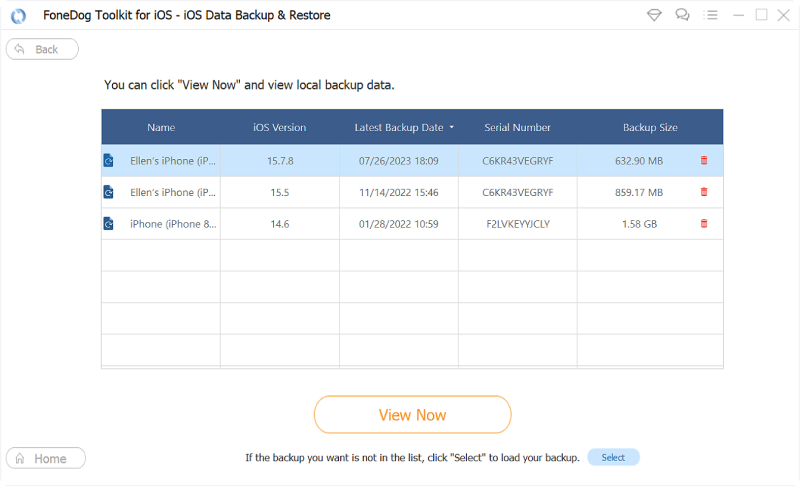
The next step would be the FoneDog Toolkit showing you a page that contains a list (if you have created several) of backup files available for transfer. By default the most recent one created would be the first one displayed.
After carefully reviewing the said list you can click on "View Now" so that the toolkit will begin its scan of the backup file you wish to restore.
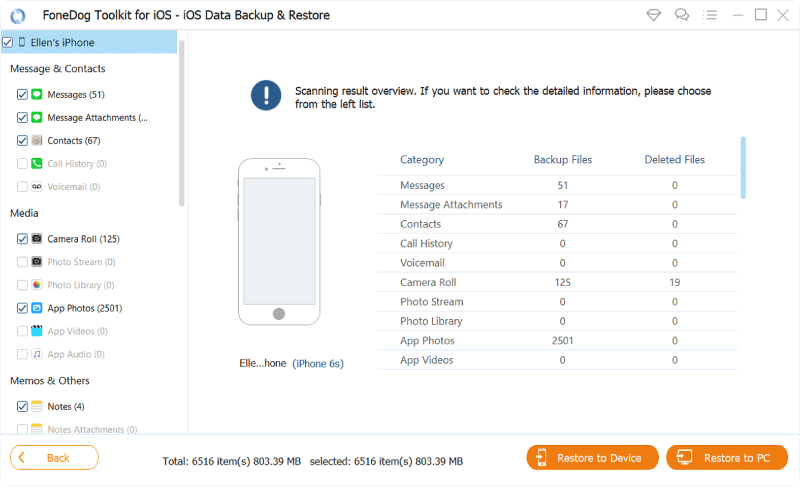
You'll see the progress while it's ongoing and even have the ability to pause or stop the scan if you want to.

When the toolkit finishes the scan it will show you a more detailed view of the backup file this will allow you to explore the contents. It is still categorized but each has a drop down options for you to be able to check each item one by one.
Once you're ready to proceed you just need to choose where to have it restored, either on your device or your PC then you're done.
Watch the video below to learn how to fully back up your iPhone with the FoneDog Toolkit
Follow these steps on how to do a full backup using iTunes and Restore the file on your iPhone, other iOS device or directly to your PC or Mac. (Important Note: Make sure that you have the latest iTunes version installed before proceeding)
Step 1: Connect your iPhone to your computer then launch iTunes (use only the original USB cable that came with your iPhone)
Step 2: Once your device is detected it will show up on the iTunes interface under "Devices". When you click on your device it will bring up a page that will now show you the summary details.
Step 3: Make sure that the box associated with the "This Computer" is checked then click on "Backup Now"
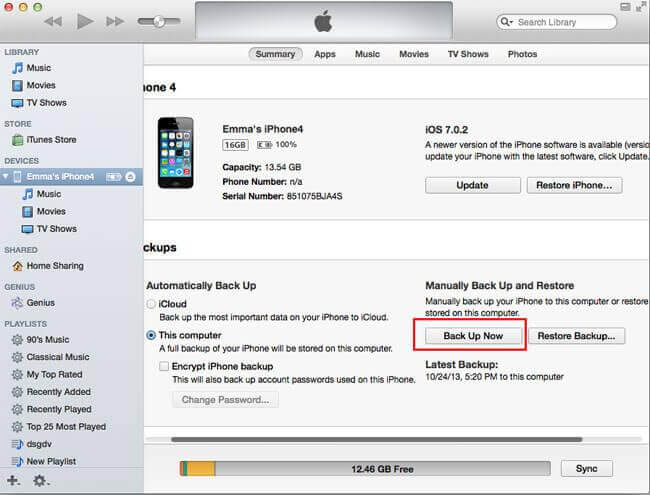
Step 4: This will now initiate the backup process of your iPhone. Take note it will take some time since iTunes backs up all data on your device. It would be best to not do anything else for the meantime and just let the process finish.
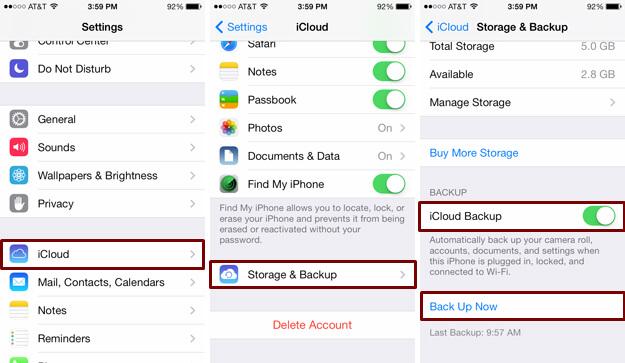
If you don't have access to your computer and you are in need of a way to create a backup you can directly do it on your iPhone using the iCloud service. Here are the steps to do it.Important Note: You either need a Wifi connection or use your cellular data to use the iCloud storage.
Step 1: After making sure that you have connected your iPhone to a stable network go to your device's "Settings"
Step 2: Tap on iCloud then go to "Storage and Backup"
Step 3: Make sure that "iCloud Backup" is enabled this would allow automatic backup from here on. Then tap on "Backup Now" to initiate the process.
Step 4: Keep your iPhone connected to the internet and plugged into a power source until it finishes backing up. To check on the file that was created just go back to your iPhone's settings then iCloud after which tap on "Manage Storage". Select your device, on the next page you should see the details of your backup like time and size.
Important Note:
Before doing a backup using iCloud make sure that you check that you have enough storage space left. You initially get 5GB but if this won't be enough then you would need to purchase additional storage for a monthly cost.
Just like the iCloud drive provides Apple users a way to create backup files for the data stored on their iPhone's there is similar software that is available for use that provides almost the similar feature. To name a few that are popular with users are Google Drive, One Drive, and Amazon cloud drive. These apps are diverse in a way that if you would like to switch to an Android device and have some of your iPhone's previous contents transferred you would be able to do so. The only downside as mentioned is that it only allows you to back up some of the data from your iPhone, most of the time you can only save your photos, videos, contacts, and messages. The apps and app data and other settings can't be included. But if the majority of your stored data are media files then it won't make much of a difference and it would actually be convenient for you to store it on platforms like Google photos.
Our devices are integral parts of our day to day routine may it be for personal use, work, school or business related. We accumulate important files over time and even a simple SMS can be so important that we got to make sure that we keep it secure. We can never tell what may happen our devices are prone to hardware failure or software malfunction which can be fixed but the data associated can't easily be protected. That's why backing up your iPhone regularly is highly advised nowadays. That's mainly why the FoneDog Toolkit was created with the iOS Data Backup and Restore feature to give iDevice users peace of mind that if anything happens there would be a way to keep important data safe from being completely lost or erased. Not only do you get 100% success rate but you also get the chance to be able to free up some space on your iPhone and still keep all your old files that someday you may still need intact and easily accessible. Download the toolkit today and experience the hassle-free features it has to offer you.
Leave a Comment
Comment

iPhone/Android Devices’ Maintenance Expert
Staying home, listening to music, writing tech articles
Many people asked me to repair their mobile phones so I have a lot of experience in mobile phone repair, and I know a lot about Android or Apple phones.
iOS Data Backup & Restore
Back up your data to PC and selectively restore iOS data from backups.
Free Download Free DownloadHot Articles
 /
/
INTERESTINGDULL
/
SIMPLEDIFFICULT
Thank you! Here' re your choices:
Excellent
Rating: 4.5 / 5 (based on 82 ratings)
