FoneDog Screen Recorder
FoneDog Screen Recorder
Special Offer
Special Offer


By Vernon Roderick, Last updated: August 3, 2018
"Why my iCloud backup couldn't be complete? And how can I fix it?"
In this article, we are going to try and troubleshoot the problem for you and get your iCloud backups working again.
Backing up our iOS device is important, especially if you have a lot of important files and data that you would want to be protected and secured. Now, one of the ways that you can backup your data and file is through iCloud, especially if you’re paying for more storage space.
The process of doing this is simple and easy, and there usually won’t be any problems. However, there will be cases where you will be met with the “iCloud backup could not be completed” problem and your files and data won’t back up properly.
There are a variety of reasons why this would happen, but this article won’t be discussing that. This article will be discussing how to fix the “iCloud backup could not be completed” problem.
Part 1. 4 Solutions to Fix Your iOS Device Not Backing Up on iCloud.Part 2. How to Backup Data When iCloud Not Work?Video Guide: How to Backup and Restore Data from iPhone?Part 3. Conclusion.
When it comes to fixing the problem, there are actually a lot of ways that you can do it and one of those ways is the simplest and easiest solution available.
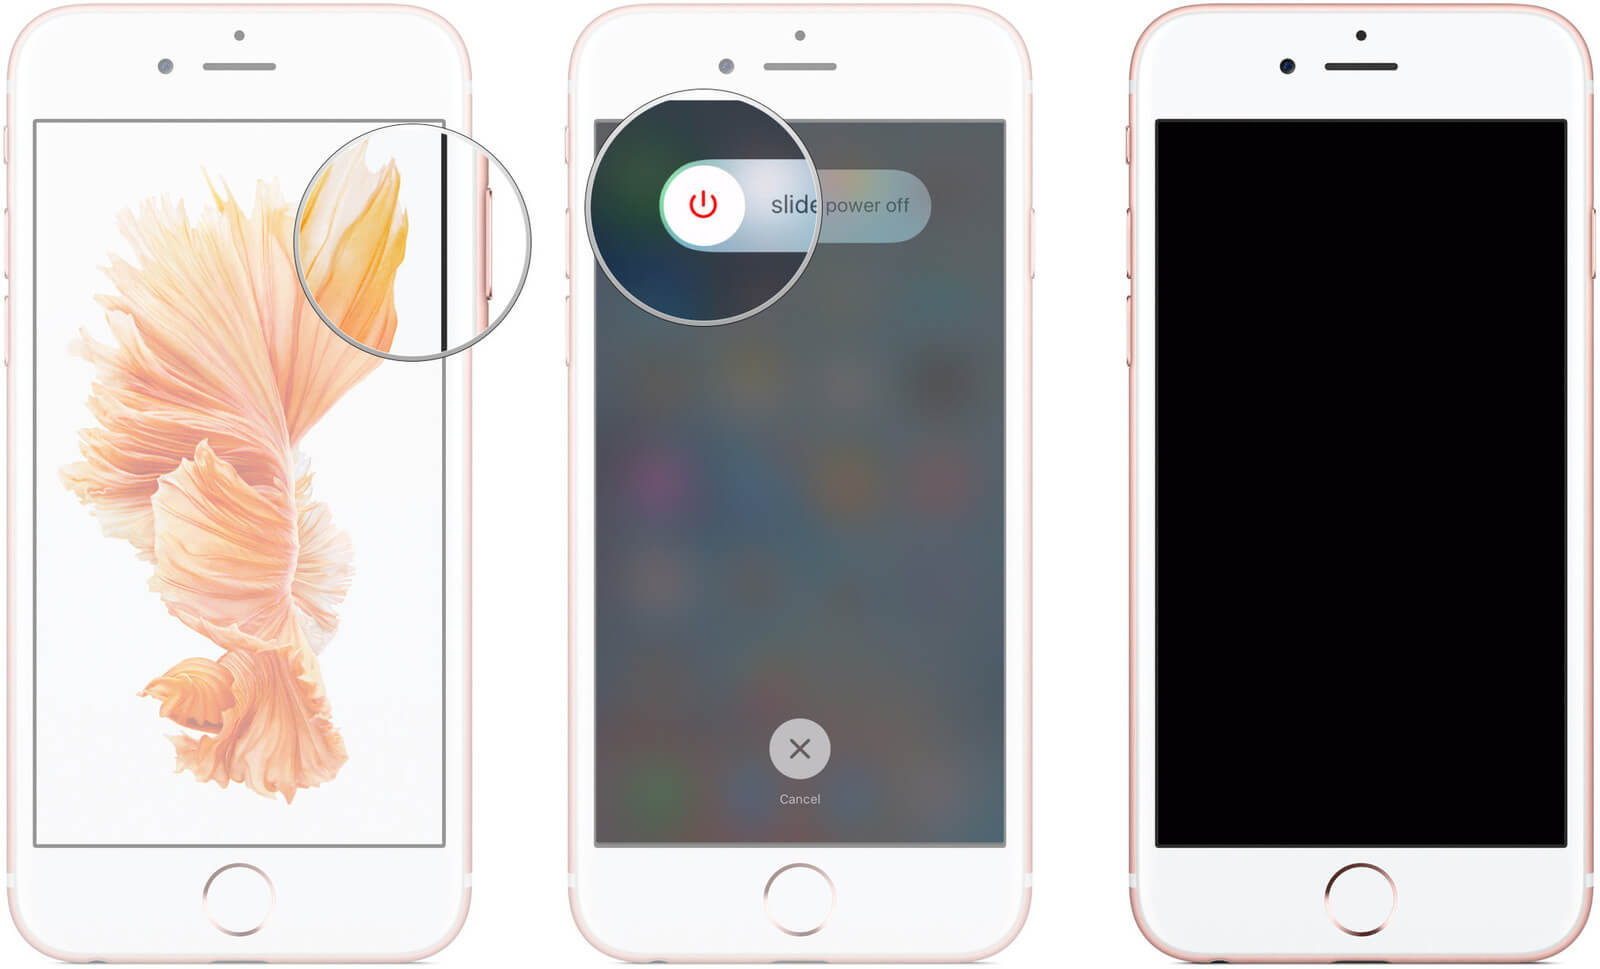
This solution is actually commonly used to fix a lot of issues and problems with a lot of devices, and this could include fixing your iCloud error. It is easy and simple to do this, you would just need to hold the power button and the home button on your device simultaneously until the device starts to reboot.
This method is basically forcing your device to reboot. You can also do it the normal way by just switching it off by holding the power button and sliding the power off toggle on the screen then switching it on again.
Now it the above fix didn’t work, the next thing that you need to do is to double check your iCloud settings to see if iCloud Backup is turned on.
To do that:
For the automatic backup of iCloud to function properly, your device would need to be connected to a WiFi Network and to a power source. You should also check if your iCloud still has storage space, the error in the backup process could possibly be because you don’t have any more space on your iCloud.
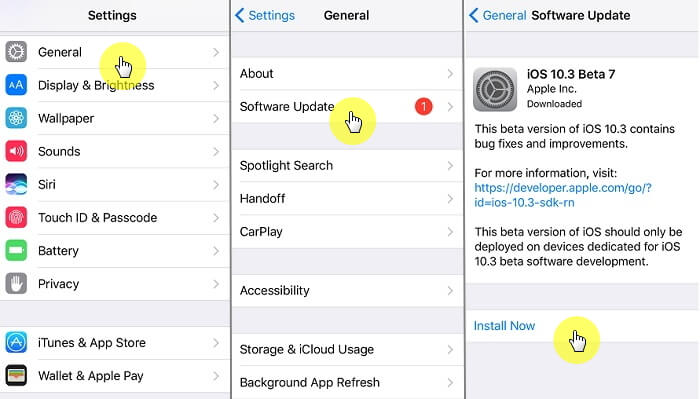
Another solution that you can try is checking to see if your device’s iOS is updated. Though this solution won’t guarantee that it will fix your problems with the iCloud backup, there are some updates that provide bug fixes, so keeping your device updated could make your iCloud work properly.
To do this:
It is important that your device is connected to a WiFi Network when you are verifying its iOS version and updating it to a newer version. It is also important that you first backup your device before updating the iOS.
Since your iCloud backup is not working properly, you need to back up your file using on a computer using iTunes so you can restore it back to its previous setting in case something goes wrong with the updating.
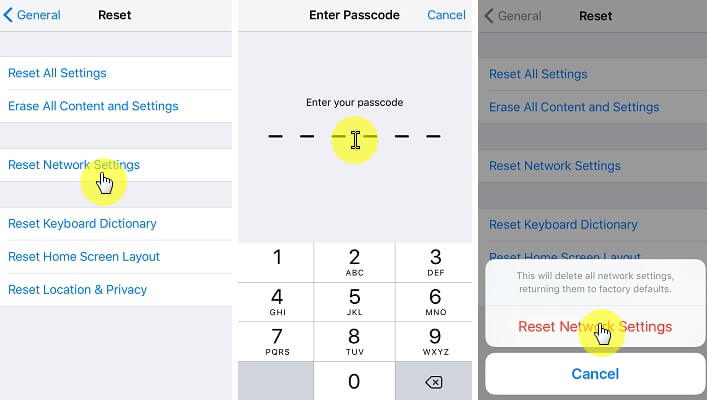
If other solutions still don’t work, you can try deleting your old backup file in iCloud and resetting the network settings of your device. You would first need to backup your device to your computer, though, using iTunes to avoid losing any important data. Now to delete your old iCloud backup file and reset your network settings.
You need to:
It can be a problem if you won’t be able to back up your data in your iCloud account, especially if you have important files you want to preserve. A lot of people, though, don’t really use their iCloud for their backup files because of its limitations.
One of the limitations is the storage space given for free is only 5GB and you will need to pay monthly to increase the limits of your storage space. Another limitation is that you can’t fully view the data contained in your backup file.
iCloud only allows you to view the size and date when the backup was created. This makes it harder for you to see if the backup contains the important data that you need, especially when you’re in the process of restoring your device. This is why using a third-party provider to back up your files and data is often suggested.
One such provider is FoneDog Mobile Solution Provider, which offers the iOS Data Backup and Restore software for your backup needs. The good thing about this software program is that it is simple and easy to backup your device.
It also allows you to preview the individual files and data you backed up so you can selectively restore them. The software is an ideal program for backing up and restoring your iOS device. Download and Try this Software before you Buy!
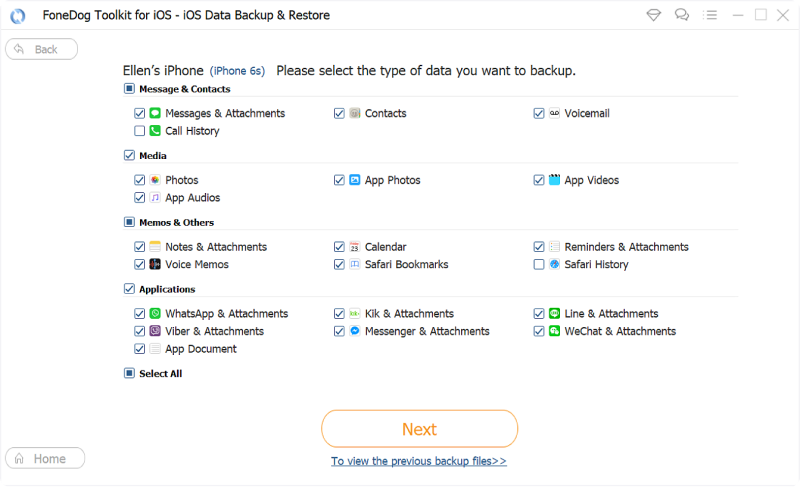
Step 1. To back up your files and data using the program, you would first have to connect your iOS device to a Mac or PC and install the iOS Data Backup and Restore software from FoneDog. Then you would need to open the FoneDog Toolkit – iOS Toolkit and click iOS Backup & Restore and choose iOS Data Backup.

This will take you to a page where you will need to choose the Data Backup Mode you will use to backup your files. You will have two choices here, it is either Standard backup or the Encrypted backup.
The former is the regular backing up of data while the latter will allow you to input a password so only those who know the password can access the backup file. After selecting the mode, it is time to click Start and then choose the data and files you want to be backed up.

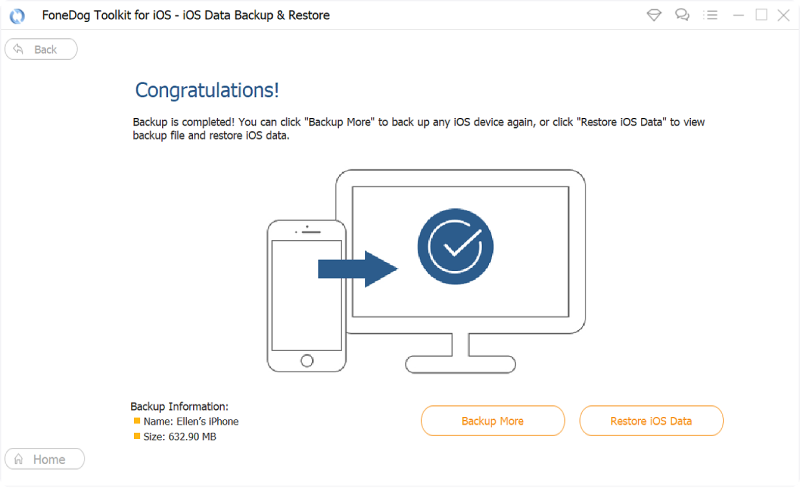
Once a selection has been made the FoneDog Toolkit will begin backing up the data and it will display the name and size of the backup once it is done. Now that the files and data of your iOS device have been backed up, you can choose to restore it to any device whenever you need to do so.
As mentioned above, the software will provide you with an option of previewing individual data to allow you to selectively restore the file to your computer or device. The beauty of the iOS Data Backup and Restore is that your data will be 100% secure during the backing up and restoration process.
You won’t have to worry about losing any data during both processes, as the software will protect your precious data. And the best part here is that you can try out the iOS Data Backup and Restore for free. FoneDog allows for a 30-day trial period to let you test the software and see if it is something that you will need.
Can't-miss:
How to Selectively Extract iCloud Backup to iOS Devices?
How to Delete Photos from iCloud
Yup! you can do it with one click. This is through the help of a great program called FoneDog Toolkit - iOS Data Backup & Restore, which will help you backup and restore whatever data you like!
Backing up your iOS device’s data and files is an important task to ensure that your data will be protected in case something happens to your device. One of the most common ways of backing up your data is through iCloud.
It is an easy and simple process to do so, and you won’t usually experience any problem. There are, however, cases where backing up your files in iCloud will result in an error. Now, there are a lot of possible reasons why this would happen. Fortunately, there are also several solutions that you can try to fix the problem.
This is why a third-party solutions provider, like FoneDog and their iOS Data Backup and Restore software is something that I will recommend. The software program allows you to easily backup the files and data of your iOS device, as well as easily restore them.
Leave a Comment
Comment

Technical Expertise for PC/Website Optimization
One of my passion is to develop software of my own
I write articles to share knowledge about IT technology and some experience in developing my own software, and developing my own software is one of my passions for work.
iOS Data Backup & Restore
Back up your data to PC and selectively restore iOS data from backups.
Free Download Free DownloadHot Articles
 /
/
INTERESTINGDULL
/
SIMPLEDIFFICULT
Thank you! Here' re your choices:
Excellent
Rating: 4.7 / 5 (based on 62 ratings)
