FoneDog Screen Recorder
FoneDog Screen Recorder
Special Offer
Special Offer


By Gina Barrow, Last updated: July 4, 2017
"How do I get my data back on my new iPhone from iCloud? I want to set up my new iPhone and transfer my existing iMessage threads and other photos only. My old iPhone has been fully backed-up to my iCloud account but I don't want to do a full iCloud restore to the new iPhone because there's a lot of old junk and I'd like to start fresh and new." ~User from Apple forums
Every time Apple launches their new iPhone series, everyone is excited to get their own just like the recent iPhone 11. This new phone is loaded with cool features like its wireless capabilities, sleek design, and great camera settings. It has improved a lot of things from the last model that many iOS lovers are really dreaming of getting their own iPhone 11. Since you are prepping up for your new phone, you might have already done series of backups to make sure you got what you need on the new device. However, you backup your apps and other contents to iCloud, it seemed that there’s no way to selectively restore iCloud backup contents to your new iPhone. You will need to restore the whole backup file because iCloud does not allow selective restore, only selective backup. This might cause trouble in the case and mess up your new phone. In this article, we will learn about the different methods to backup and restore iCloud backup to iPhone selectively.
Part 1. Selectively Backup Contents to iCloudPart 2. Selectively Restore iCloud Backup Contents with FoneDogPart 3. What Do iCloud Backups?Part 4. Video Guide: How to Recover an iCloud Backup to iPhone 7 Selectively?
You know very well that iCloud has only 5GB free space, so if you are using multiple iOS devices and has a lot of apps and files, you might have storage issues with your iCloud but of course, you can always purchase for more space. One way to save some space is to backup only those important data, mostly photos, videos, music, and other media files. These files also consume much space in iCloud. However, there is an option in iCloud that you can selectively do backups without compromising the free storage. If you are using iOS 10.3, you are able to manually control your backups in iCloud, see the steps below:
To view iCloud storage
You can optimize the allotted iCloud space by simply checking the space consumed already and decide on whether to erase some very old backups or purchase for more space.
By doing this option, you can manage your backups easily without adding some junks on your iCloud files. Now if the new iPhone 7 is ready and you have all the backup files needed to selectively restore, in the next part of this article, you will be amazed on how you can selectively restore iCloud backup contents to your new iPhone 7 conveniently.
 Recover Data From iCloud
Yes, it is very much possible to selectively restore iCloud backup contents. What you need is FoneDog iOS Data Recovery, a program that is specializing in iOS device backup and recovery. It has amazed many iOS owners with its easy to use interface and flexible tool options. Using iCloud Recovery. Find out how this software works:
If you haven’t downloaded FoneDog iOS Data Recovery yet you may do so. After downloading, install the software and launch. Choose Data Recovery when you reach the main menu.
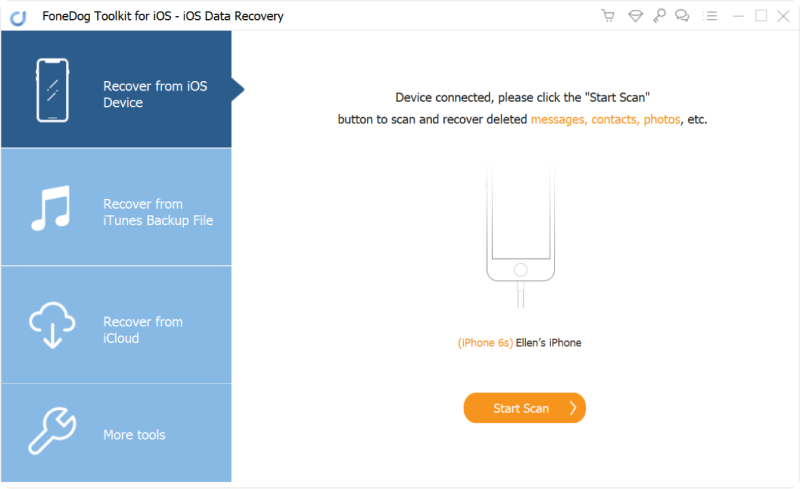
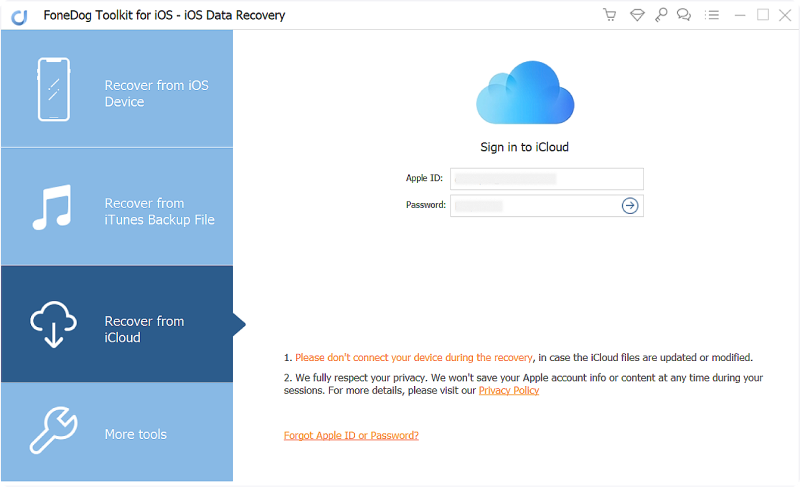
Click on Recover from iCloud Backup Files and connect your new iPhone 7 using the USB cable that came along with the box. On the main screen, you will be asked to log in to your iCloud account. Enter the username and password to get into your backup files. FoneDog iOS Data Recovery does not save your information for privacy protection. Make sure the connection is not interrupted to avoid any issues.
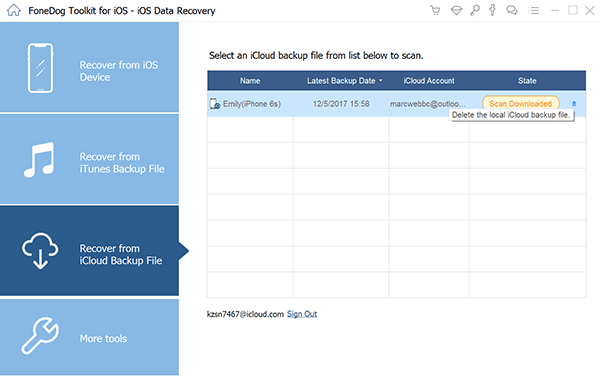
Once you have logged in, you will see the lists of iCloud backups available, you need to select the desired backup file to be extracted.
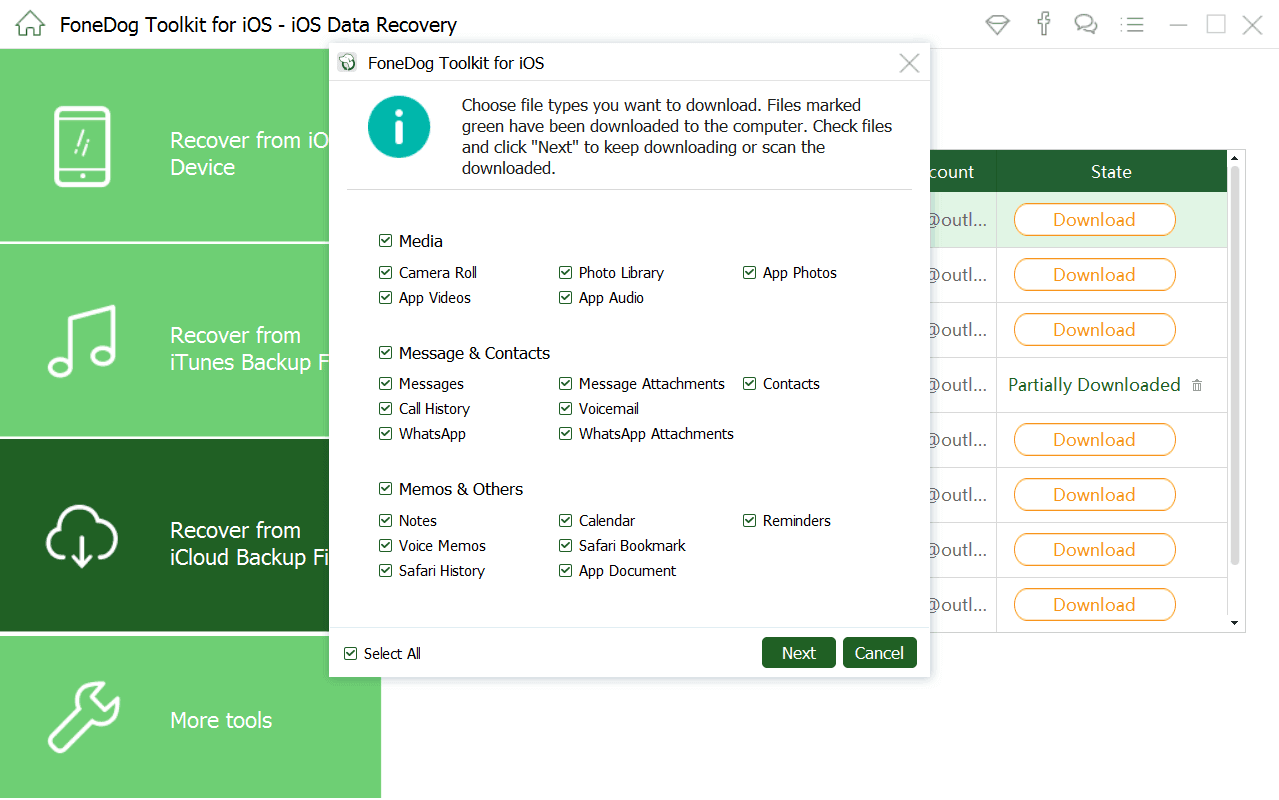
After choosing the desired backup file, you will see a pop-up window with all the file types available for downloads such as photos and videos from App, camera roll, and App videos; messages and call logs, memos and notes. You can do selective apps or select them all. Click next to continue.
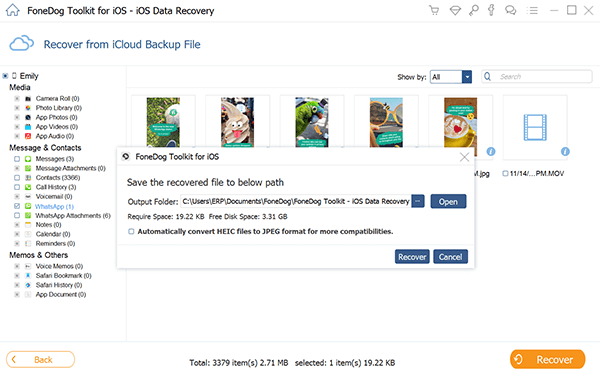
FoneDog iOS Data Recovery will now scan the backup file and extract them right after. When the scanning stops, you will see all the files categorically wherein you can preview each item to make sure you got the right one. You can go over each file and tick each box beside the item for multiple selections or simply click the select all box to restore all the extracted backup files. You can choose to Restore to Device to finish the process.
FoneDog iOS Data Recovery is so easy to use and can be done by anybody even those without any technical backgrounds. It is also available to both Windows and Mac computers so everyone can use it. All you need is this software - FoneDog iOS Data Recovery and follow the guides above. This program has in fact 3 methods for recovery: Recover from the iOS device, Recover from iTunes Backup File, and Recover from iCloud Backup File.
iCloud basically makes a copy of your iPhone, iPad, and iPod touch information so whenever you set up a new device, you can easily restore your information using the iCloud backup. You can also turn on iCloud Photo Library on your new iPhone 7 so all the photos and videos will be saved in the iCloud. All your purchases from the App Store such as music, movies, and videos, will be saved as well except for the contents, it only records your purchase information but you can re-download the app or content from the App store at any time. Before that, you have to make sure you have set up iCloud in your iPhone 7.
Set up iCloud
You can also set automatic iCloud backup so you don’t have to worry about data loss. Here’s how to do it:
Sync Important files
You can sync your emails, contacts, calendars, notes, and reminders so you can access them in any of your iOS devices and online.
Note: You can set iCloud as the default account for contacts, calendars, reminders, and others so that any new contact is added are synced directly to your iCloud account. In order to do this, you can go to Settings > Mail, Contacts, and Calendars on your iPhone> Scroll down until you see contacts, calendars, reminders, bookmarks, etc… and then set the Default Account to iCloud. If you have saved your contacts to anywhere else on your phone, you can always merge them to remove any duplicates.
iCloud is a very good feature that allows all users to effectively backup their data without much to do. However, the only problem is, whenever issues arise such as you want to recover specific data, you don’t have any option to do a selective restore. You need to download the entire backup file and it might cause more data loss because your existing apps and settings will be gone and might be replaced by the old files. The good news is, FoneDog iOS Data Recovery is a perfect program designed to give peace of mind to all iOS owners. This software allows you to preview the files first prior to recovery which sets them apart from the rest of the programs available in the market today. You can now selectively restore iCloud Backup contents to your new iPhone 7 with FoneDog iOS Data Recovery. Give it a try!
Leave a Comment
Comment

Technical/Creative Writer
Kitchen, my safe space; black, my favorite color
Was a Technical Specialist for a while, troubleshooting Smartphone and Software-related issues until a writing stint caught my attention.
iOS Data Recovery
3 Methods to recover your deleted data from iPhone or iPad.
Free Download Free DownloadHot Articles
 /
/
INTERESTINGDULL
/
SIMPLEDIFFICULT
Thank you! Here' re your choices:
Excellent
Rating: 4.5 / 5 (based on 79 ratings)
