FoneDog Screen Recorder
FoneDog Screen Recorder
Special Offer
Special Offer


By Gina Barrow, Last updated: April 20, 2017
It is no secret that message is so important in our life. You may wonder how to recover deleted iMessages from iPhone. Here you can find an answer. You may wonder know how to do it. Many people have met such a situation like below.
"My son accidentally deleted iMessages on his iPhone 7. He is not too happy about that. Is it possible to recover deleted imessages free? Can somebody please help me? Thanks in advance."
If you are using text messages most of the time on your iPhone, iPad or iPod touch, you may have also used iMessage on your iOS devices. You will notice then that both services are totally different technologies apart though they work similar to each other.
Text messages will cost you extra on your mobile plan or prepaid account; iMessage, however, is an instant messaging application for all iOS devices such as iPhone, iPad, iPod Touch and even Mac. Using iMessage has a lot of advantages which makes it unique from other SMS or MMS applications.
However, using iPhone isn’t always smooth sailing, there are rough times too and one of them may be losing or deleting your important iMessages. It can be more frustrating when you haven’t used any backup on your iOS device. The best thing about technology these days is that it can almost do anything possible.
And in this guide, I will show you 3 Ways how to recover deleted iMessages from iPhone SE(2021)/11/X and other devices.
Video Guide: 3 Ways to Recover Deleted iMessages from Your iPhonePart 1. How to Recover Deleted iMessages on iPhone DirectlyPart 2. How to Restore Deleted iMessages using iTunes BackupPart 3. How to Retrieve Lost iMessages using iCloud Backup
In fact, though similar to other instant messaging apps like WhatsApp, iMessage app only works between Apple devices running iOS 5 and up or on a Mac running OS X Mountain Lion or up, where users can also create group chats to make the conversations even better.
iOS users can use iMessage over wireless network and mobile data which makes sending and receiving messages faster. With iMessage, you can do a whole lot more than just messaging; you can send larger files like photos, contacts, videos, documents, and even locations.
Once you are connected to the internet, you can enjoy faster and smoother messaging plus it won’t cost you anything on your cellular bill. To turn-On iMessage simply go to Settings>Messages> iMessage and simply switch it ON.
Go reading and get the 3 ways to recover deleted iMessages from iPhone.
Deleting or losing conversations in iMessages can be really frustrating especially when those important messages came from a special person or a group of people. It may seem like a dead end when you discovered that you don’t even have backups set.
FoneDog - iOS Data Recovery will save you from all the hassles and frustrations. This third party software is every iOS user’s dream partner in times like this.
FoneDog is a professional recovery program that allows you to retrieve lost or deleted files from any iOS devices like iPhone, iPad, and iPod touch. You can restore your lost photos which are important for you with FoneDog not only recover the iMessages.
FoneDog - iOS Data Recovery is easy to use, convenient and effective. To begin your recovery adventure, refer to these simple steps:
iOS Data Recovery
Recover photos, videos, contacts, messages, call logs, WhatsApp data, and more.
Recover data from iPhone, iTunes and iCloud.
Compatible with latest iPhone 11, iPhone 11 pro and the latest iOS 13.
Free Download
Free Download

Here is the 1st way to directly retrieve deleted iMessages from iPhone in the 3 ways to recover deleted iMessages from iPhone in details:
FoneDog - iOS Data Recovery works with Windows or Mac to bring you the optimum quality and service in recovering important files back.
To start with, download the software and install it on your computer. Once installed, launch the software and connect your iOS device using an original USB cable and click on “Recover from iOS Device”.
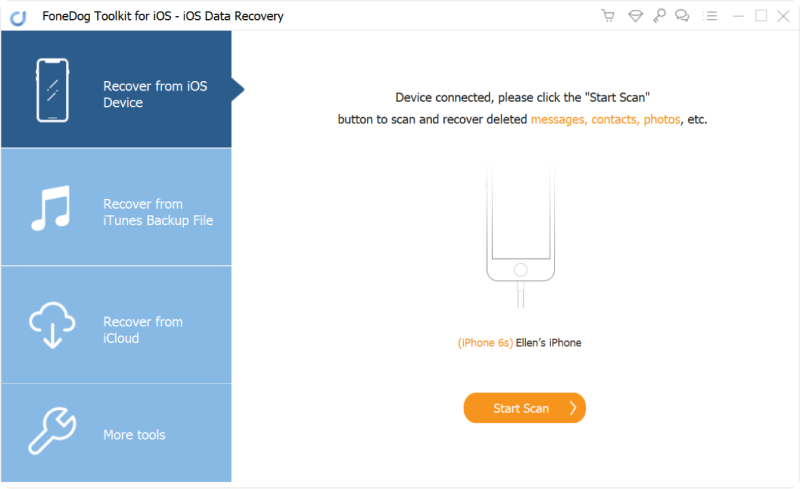
Once the connection is established, FoneDog toolkit will prompt on the dashboard both existing and deleted files for recovery.
Then click on “Start Scan”.
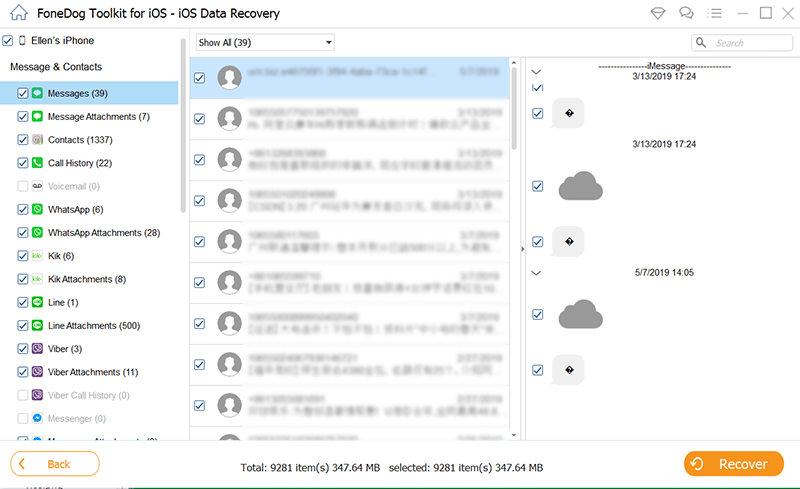
Scanning may take time base upon the load of data you have selected for recovery. However, once it is completed, you will have the chance to preview those deleted iMessages back.
On your left side tool panel of the dashboard, you can see the category lists of the recovered files and data; choose iMessage then go over to the missing messages.
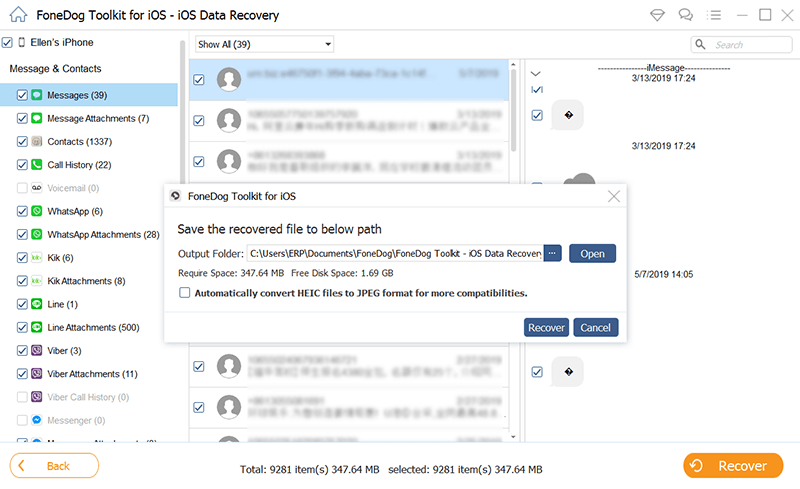
Each item has a checkbox beside, simply tick the box desired to retrieve and then click on “Recover” where it will save the missing files on your computer.
FoneDog - iOS Data Recovery is highly recommended by millions of users worldwide. This program allows you to recover deleted or missing iMessages in 3 ways. Here are the other recovery steps:
This second recovery option will be using your iTunes backup. It will restore the most recent backup file from your iPhone, iPad, and iPod touch. If you have an iTunes backup, follow the steps below of the 2nd way to retrieve deleted iMessages from iPhone through iTunes backups in the 3 ways to recover deleted iMessages from iPhone in details:
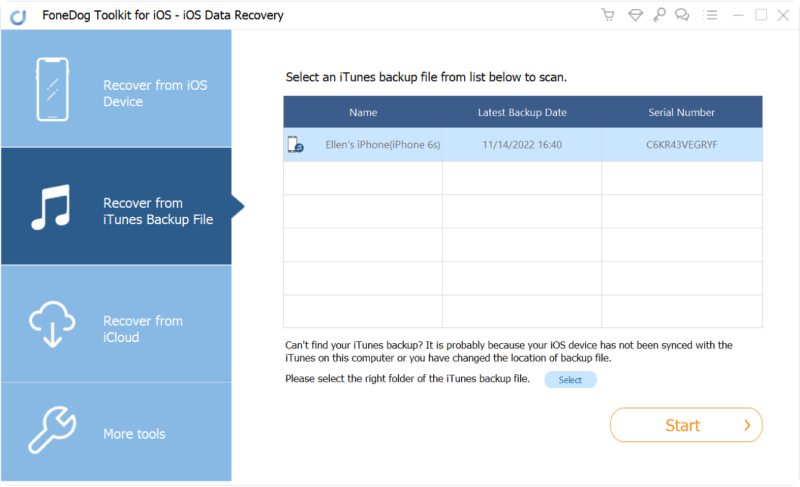
After you have downloaded the FoneDog - iOS Data Recovery software, launch the program, connect the device with the original USB cable and click on “Recover from iTunes Backup File” from the left side panel of the dashboard.
The recent backup files of your device will automatically appear on the screen once the connection is established. Select the right device name and click “Start Scan”
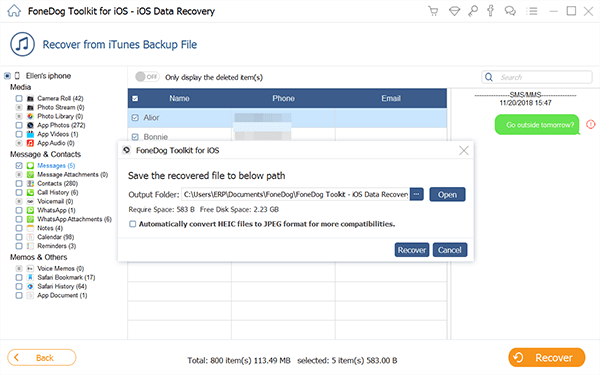
After the scanning is completed, FoneDog - iOS Data Recovery will extract all the data inside the iTunes backup then will display all the recovered items in a category list.
Head over to an iMessages folder to retrieve those important messages back. Preview one by one to make sure of the contents then you can choose all or selectively choose each item by simply clicking on the checkbox beside each item.
After carefully verifying the messages, you can click on “Recover” where it will be saved in a folder on your computer.
The third step in recovering deleted or missing iMessages is through iCloud back-up. This step, however, requires you to restore the full backup and reset the iPhone just like brand new. This means all existing data inside your iOS device will be erased. If you would like to go through iCloud recovery and view deleted text messages in iCloud, follow these steps of the 3rd way to retrieve deleted iMessages from iPhone via iCloud backups in the 3 ways to recover deleted iMessages from iPhone in details:
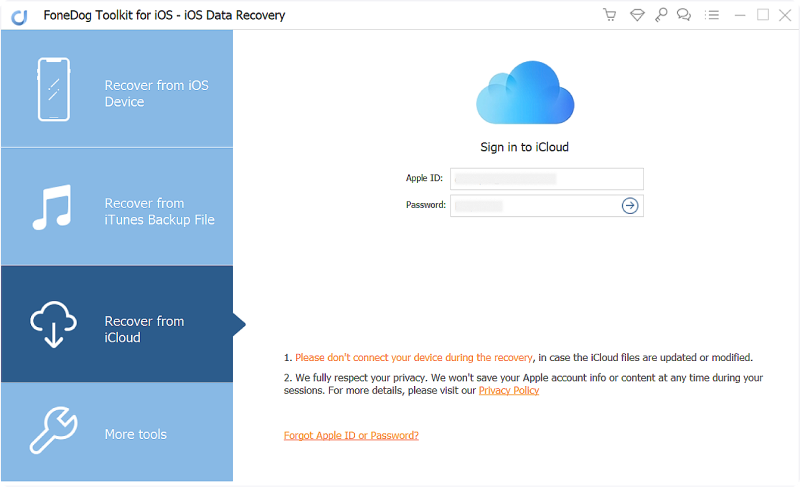
While the FoneDog - iOS Data Recovery is running, click on “Recover from iCloud Backup File” from the left-side panel of the dashboard. To continue, you need to log in using your iCloud account.
After successful login, the software will go over the all the iCloud backup files automatically. Choose the most recent backup by clicking on the right device name and model then head down to “Start Scan”
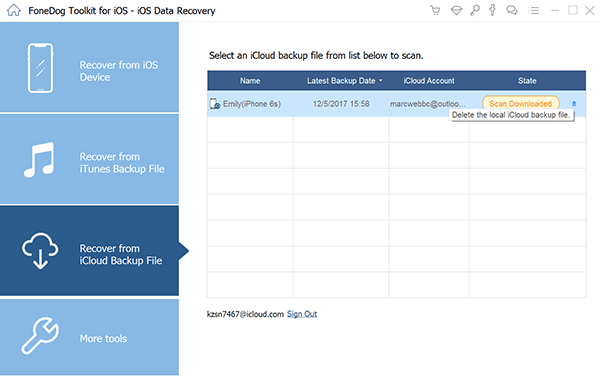
Scanning and downloading may take some time probably around 2-5 minutes depending on your network connection and load of data stored in the iCloud backup.
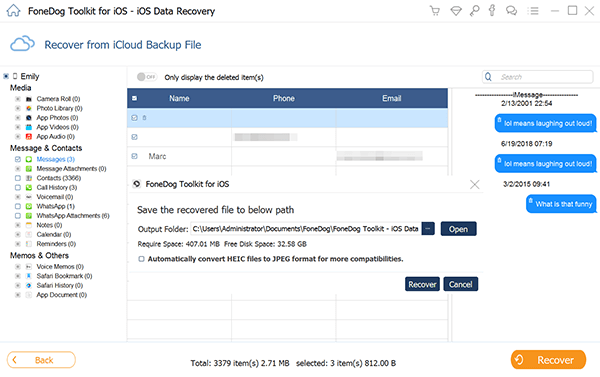
After the scanning is finished, you can see the recovered file categories on the left side column of the program.
You can click on “Messages” and check all your deleted iMessages files. Go over and preview each item and once you are sure, you can click on “Recover”.
With the 3 ways to recover deleted iMessages from iPhone provided above, only FoneDog - iOS Data Recovery is the perfect and the safest way to recover deleted iMessages on your iPhone, iPad, and iPod touch. It provides simple instructions without requiring full technical background and expertise.
All you need is to download the program, install on your computer (Windows or Mac), launch it and ready to go.
iOS Data Recovery
Recover photos, videos, contacts, messages, call logs, WhatsApp data, and more.
Recover data from iPhone, iTunes and iCloud.
Compatible with latest iPhone 11, iPhone 11 pro and the latest iOS 13.
Free Download
Free Download
Leave a Comment
Comment

Technical/Creative Writer
Kitchen, my safe space; black, my favorite color
Was a Technical Specialist for a while, troubleshooting Smartphone and Software-related issues until a writing stint caught my attention.
iOS Data Recovery
3 Methods to recover your deleted data from iPhone or iPad.
Free Download Free DownloadHot Articles
 /
/
INTERESTINGDULL
/
SIMPLEDIFFICULT
Thank you! Here' re your choices:
Excellent
Rating: 4.7 / 5 (based on 72 ratings)
