FoneDog Screen Recorder
FoneDog Screen Recorder
Special Offer
Special Offer


By Nathan E. Malpass, Last updated: May 14, 2025
iCloud has become an integral part of our lives, serving as a secure and convenient platform for storing important data, from cherished photos to crucial documents. However, like any technology, it's not immune to mishaps and accidents. Whether you've accidentally deleted files, encountered synchronization issues, or faced data loss due to device theft or damage, the fear of losing your iCloud data can be daunting. But worry not; this article is your roadmap to how to recover iCloud data.
We understand the anxiety that accompanies data loss, which is why we've crafted this comprehensive guide to help you retrieve your precious information from the depths of your iCloud storage. By the time you've finished reading, you'll be equipped with the knowledge and tools to recover iCloud data like a pro. Let's dive into the world of iCloud data recovery and discover the secrets to safeguarding your digital memories and important files.
Part 1. Basic Ways to Recover iCloud DataPart 2. Best Way to Recover iCloud Data (in one click)Part 3. Summary
How to recover iCloud data? When it comes to recovering iCloud data, one of the most straightforward methods is through iCloud.com, accessible via your preferred web browser. Whether you've lost photos, contacts, notes, or other essential files, this method allows you to restore your data with ease. Here's a step-by-step guide on how to use iCloud.com for data recovery:
Step 01: Access iCloud.com
Open your preferred web browser on your computer or mobile device. Navigate to iCloud.com by entering the URL in the address bar or by clicking here.
Step 02: Sign In to Your iCloud Account
On the iCloud login page, enter your Apple ID and password associated with the iCloud account containing the data you want to recover.
Step 03: Navigate to the Data Section
After successfully signing in, you'll be directed to the iCloud dashboard. Here, you'll find various app icons representing different types of data, such as Photos, Contacts, Notes, and more. Click on the app icon that corresponds to the data you want to recover.
Step 04: Browse and Select the Data
Once you're inside the specific app, you'll be able to browse through your data. Use the available options and filters to locate the files or items you wish to recover.
Step 05: Restore Data
Select the individual files or items you want to recover by clicking on them. To select multiple items, hold down the Ctrl key (Windows) or Command key (Mac) while clicking on each item. With your desired data selected, look for a "Restore" or "Download" option, usually represented by an icon or button (such as a cloud with an arrow). Click on this option to initiate the recovery process.
Step 06: Confirm and Wait
A confirmation prompt may appear to confirm your action. Confirm that you want to restore the selected data. Depending on the size of the data and your internet connection speed, the recovery process may take some time. Be patient and allow iCloud to complete the task.
Step 07: Check Recovered Data
Once the recovery process is complete, you can check your iCloud app to ensure that your data has been successfully restored. It should now be accessible from your device.
By following these steps, you can easily recover iCloud data using iCloud.com on a web browser. Also, you can recover deleted call history from iCloud. However, if this method doesn't meet your needs or you encounter any issues, don't worry; there are alternative methods and tools available for iCloud data recovery, which we'll explore in the next sections of this article.
How to recover iCloud data? If you have an Apple device handy, such as an iPhone or iPad, you can take advantage of the iCloud app to recover your iCloud data with ease. This method provides a seamless and direct way to retrieve your lost or deleted files. Here's how to use the iCloud app on your Apple device for data recovery:
Step 01: Access iCloud Settings
Unlock your Apple device and go to the home screen. Open the "Settings" app, which is represented by a gear icon.
Step 02: Sign In to iCloud
Scroll down in the Settings menu and tap on "iCloud." If you're not already signed in, tap on "Sign In" and enter your Apple ID and password associated with your iCloud account.
Step 03: Select the Data to Recover
In the iCloud settings, you'll see a list of apps and data types that are being backed up to iCloud. Ensure that the app or data you want to recover is toggled on to enable iCloud backup for that specific data.
Step 04: Restore Data
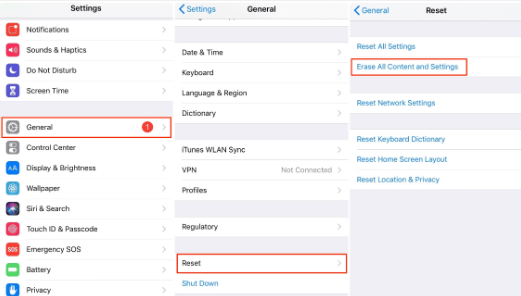
To initiate the data recovery process, go back to the main Settings menu and tap on "General." Scroll down and tap on "Reset." Choose "Erase All Content and Settings." Don't worry; this won't erase your iCloud data; it will only remove data from the device. A warning prompt will appear. Confirm your decision by tapping "Erase [Device]." Your device will be reset to factory settings.
Step 05: Restore from iCloud Backup
After your device is reset, it will restart and display the initial setup screen. Follow the on-screen instructions until you reach the "Apps & Data" screen. Select "Restore from iCloud Backup." Sign in to iCloud using your Apple ID and password.
Step 06: Choose the Relevant Backup
You'll see a list of available iCloud backups. Choose the most relevant one based on the date and content you wish to restore.
Step 07: Wait for the Restore
Your device will begin the restoration process. This may take some time, depending on the size of the backup and your internet connection speed. Ensure your device is connected to Wi-Fi and power during this process.
Step 08: Complete the Setup
Once the restoration is complete, your device will restart, and your selected data will be recovered. Complete the device setup by following the on-screen instructions.
By following these steps, you can efficiently recover iCloud data using the iCloud app on your Apple device. This method allows for a seamless recovery process without the need for a computer or web browser. Your iCloud data will be restored to your device, making it readily accessible once again.
Restoring iCloud data directly on your iOS or iPadOS device is a convenient way to recover your lost or deleted data without erasing the entire device. This method allows you to selectively restore specific app data from iCloud. Here's how to recover iCloud data on your iOS or iPadOS device:
Step 01: Access iCloud Settings
Unlock your iOS or iPadOS device. Open the "Settings" app, represented by a gear icon.
Step 02: Sign In to iCloud
Scroll down and tap on "iCloud." If you're not already signed in, tap "Sign In" and enter your Apple ID and password associated with your iCloud account.
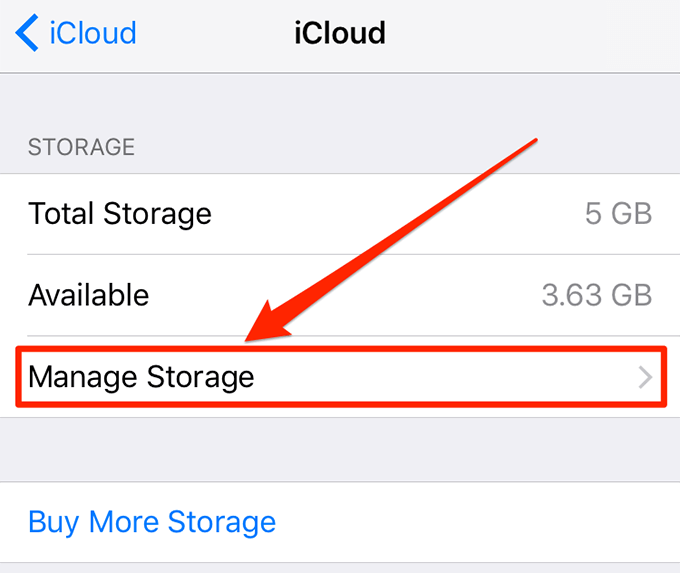
Step 03: Manage Storage
In the iCloud settings, tap on "Manage Storage" under the "Storage" section.
Step 04: Select Your Device
You'll see a list of devices linked to your iCloud account. Tap on the device from which you want to restore data.
Step 05: Choose Data to Restore
On the next screen, you'll see a list of apps that have data backed up to iCloud. Tap on the app for which you want to restore data.
Step 06: Restore Data
Toggle on the switch next to the specific app data you want to recover. This action will initiate the data restoration process for that app.
Step 07: Wait for Restoration
The restoration process may take some time, depending on the size of the data and your internet connection speed. Make sure your device is connected to Wi-Fi and power during this process.
Step 08: Check Restored Data
Once the restoration is complete, you can access the app to see if your data has been successfully restored.
This method allows you to restore specific app data from your iCloud backup without erasing your entire device. It's particularly useful if you only need to recover data from a specific app, such as messages, photos, or notes.
Keep in mind that not all apps support individual data restoration through this method; it depends on whether the app developer has enabled this feature. By following these steps, you can efficiently recover iCloud data on your iOS or iPadOS device, ensuring that your important files and information are back where they belong.
How to recover iCloud data efficiently and comprehensively? One of the top tools in the market is FoneDog iOS Data Recovery. FoneDog iOS Data Recovery can recover a wide range of data types, including photos, messages, contacts, videos, notes, and more. This versatility makes it a comprehensive solution for various data loss scenarios. Even iPhone contacts disappearing randomly, it can help you.
Now, let's dive into the steps to recover iCloud data using FoneDog iOS Data Recovery:
Step 01: Install and Launch FoneDog iOS Data Recovery
Download and install FoneDog iOS Data Recovery on your computer from the official website. Launch the program once installation is complete.
iOS Data Recovery
Recover photos, videos, contacts, messages, call logs, WhatsApp data, and more.
Recover data from iPhone, iTunes and iCloud.
Compatible with latest iPhone and iOS.
Free Download
Free Download

Step 02: Choose "Recover from iCloud Backup"
From the program's main menu, select "Recover from iCloud Backup" on the left sidebar.
Step 03: Sign In to iCloud
You'll be prompted to sign in to your iCloud account using your Apple ID and password. FoneDog iOS Data Recovery ensures your data's security by using encryption during this process.
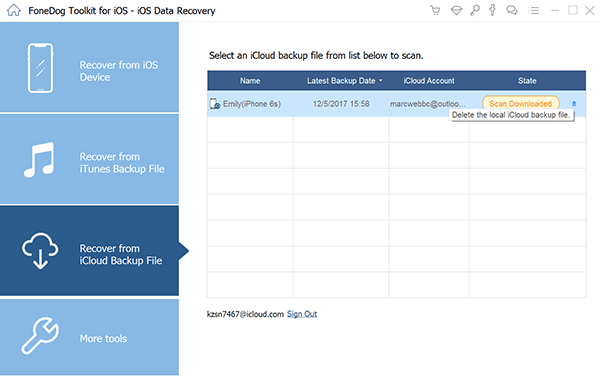
Step 04: Select iCloud Backup File
After signing in, you'll see a list of iCloud backup files associated with your account. Choose the backup that contains the data you want to recover and click "Download" next to it.
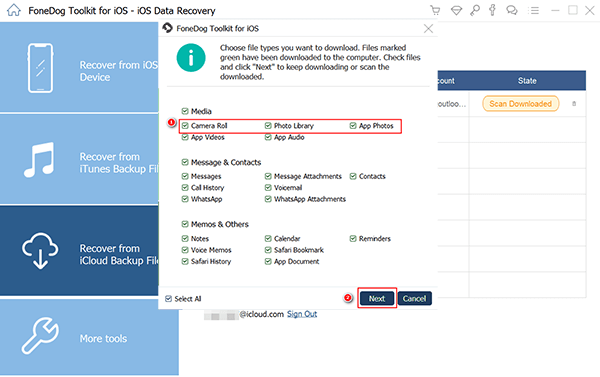
Step 05: Choose Data Types to Recover
FoneDog iOS Data Recovery will scan the selected iCloud backup file and present a list of recoverable data types. Select the specific data types you want to recover, such as contacts, photos, messages, etc.
Step 06: Start Scanning
Click the "Next" button to start the scanning process. This may take a few moments, depending on the size of your backup.
Step 07: Preview and Recover Data
Once the scanning is complete, you can preview the recoverable data in detail. Select the items you wish to recover, then click the "Recover" button.
Step 08: Choose Recovery Destination
Choose a location on your computer to save the recovered data.
Step 09: Complete the Recovery Process
FoneDog iOS Data Recovery will begin the data recovery process. Once finished, you'll receive a confirmation that your selected data has been successfully recovered.
FoneDog iOS Data Recovery offers a hassle-free and efficient way to recover iCloud data, ensuring that your valuable information is restored without any data loss. Whether you've lost data due to accidental deletion, device damage, or any other reason, this software simplifies the recovery process, allowing you to regain access to your iCloud data with ease.
How to recover iCloud data? In this comprehensive guide, we've explored various methods and tools to help you recover iCloud data effectively. Your iCloud account holds a treasure trove of essential information, from photos and contacts to notes and messages, and we've provided solutions to ensure you can regain access to this valuable data.
Whether you prefer the convenience of using iCloud's web interface or the direct approach on your Apple device, or if you opt for the comprehensive features of FoneDog iOS Data Recovery, you now have the tools and knowledge to recover your iCloud data efficiently. Protect your digital memories, contacts, and important files by mastering the art of iCloud data recovery.
Leave a Comment
Comment

iPhone/Android Devices’ Maintenance Expert
Staying home, listening to music, writing tech articles
Many people asked me to repair their mobile phones so I have a lot of experience in mobile phone repair, and I know a lot about Android or Apple phones.
iOS Data Recovery
3 Methods to recover your deleted data from iPhone or iPad.
Free Download Free DownloadHot Articles
 /
/
INTERESTINGDULL
/
SIMPLEDIFFICULT
Thank you! Here' re your choices:
Excellent
Rating: 4.7 / 5 (based on 64 ratings)
