FoneDog Screen Recorder
FoneDog Screen Recorder
Special Offer
Special Offer


By Nathan E. Malpass, Last updated: August 12, 2018
Voice control on my Apple devices is very handy. I can use it to do a lot of stuff without tiring myself out. Unfortunately, there are times where I can’t turn off voice control and it bums me out. How do I turn off voice control completely?
Part I: Introduction to Voice ControlPart II: Can You Turn Off Voice Control?Part III: Bonus Tip: A Useful Tool to Recover Data from iPhone!Part IV: Conclusion.
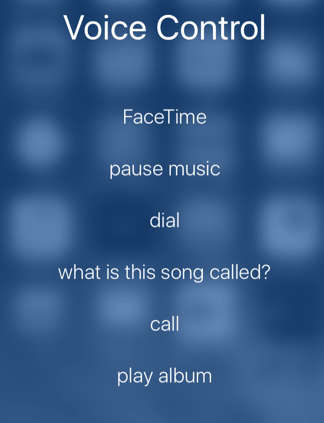
Voice Control is a great way to control your Apple devices using your voice. It was already used in Apple devices way before Siri came along. Voice control was introduced with the iOS 3.0 allowing users of Apple devices to take charge of the iPhone and Music applications just by talking through the microphone.
Voice control was replaced by Siri. However, it is still available (although it’s hidden). And if you prefer to use it on your Apple device versus Siri, you can still you use it to control your device. Voice control supports a lot of languages including Chinese, English, Japanese, Spanish, Portuguese, Korean, and Norwegian, among others. You can even change the settings for the language you will use with this handy feature.
Voice control can come with a lot of features. However, you just can’t turn it off sometimes and this can be so annoying. Here’s how to turn off voice control on your Apple Device.
Actually, you cannot turn off or disable Voice Control in iOS 10. What you can do to stop it from turning on is by enabling Siri. Thus, Siri will override the Voice Control feature of your Apple device. However, there’s one news you might now want to hear. Disabling Siri and Voice Control simultaneously is not possible in iOS 10.
To help you with the problem of disabling Voice Control, here’s a step-by-step guide:
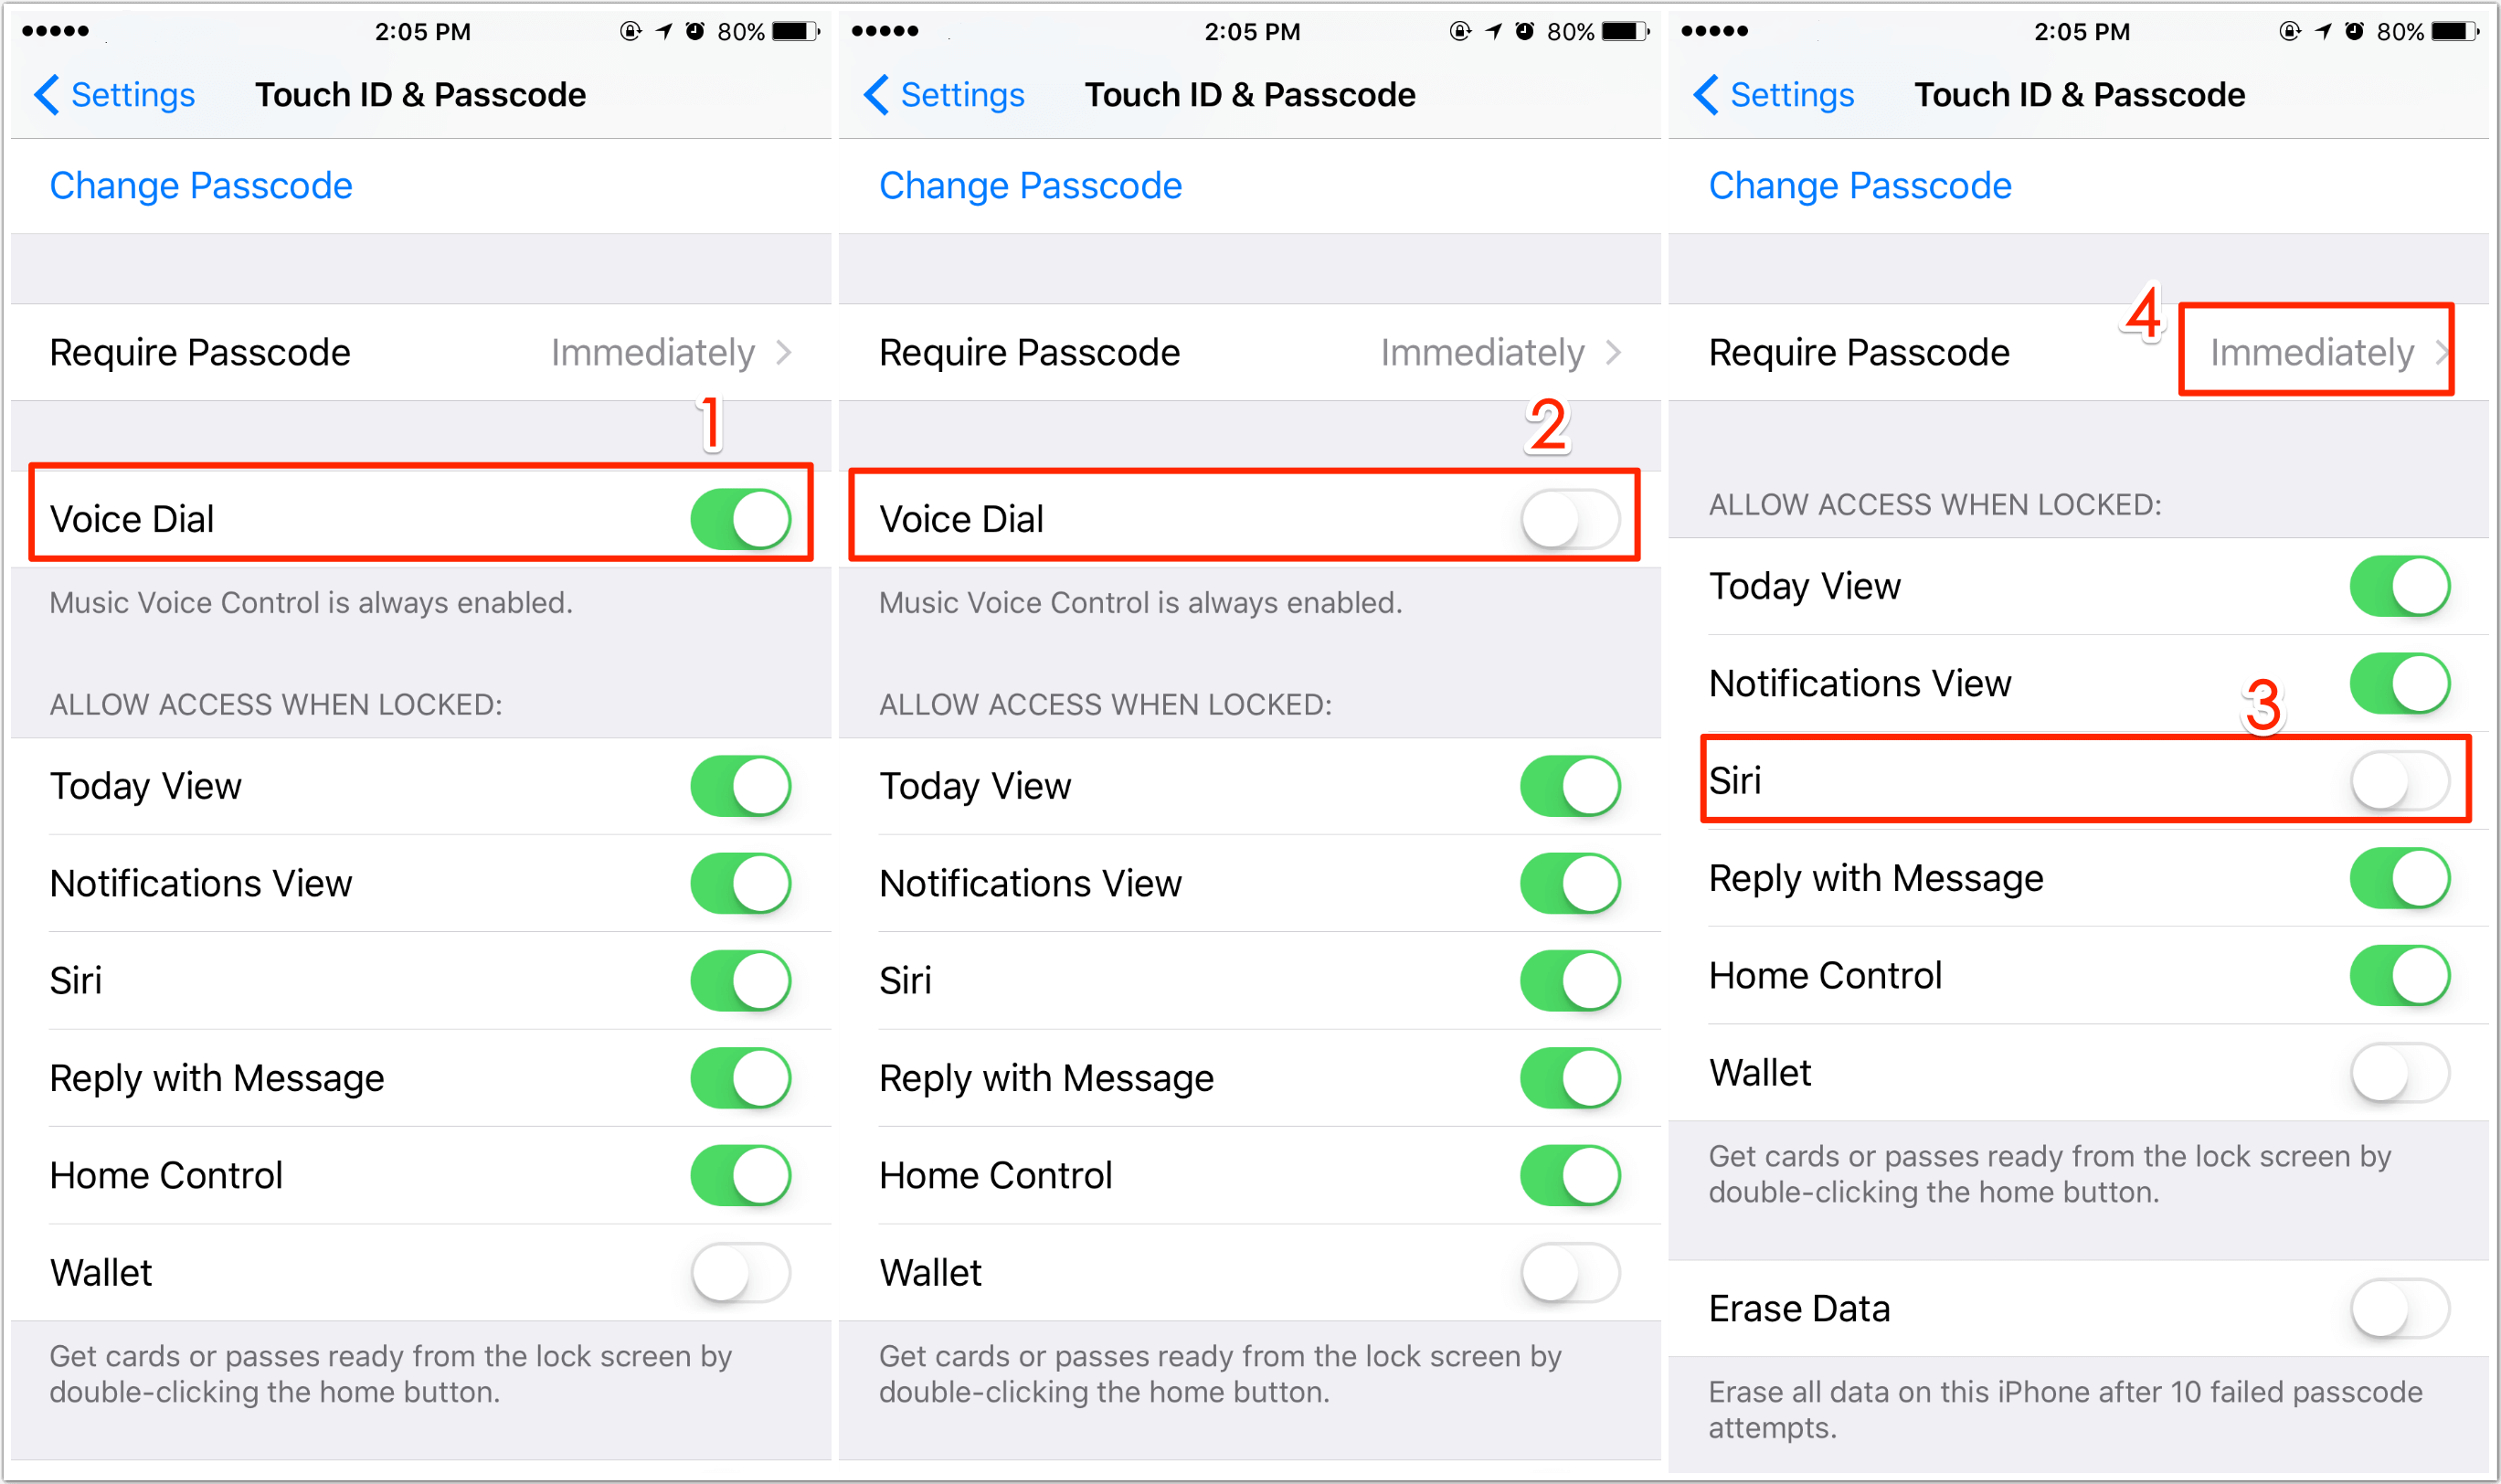
Remember that when you deactivate Siri, Voice Control will take over your phone once again. You can deactivate Siri by going to the Settings Menu and visiting the Siri option. Tap once again to deactivate Siri.
Sometimes, you accidentally remove or delete important data on your Apple device due to Voice Control being activated while on your pocket. You might not want to restore your iPhone to its original state or you might lose more data.
In this case, you need to have an iPhone data recovery software that will help you with the job. We recommend FoneDog’s iOS Data Recovery Tool.
Here are a variety of reasons why we want you to use this software:
-It helps you recover lost photos, contacts, messages, videos, and call logs, among others.
-You can use it to recover data from iTunes, iPhone, and iCloud.
-It is compatible with various versions of Apple devices such as iOS 17, iPhone 15.
-It is 100% secure.
-It is one of the best data recovery tools with the world’s top success rate.
Before you take on this step, you have to do something first. You have to actually download iTunes’ latest version. Do not open iTunes when you are using FoneDog Toolkit. This will help you prevent automatic syncing.
On the other hand, you can also disable iTunes automatic syncing. Do this by launching iTunes then going to Preferences. Go to Devices and select “Prevent iPods, iPhones, and iPads from syncing automatically.”
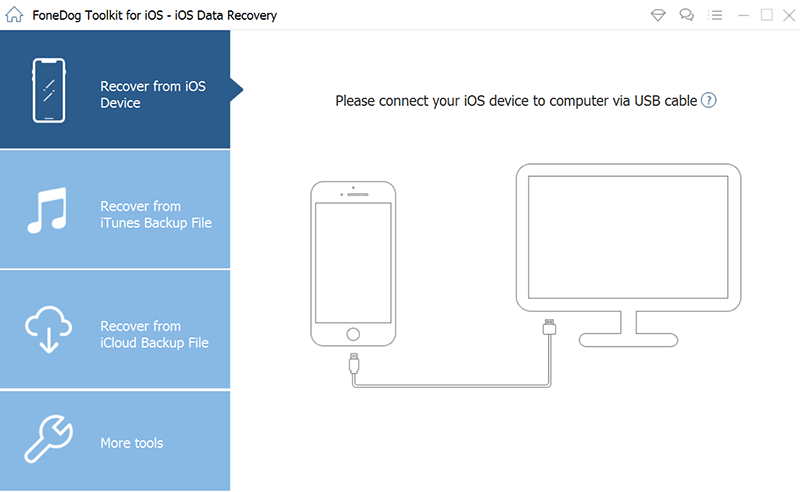
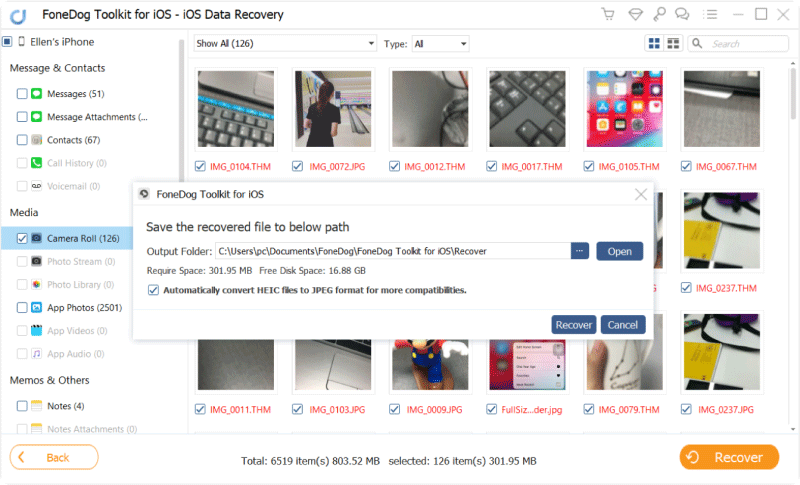
Now, let’s go to the main course. In this step, you have to download FoneDog. Next, you have to install it on your computer. Launch the software after which you have to connect your Apple device through the USB cable. Then, on the tab located at the left, select “Recover from iOS Device.” Press “Start Scan.”
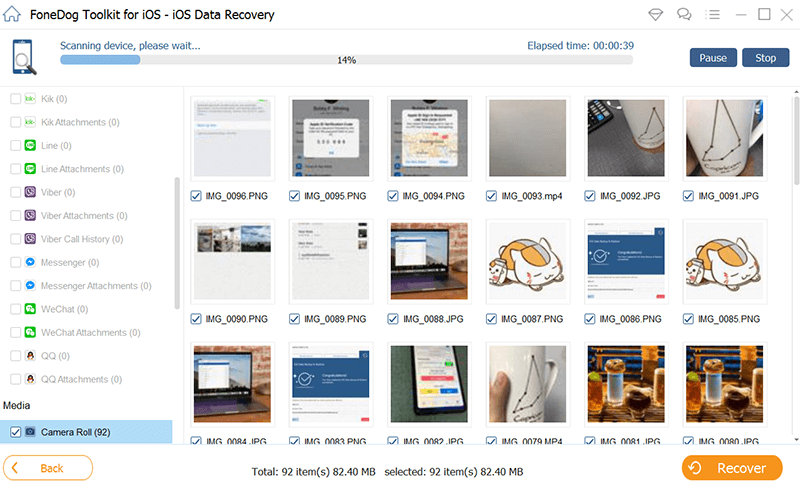
After you have pressed the “Start Scan” button, the software will now start the process of scanning your iPhone, iPad, or iPod to check for deleted or lost files. This may take a few minutes depending on the number of files on your Apple device.
After the process of scanning is done, all the data found by the software can be seen on the left-hand side of the software’s interface. You can check all these files one by one.
Take note that you can click “Pause” if you have already seen the files you actually want to look for during the scan. This will automatically stop the scanning process.
In this step, you will choose the files you want to restore to your PC or Mac. You can opt to select all data or you can selectively choose some files only. After you have chosen the data, click “Recover.” After which, select the Path or Directory where you want to put the files. The software will now recover the data to your computer safely and quickly.
You can also try it out for free because the FoneDog - iOS Data Recovery has a 30-day free trial to allow you to test out this application
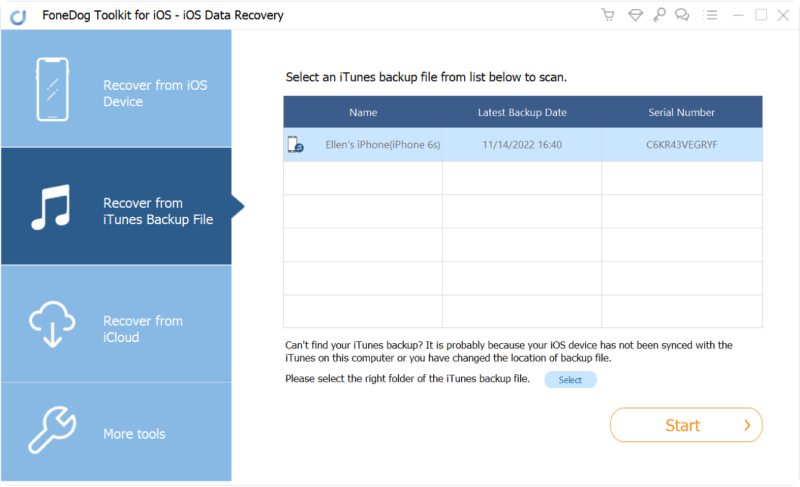
In this step, you have to open FoneDog - iOS Data Recovery software. Choose one option named “Recover From iTunes Backup File.” The software will automatically find all iTunes backup files located on your computer. It will be shown in the software’s window.
Choose the backup that you want and then select “Start Scan.” This will now start the scanning of iTunes backup files
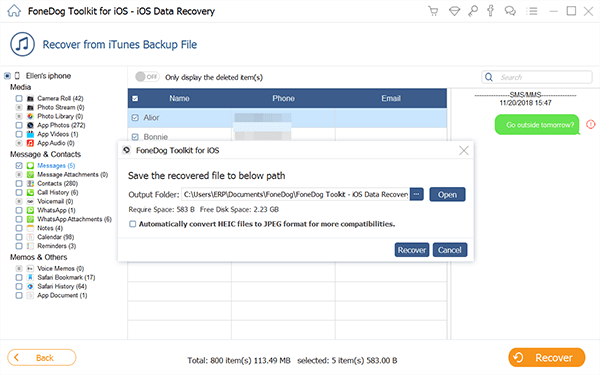
The scanning process takes a few minutes. This will extract data included in the iTunes backup file. Once the process is finished, the left-hand side of the software’s interface will show scanned data such as Messages, Photos, Videos, and Contacts, among others.
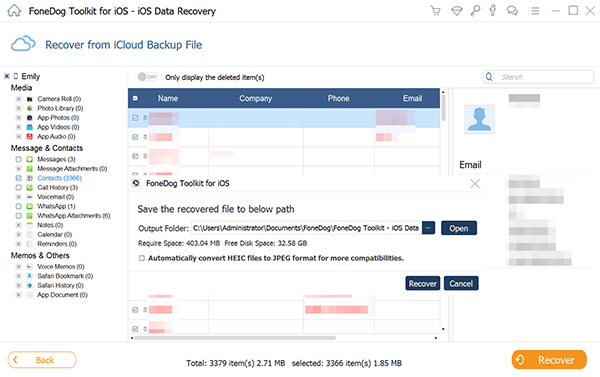
You can check all files one by one before you try to recover them. You can also select all files or select a few ones. After which, click the “Recover” button.
Here’s A Tip: In the results window of the scanning process, there is a search box. You can use this to search for the files you need using names or keywords
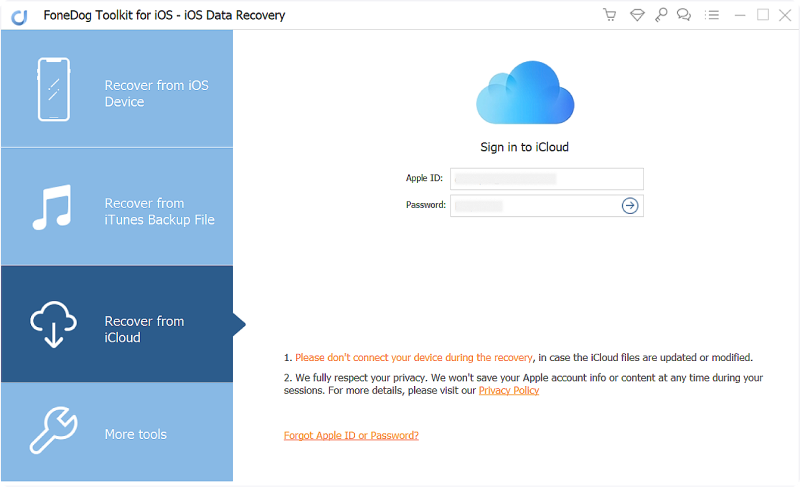
Open the FoneDog - iOS Data Recovery software. Chose the option “Recover From iCloud Backup File.” You need to log in to iCloud by entering your iCloud account (Apple ID) and your password. FoneDog is a secure device and will protect your privacy.
Take note that if two-step verification (two-factor authentication) is enabled on your Apple devices, you should turn them off. In this way, you can access your iCloud with FoneDog.
Once you are logged into iCloud, all backup files in your iCloud account will be displayed. Choose the backup file you want to recover data from and click on the Download button.
Here’s A Tip: In the window, you can choose the file types you wish to download. This will allow you to reduce the downloading time needed to get the iCloud backup file.
Then, click “Next” in order to begin the scanning process. Just wait for the process to be completed. This will take up to a few minutes
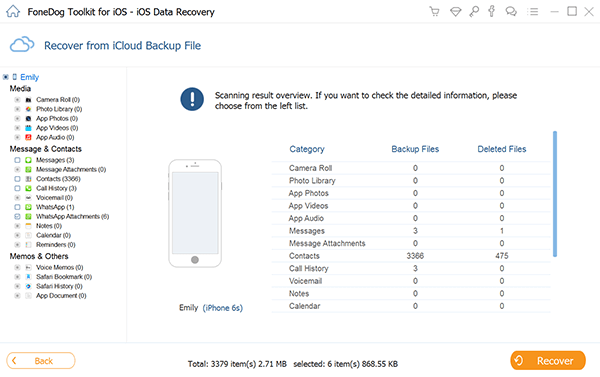
When the scanning process is complete, you can check out all the data in your iCloud backup file. These data include videos, photos, messages, contacts, and call logs, among others. You can select all data types or you can selectively choose a few that you wish to recover. Press the “Recover” button afterward to restore the files on your computer.
Tip: In the option named as “Recover from iCloud Backup File,” you are required to connect your iPhone to your computer. However, you should still be connected to the Internet in order to download backup files from iCloud.
People Also ReadQuick Guide: How to Recover Lost Voice Memos from iPhoneDelete Guide: Delete Text Messages on iPhone Permanently
Voice Control can be very handy. However, it can sometimes be annoying since it automatically activates dial logs and other applications without your consent. Use our guide above to disable Voice Control on your Apple device. If anything goes wrong because of Voice Control, you can recover deleted or lost files with FoneDog’s iOS Data Recovery tool without having the need to restore your Apple device to its original state.
Leave a Comment
Comment

iPhone/Android Devices’ Maintenance Expert
Staying home, listening to music, writing tech articles
Many people asked me to repair their mobile phones so I have a lot of experience in mobile phone repair, and I know a lot about Android or Apple phones.
iOS Data Recovery
3 Methods to recover your deleted data from iPhone or iPad.
Free Download Free DownloadHot Articles
 /
/
INTERESTINGDULL
/
SIMPLEDIFFICULT
Thank you! Here' re your choices:
Excellent
Rating: 4.6 / 5 (based on 68 ratings)
