FoneDog Screen Recorder
FoneDog Screen Recorder
Special Offer
Special Offer


By Adela D. Louie, Last updated: May 15, 2018
The Guide of How to Fix iPhone Not Vibrating problem.
On our iPhone device, vibration is one the most helpful feature that it has. This is actually what we need when we do not want to be disturbed by the ring of our iPhone device but we still want to know if we have an incoming call or if we received text messages and other things that our iPhone device notifies us.
Actually, most iPhone users put their device in vibrate mode all the time. Having a not working vibration from our iPhone device can really be frustrating because we might miss important calls or we might not reply immediately when we receive a very important text message or email.
We know how it feels when we are dependent on one thing then suddenly it does not work anymore.
Here, we have listed some solutions for you that you can do on your iPhone device for you to fix your iPhone 7 not vibrating. And if anything goes wrong, we have also included the nest program that you can use for you to fix this issue on your iPhone device.
After reading this guide, you will know why is my iPhone not vibrating!
Part 1. Common Method You Can Do When iPhone Not VibratingPart 2: The Safest Way to Fix Your iPhone Stopped Vibrating ProblemVideo Guide: How to Fix iPhone Not VibratingPart 3. Backup Your iPhone When iPhone Not VibratingPart 4. Conclusion
When your iPhone not vibrating, you can try the common methods below first:
For you to fix your iPhone that is not vibrating, doing a forced restart is the first thing you should do. Many issues can be fixed by doing this so might as well try it on your iPhone not vibrating and see if it can help you fix it. To do a force restart on your iPhone, go ahead and follow the guide below:
Press and hold the home button and the power button at the same time -
For iPhone 7 and iPhone 7 Plus, press and hold the Volume Down button and the Sleep or Wake button at the same time.
Keep holding them for about ten seconds or until you see the Apple logo appear on your screen.
Sometimes, the quickest way for you to solve a problem is by double-checking it rather than you doing more complex things or going around in circles. If force restarting does not work to fix the issue, then you can go ahead and check if you have enabled vibrate on your iPhone device. Here are the steps on how you can do it.
On your iPhone, go and launch Settings and then tap on Sounds.
Turn on the two toggle buttons on the option that says "Vibrate on Ring" and "Vibrate on Silent". If you do this, then your iPhone device should be vibrating whether it is in silent mode or not.
The "Do not disturb" button is a feature of iPhone device wherein it allows its users to block or stop the calls and notifications when they do not want to be disturbed. This feature of iPhone device comes really handy when you are currently in class, in a formal event or in a very important meeting. Here is how you can actually check on this feature.
Method 1:
Just swipe upwards starting from the bottom of your screen so that the control panel will appear.
Tap on the moon shape to turn off the "Do not disturb" feature.
Method 2:
On your iPhone, launch your Settings and then tap on the "Do not disturb" button.
Make sure that you have turned off the Manual option and the Scheduled as well.
Having your iPhone device updated to the latest version will also help you to fix your iPhone not vibrating. So, if you use the vibrate feature on your iPhone when it is in silent mode, make sure that you have the latest update. For you to check for the latest update, do the following steps.
Go to the Settings of your iPhone device and then tap on General
After that, go ahead and tap on Software Update.
Tap on Install Now if you see that there is an available update for your iPhone device
Doing a Reset All Settings option on your iPhone device might also help you fix your iPhone not vibrating issue. Remember that performing this option will not remove any data on your iPhone device but will cancel all the settings stored on your iPhone device. Follow these steps for you to try fixing your iPhone that is not vibrating when you are in silent mode.
Go to your Setting and then go to General
Select the Reset button located at the bottom of the General menu
Tap on Reset All Setting and then enter your passcode if you have any.
Then, confirm the procedure by tapping again the Reset All Settings. Once you have a tap on that again, your iPhone will then restart.
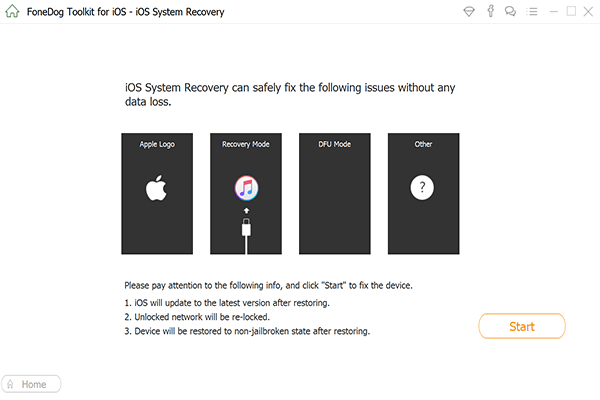
If performing all the listed methods above still does not help you fix your iPhone stopped vibrating issue, then there might be system glitch on your iPhone device. To help you fix a system error on your iPhone device safely, we recommend you use a program called FoneDog Toolkit - iOS System Recovery, follow the steps below:
This program does not only help you to fix your iPhone device that is not vibrating. but also in many ways.
The FoneDogToolkit - iOS System Recovery program a tool that you can actually use to solve the issue on your iPhone device that is unable to vibrate. Aside from this, the FoneDog Toolkit - iOS System Recovery can also help you to fix various software issues on your iPhone device such as recovery mode, DFU mode, white screen looping, endless start, frozen and unresponsive iPhone device, the slide is not working, and error codes on using iTunes.
The FoneDog Toolkit - iOS System Recovery program is also compatible with any iOS device like iPad, iPhone, and iTouch devices. It is also compatible with the new models of iPhone like the iPhone X, iPhone 8, and the iPhone 8 Plus. it will also keep all of your data safe and secured during the repair process.
The FoneDog Toolkit - iOS System Recovery is the safest way on how you can repair your iPhone device. You can free download to try.
Now, let us start repairing your iPhone device. Don't worry, because the guide below is very easy because we made sure that the FoneDog Toolkit - iOS System Recovery program is a user-friendly program so that anyone can use it.
Of course, the very first thing that you need to do is to have the FoneDog Toolkit - iOS System Recovery Tool downloaded and installed on your computer.
You can have the program installed on either your Mac or Windows computer.
After you have successfully installed the FoneDog Toolkit - iOS System Recovery program on your computer, then you can go ahead and launch it and then connect your iPhone to your computer using your USB cable.
Wait for the program to detect your iPhone. Once the FoneDog Toolkit - iOS System Recovery program recognizes your iPhone device, go ahead and select iOS System Recovery from the main interface of the program.
After that, go ahead and click on the Start button.
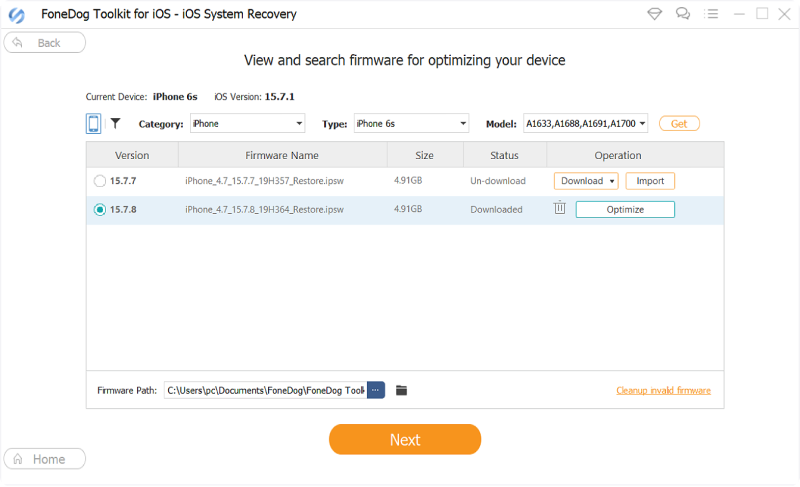
You have to download the Firmware Package so that the FoneDog Toolkit - iOS System Recovery will be able to fix the abnormalities that your iPhone device have.
In case that you do not have the latest version of iOS on your iPhone, the FoneDog Toolkit - iOS System Recovery will provide you the download to it.
From here, all you have to do is to click on the Repair button and wait for it to finish the download.
The FoneDog Toolkit - iOS System Recovery will also ask you to enter the required information it needs for it to download the right software for your iPhone.
You will be required to put in there the make, model of your device, and the model number. If you have no idea about any of this information, just go ahead and look at it up on the Apple's website for you to make sure.
Key in the information needed by the Fonedog Toolkit iOS Data Recovery program and then click on the Repair button.
After that, the FoneDog Toolkit - iOS System Recovery program will then start repairing your iPhone device.
You have to remember a very important thing while you are in the repairing process. You are not allowed to use your iPhone device while the repairing process is in progress.
If you use your iPhone for the time being that your iPhone is repairing by the FoneDog Toolkit - iOS System Recovery program, then big chances are your iPhone is at the risk of being bricked and we are sure would not want that to happen.
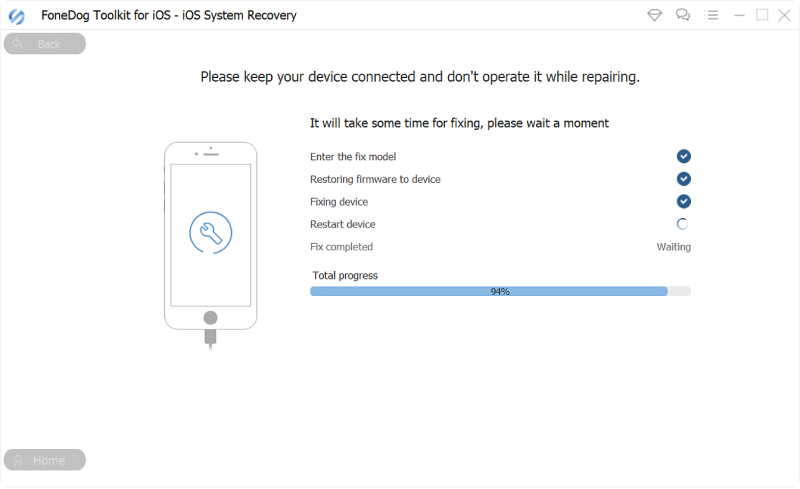
Here, you will test your patience, because the repairing process may take some time depending on what the issue of the FoneDog Toolkit - iOS System Recovery program is repairing.
Never worry, because the FoneDog Toolkit - iOS System Recovery program will surely notify you once the process is completely done.
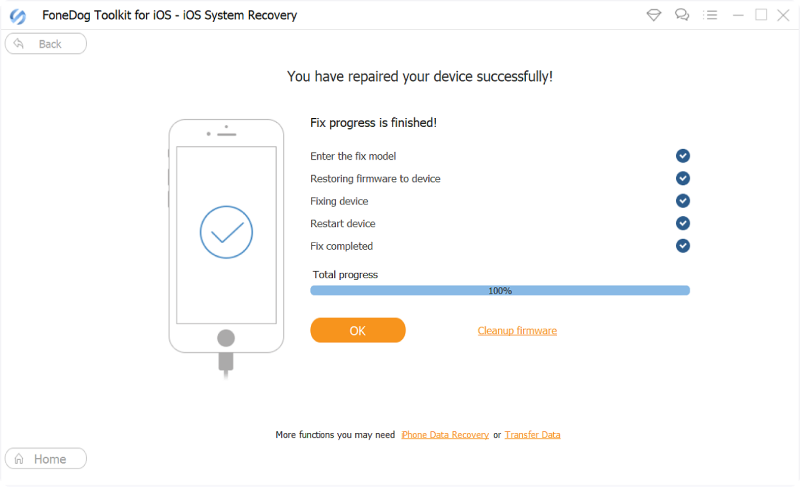
Once the FoneDog Toolkit - iOS System Recovery program was able to notify you that the repairing process is complete, just wait for your iPhone to reboot before using it.
That is also the time wherein you can unplug your iPhone device from your computer.
People Also Read:
3 Easy Ways to Fix when Your iPhone Stuck on Apple Logo
How to Fix iPhone Touch Screen Not Working
Now, if a case that none of the mentioned solutions above was not able to fix your iPhone not vibrating issue, then it is time to go to the Apple store so that they could check and fix your iPhone. If this is the case, then the issue is most probably due to a hardware problem.
But before you go to the Apple store to get your iPhone device fixed, always remember to backup your iPhone device. You can always use iTunes backup or iCloud backup or you can also use our very own backup and restore program.
All the given solutions above are really helpful in fixing your iPhone not vibrating issue. You just need to be patient so that you can fix your own iPhone device. But what we highly recommend to you is by using the FoneDog Toolkit - iOS System Recovery program.
This is because the FoneDog Toolkit - iOS System Recovery program is a guaranteed help on any system problem that you have on your iPhone device. As have mentioned, the FoneDog Toolkit - iOS System Recovery program can help you fix various system issues on your iPhone device like if your iPhone keeps on looping on the Apple Logo, if your slide is not working, if your iPhone is stuck in recovery mode, if you are experiencing a black screen, blue screen, and red screen on your iPhone.
It can also help you fix your iPhone if it gets stuck in DFU mode if your iPhone has frozen if it is occurring an endless start and if you are experiencing a white screen.
The FoneDog Toolkit - iOS System Recovery program also comes compatible with any iOS device including those models that just came out like the iPhone X, iPhone 8, and iPhone 8Plus. It is also compatible with the latest OS version of Apple which is the iOS 11.
And the great thing about using the FoneDog Toolkit - iOS System Recovery is that you will never lose any of your data on your iPhone device.
Leave a Comment
Comment

Tech Website Writing /Content Optimization
Singing, smiling, surprising every day!
So as a technical writer, it is my duty to gather effective and reliable solutions to answer questions on how to deal with the issues they are having with their devices.
iOS System Recovery
Repair various iOS system errors back to normal status.
Free Download Free DownloadHot Articles
 /
/
INTERESTINGDULL
/
SIMPLEDIFFICULT
Thank you! Here' re your choices:
Excellent
Rating: 4.4 / 5 (based on 100 ratings)
