FoneDog Screen Recorder
FoneDog Screen Recorder
Special Offer
Special Offer


By Nathan E. Malpass, Last updated: September 12, 2018
I own an iPhone 7 and love it to death. But I noticed that it keeps getting stuck. My friends told me to wipe my iPhone completely like it just started off from the box.
I tried it with iTunes but it keeps giving me an error. How do I completely wipe off my iPhone without using iTunes? Please help me.
~iPhone 7 User
Apple devices are not without flaws. Sometimes, it can lag, hang up, or completely freeze. When these scenarios happen, it might be difficult for you to use your iPhone.You might have problems surfing the net, making calls, reading emails, and doing other personal- or business- related tasks.This can be a problem for most users. People who don’t know how to fix this might tell you to buy a new iPhone altogether.However, that is not the best solution to this problem. One way to fix it is to wipe your iPhone clean like it’s brand new. So, how do you do this? Read our guide below.
Part I: Wipe Your iPhone Clean Through Factory Reset.Part II: Wipe Out Your iPhone With FoneDog.Part III: Backing Up Data.Part IV: Conclusion.
People Also Read3 Easy Ways to Fix when Your iPhone Stuck on Apple LogoHow to Fix iPhone is Disabled Connect to iTunes Error?
There are various ways to wipe your iPhone clean. One way is through iTunes. However, this method is too time-consuming. And sometimes, it even leads to errors.
Another way is to Factory Reset your iPhone clean. This can be done in a few simple steps. It erases everything on your iPhone including its settings.
Here are the steps to erase iPhone without iTunes:
Easy, right? However, there’s still a better way of wiping out your iPhone. It’s with a tool called FoneDog. The software is called iOS System Recovery. Below’s a guide on how to use it.
Before we get into the nitty-gritty of wiping out your iPhone with FoneDog’s iOS System Recovery, let’s talk about its features. What can this tool do?
-It allows you to fix the issues you face with your iPhone. These issues include looping on the apple logo, getting stuck in recovery mode, non-working slide, getting a black/ red/ blue screen, remaining in DFU mode, freezing and being non-responsive, restarting endlessly, and facing the white screen of death.
-This tool gives you the ability to repair your iOS device in a safe manner.
-It helps keep your data safe and secure during repair.
-It is compatible with any iPhone or iPad unit.
-It supports the latest iOS and various units of iPhone.
-It allows you to fix errors codes that occur when using iTunes.
Now, let’s get onto the step-by-step guide on how to use it:
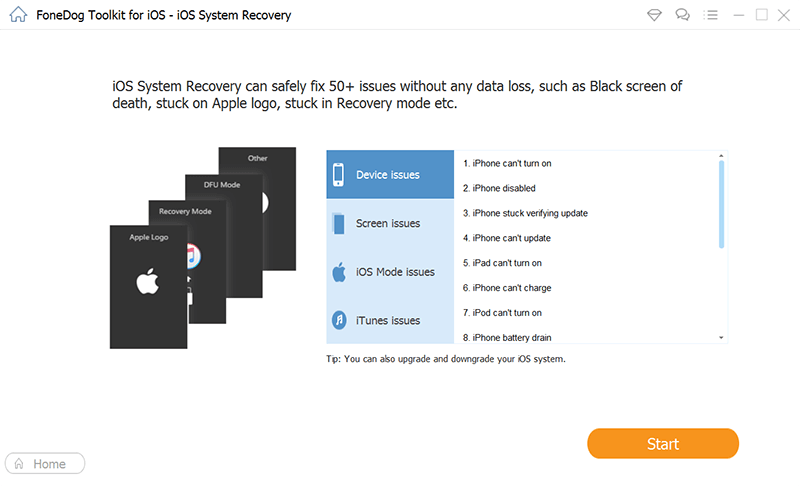
First, you have to launch FoneDog. And as you see the main interface, you have to select “iOS System Recovery” option. Once you are in this option, you have to connect your iPhone to your computer using the USB cable that comes with it.
FoneDog should be able to detect your device automatically. Once your device is detected by the software, press the Start button.
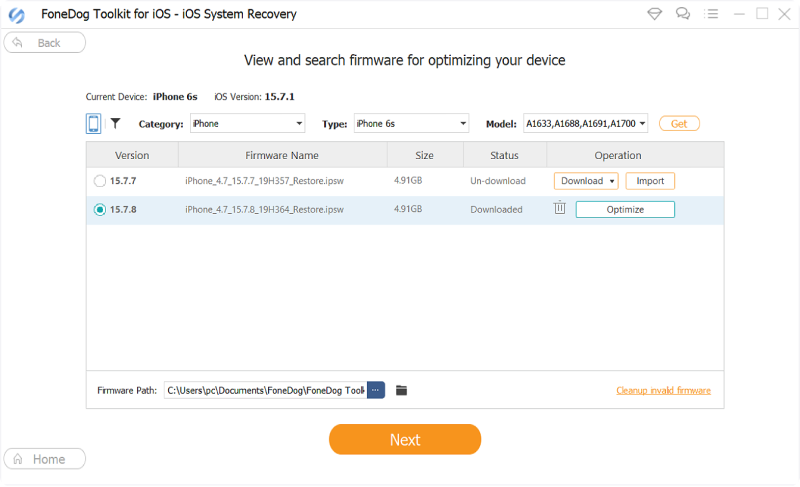
In this step, you have to download the firmware. For the software to be able to fix the issues with your iPhone, you have to download the firmware. This is a requirement.
FoneDog will then give you the latest iOS version to download. What you have to do is to press the “Repair” button. Wait for the process of downloading to be complete.
After the download is finished, FoneDog automatically repairs your device. During this part of the process, you should not use your device. Do not disconnect it from the computer as well. If you do so, your device will be at risk of becoming bricked.
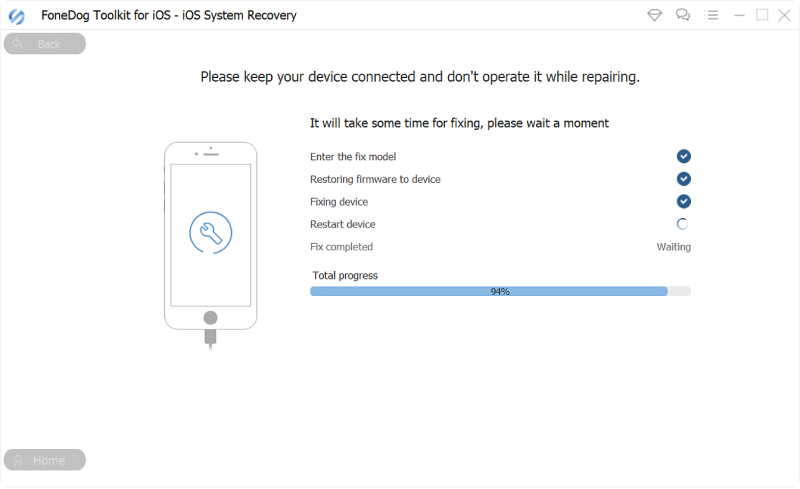
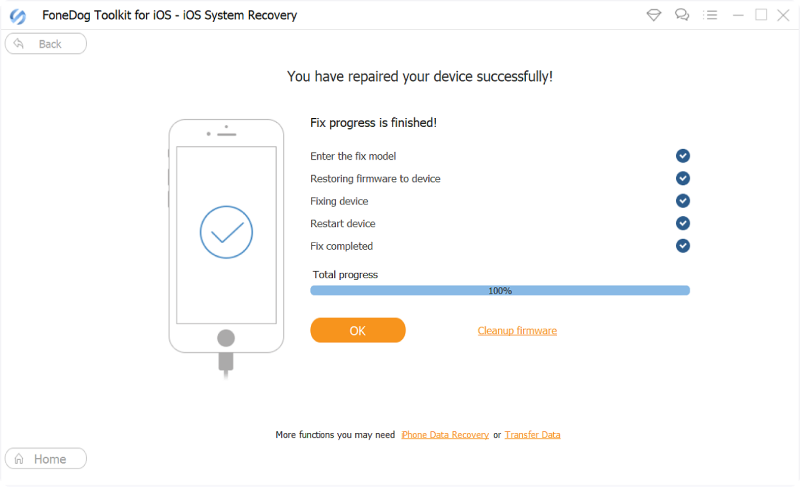
The process of repairing your iPhone might take a few minutes. Once the process is done, FoneDog will show a notification. Do not unplug your device once you see this notification. You have to wait for your iPhone to reboot. After the reboot is complete, you can now unplug or disconnect your device from the computer.
Sometimes, before you completely wipe off your iPhone, you would want to back up your data. This can be done easily through FoneDog’s iOS Data Backup & Restore tool.
Before you do the actual cleaning process of the iPhone, you can back up photos or messages. You can simply restore them after the wiping out process has been completed.
Here’s how to do it step-by-step:
Step 1 - Connect your iPhone to your computer.
Step 2 - Install and open FoneDog Toolkit - iOS Toolkit.
Step 3 - Choose iOS Data Backup & Restore.
Step 4 - Click iOS Data Backup.
Step 5 - Select Standard Backup OR Encrypted Backup. The latter allows you to protect the backup with a password.
Step 6 - Click Start.
Step 7 - Select the type of data you want to backup. If you want to backup photos, select Photos.
Step 8 - Click Next.
Step 9 - Wait for the process to be complete.
Now, this is the part where you do the cleanup process. After the wiping out process is done, you can now restore the backup to your iPhone. Here’s how to do it:
Step 1 - Connect iPhone to the computer and open FoneDog Toolkit - iOS Toolkit.
Step 2 - Choose iOS Data Backup & Restore.
Step 3 - Select iOS Data Restore.
Step 4 - Select your backup file.
Step 5 - Click View Now.
Step 6 - FoneDog will now scan backup files. Click Pause to pause or Stop to finish the process.
Step 7 - Preview backup data. Select the files or data you want to restore.
Step 8 - Click Restore To Device to restore it back to your iPhone.
Sometimes, iPhone just gets stuck or lags. This is caused by some software or hardware issues. In cases like these, you can simply wipe off your iPhone data through factory reset or through FoneDog’s iOS System Recovery.
If you want to back up your data before wiping it off clean, you can use iOS Data Backup & Restore, a tool made by FoneDog as well. Then, you can simply restore your data back to your iPhone after it has been wiped off clean.
Leave a Comment
Comment

iPhone/Android Devices’ Maintenance Expert
Staying home, listening to music, writing tech articles
Many people asked me to repair their mobile phones so I have a lot of experience in mobile phone repair, and I know a lot about Android or Apple phones.
iOS System Recovery
Repair various iOS system errors back to normal status.
Free Download Free DownloadHot Articles
 /
/
INTERESTINGDULL
/
SIMPLEDIFFICULT
Thank you! Here' re your choices:
Excellent
Rating: 4.6 / 5 (based on 65 ratings)
