FoneDog Screen Recorder
FoneDog Screen Recorder
Special Offer
Special Offer


By Adela D. Louie, Last updated: November 29, 2022
We used Spotlight search almost every day. We used it to make emails, create schedules, and even share sensitive information such as bank accounts and many more, and to be able to protect this data we must know how to erase search suggestions on iPhone.
In this article, we will be talking about some of the methods that we can follow to be able to properly erase search suggestions on your iPhone. It helps us get rid of the chances that some people might use our personal data for their own gain. Also, it is a way that you can be able to leave no traces of whatever it is that you do over the web in case you are a highly sensitive individual and what you do for a living requires such a level of privacy.
For those who are new to using iPhone, the Spotlight search bar is a way that you can be able to look for things on the search engines that you have installed on your devices, it is also a way that you can be able to easily access data that are stored on your devices such as songs, photos, contacts, messages, and a lot more. You can also use it to launch apps that you wanted to open or even play the favorite song that is lingering over your mind these past few days. As you can conclude, things that we search over it are a bit sensitive, and we must always protect data that concerns our privacy.
That is why you have come to the right place to know things that will help you easily erase search suggestions on iPhone. You have to be reminded that this one is really an important thing to know, so you have to get your pens and notebooks and be ready as you learn methods and iPhone-cleaning tool that might be a big help to you in the future.

Part #1: How to Erase Search Suggestions On iPhone?Part #2: How to Get Rid Of Search Suggestions On iPhone Permanently?Part #3: To Summarize It All
For the first part of the article, we will be learning some of the methods on how to erase search suggestions on iPhone. You better read all the lists together with the steps that you have to follow to properly execute each of the methods.
If you have an iPhone with an operating system of iOS 11 or earlier, the steps might be tricky. It is a prerogative of Apple to not give any option to erase search suggestions on your iPhone with an iOS that has versions lower than iOS 11. Now, let us all have the steps on how to easily erase search suggestions on iPhone in this part of the article.
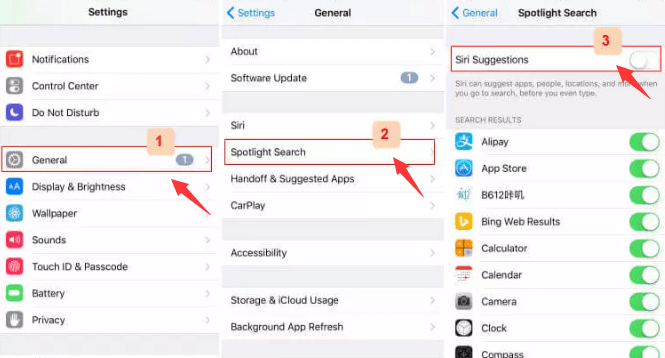
Now that we have enough knowledge on how to erase search suggestions on iPhone with an operating system of iOS 11 or earlier, the next thing that we have to figure out are the steps when you have an iOS 12 to iOS 15. If we are going to compare the steps which were mentioned before, this one seems a lot easier, let us see them below.
And that is how you easily erase search suggestions on iPhone with iOS 12 to iOS 15. If you have carefully followed the steps one after the other one, you can be able to successfully get rid of the search suggestions that you do not want to be seen by other people.
Now that we have discovered some of the ways or methods how to erase search suggestions on iPhone, we are not a hundred percent guaranteed that it can no longer be seen by others forever. And since we are protective of highly sensitive data, it is just right and proper to know how to erase search suggestions on your iPhone permanently. In this part of the article, we wanted to introduce to you a third-party application which is known as the FoneDog iPhone Cleaner.
It is a tool that can help you with maintaining the health of your device, as well as making sure that it is properly managed and organized. There are a lot of reasons why we erase search suggestions on your iPhone, well aside from privacy which is really a top priority, these data can also take up too much space on our device which is also one of the most important things that we should focus on. It is so important to be able to avoid the slow functioning of your iPhone or other devices, in that way we can be able to utilize our devices up to their full extent.
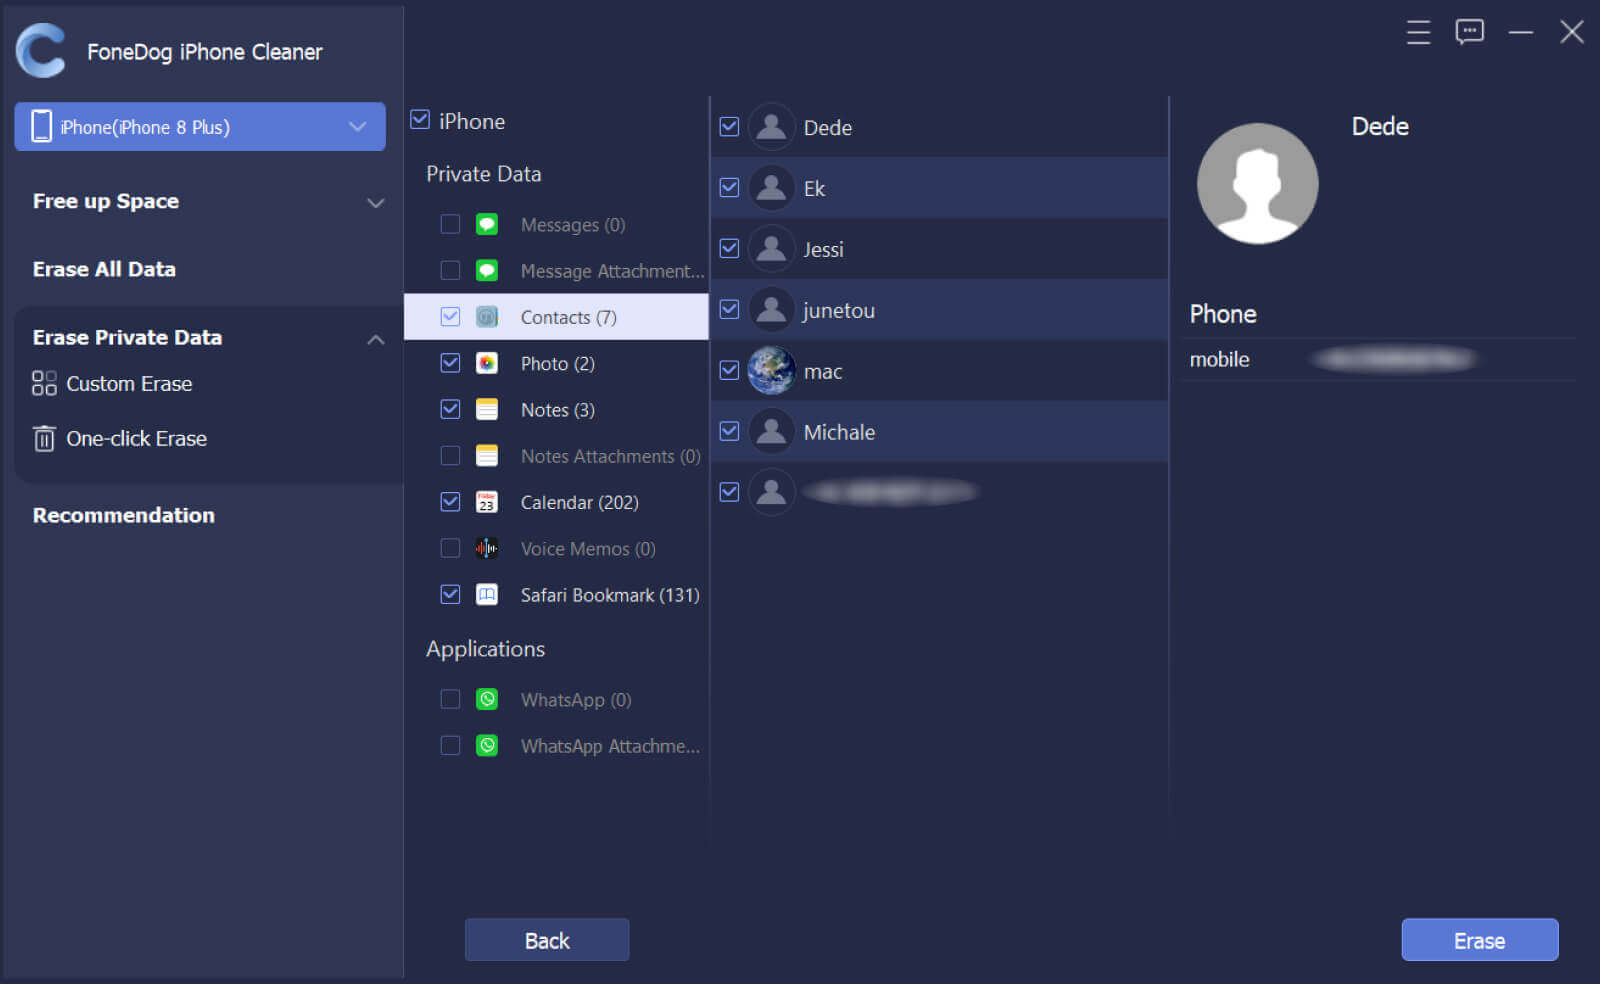
The FoneDog iPhone Cleaner has an “Erase All Data” option where you can save a lot of your effort and time. Using this feature of the iPhone Cleaner you can be able to delete all the files or data that you intend to in one tap only. And the good news about this iPhone Cleaner is, that it is also possible to delete a single item in the case that you do not want to delete them all at once. You can also use the FoneDog iPhone Cleaner to restore your files, transfer files or data from one device to another one, and even create a backup of all the files that you have.
To erase search suggestions on iPhone using the FoneDog iPhone Cleaner, you have to install the tool on your personal computer. Once it is successfully installed, you can grab your lightning cable and establish a connection between your device and your computer. Then you have to tap “Quick Scan”, and in case you wanted to discover more about your device, you can always tap “More Info”.
Now, let us start using the FoneDog iPhone Cleaner by following these steps:
People Also ReadDifferent Ways to Remove Google Search Bar (Root & No Root) in 2022A Complete Guide On How To Clear Facebook Search History
Protecting your data from the unwanted use of other people is one of the most important things that you have to always consider. It is like you are protecting yourself from the harm of others. We hope that you have learned a lot of methods that you can use to erase search suggestions on iPhone. And through all of the mentioned methods, you can be able to protect yourself from the unwanted attention that may cause your safety.
We hope that through these methods, and through the use of tools like the FoneDog iPhone Cleaner you can be able to protect things that you wanted to keep for your own safety and personal uses. It is really a good thing that we have reliable iPhone Cleaners these days which can help us protect our data while still doing things that we love.
Leave a Comment
Comment

Tech Website Writing /Content Optimization
Singing, smiling, surprising every day!
So as a technical writer, it is my duty to gather effective and reliable solutions to answer questions on how to deal with the issues they are having with their devices.
Hot Articles
 /
/
INTERESTINGDULL
/
SIMPLEDIFFICULT
Thank you! Here' re your choices:
Excellent
Rating: 4.8 / 5 (based on 106 ratings)
