FoneDog Screen Recorder
FoneDog Screen Recorder
Special Offer
Special Offer


By Adela D. Louie, Last updated: July 6, 2022
When you access your browser and look for sites to do your thing, there is a log of sites that you have visited. Even though you have your own reasons why you look for ways how to erase search history on iPhone, it is really still a must-to-know method on how you can execute it. It is also a means of tracking you and your activities as well as your activities, so for your security and well-being, it is very much important to learn how to erase search history.
There are a lot of ways to do it, as well as procedures that you have to take note of to be able to execute the deletion properly and securely. In this post, we will talk about a list of the methods on how to erase search history as well as introduced to you a tool that could help you get away from following all of these methods which are too long and too many.

Part #1: Methods on How to Erase Search History on iPhonePart #2: How to Erase Search History on iPhone Effectively?Part #3: To Summarize It All
We will be having a talk about some of the methods that you can follow to be able to erase the search history on your iPhone’s web.
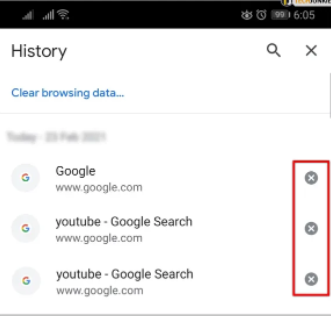
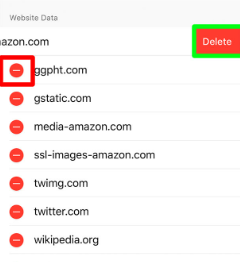
Of course, aside from the default of using Safari, we tend to download other search engines that are more familiar to us like Google Chrome. Initially, you have to remove Google search history on iPhone, here’s how.
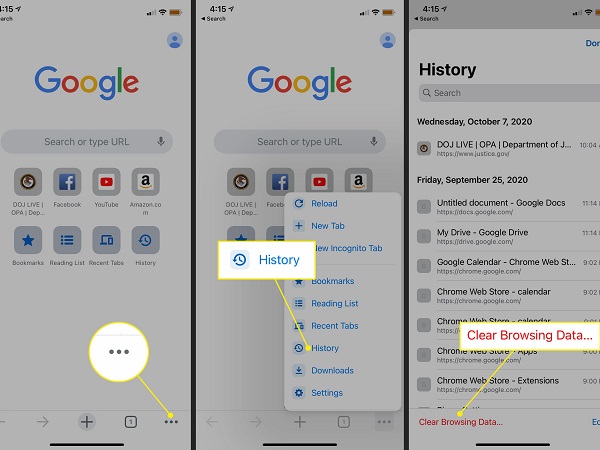
In case there are specific web searches that you wanted to delete, you can also do that by:
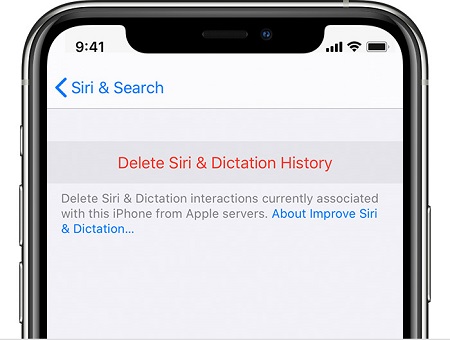
Aside from Google Chrome, you also use Siri to search for things and Apple also saves the history of all your interactions with Siri. In case you wanted to protect your privacy and to learn another way how to erase search history on iPhone, here’s how you clear the history of Siri on your iPhone.
Aside from Siri and Google Chrome, another famous web search engine is Firefox. In Firefox, all the things that you have searched are logged. And here is a way how you can erase your search history on Firefox.
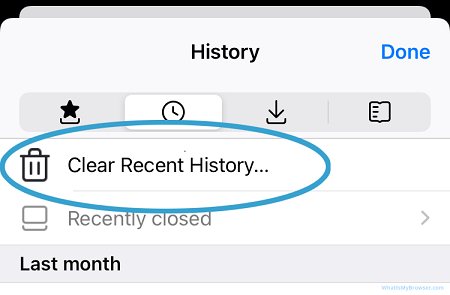
You can also delete specific sites on your Firefox’s search history by following these steps:
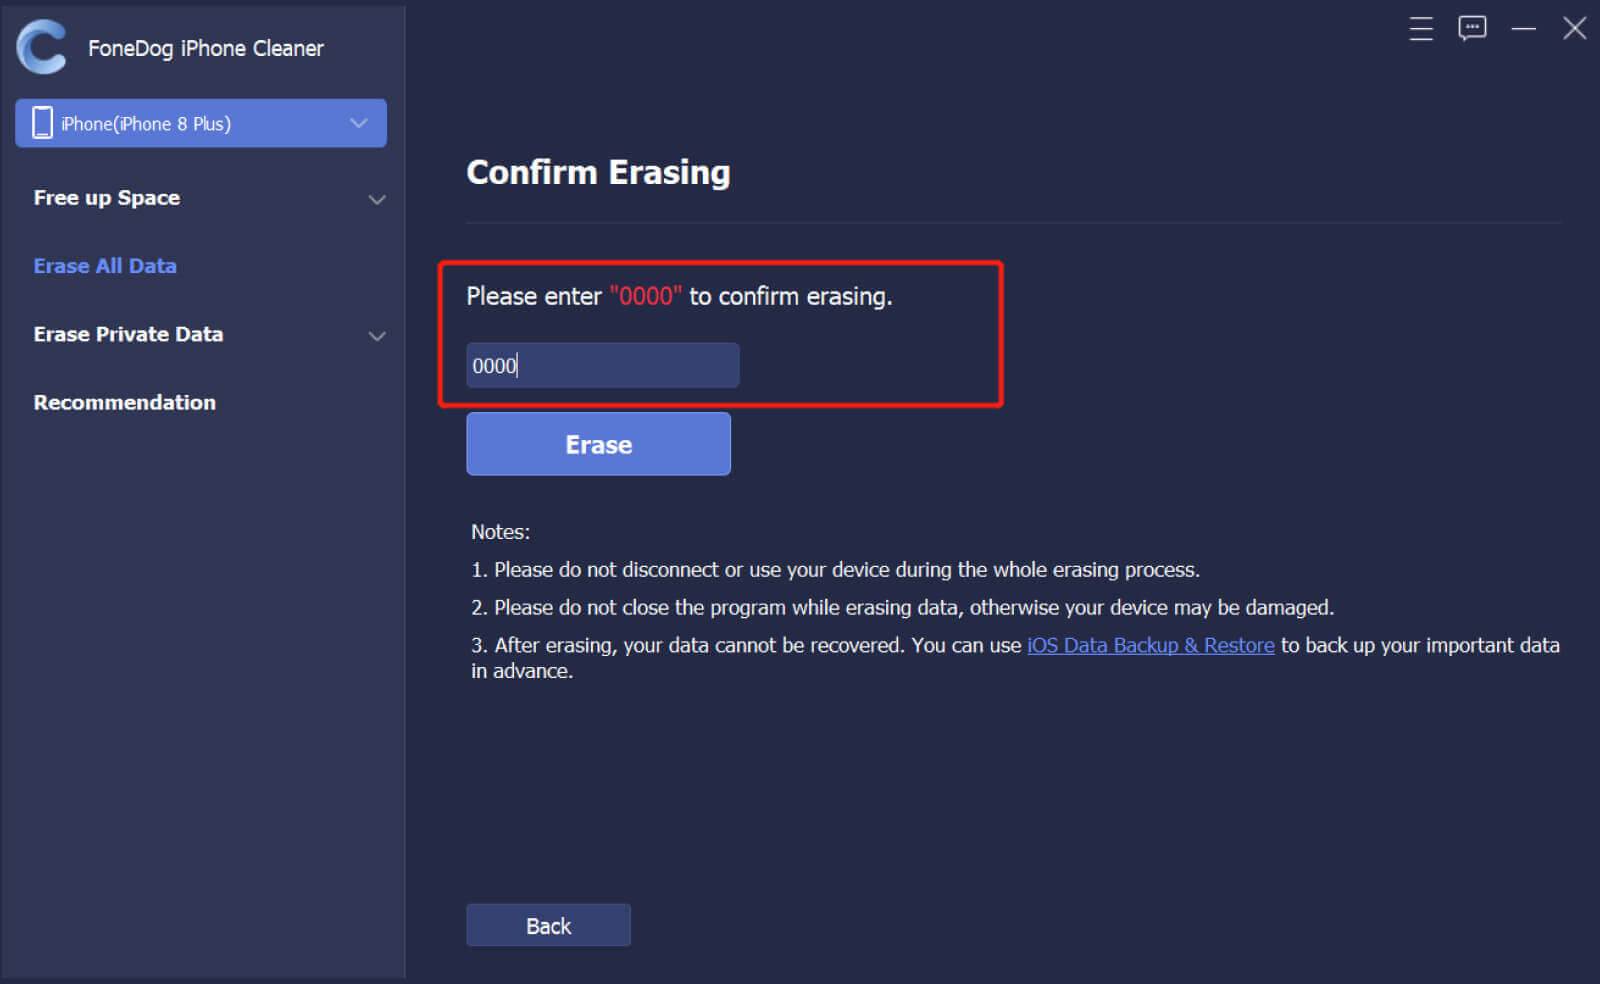
Now that you already have an idea of how to erase search history on iPhone, how about integrating a tool that you can use to do it a lot more effectively? The tool that we are talking about is the FoneDog iPhone Cleaner, a reliable partner in securing that the data that you delete on your phone is completely deleted or out of your phone’s system.
It is also important to delete all the web searches that you have made on your device, it is a way that you can be able to avoid any unwanted tracking of your activities and yourself as well. All the methods that we have discussed on how to erase search history are really a huge help.
On the other hand, the tool that we are talking about can render a lot of good things for you. Here are some of them:
Before proceeding with the deletion of data, you have to download and then install your FoneDog iPhone Cleaner on your computer. Then using a cable connect your computer to your device, and then tap “Quick Scan” to see details of your device. In case you wanted to see more, tap "More Info”.
Let us now proceed with the steps on how to use the FoneDog iPhone Cleaner.
People Also ReadHow to Delete Amazon Watch History in 2020[2022] How to Delete Purchase History on iPhone
There are a lot of reasons why you wanted to learn how to erase search history on iPhone, well; it is really a vital procedure to avoid unwanted trespass to your private searching of files or things that you must do. The methods that we have discussed above are really helpful; you just have to follow a lot of procedures to be able to make sure that you have deleted your web search properly.
You can use all these methods as your reference in the future, also the use of FoneDog iPhone Cleaner is really advisable and a lot more recommendable if you wanted to be sure. In case you wanted to browse easily and without restrictions, you can try the private browsing mode as well. Otherwise, you have to be more cautious on sites you visit, and also in keeping the logs of the websites that you use. We hope that we have helped you find ways how to erase search history on iPhone, and also we hope that you could use these ways to be able to make sure that you are safe all the time. We should be a lot more careful these days even on the things that we do over the web, there are a lot of people nowadays that can do harm at the expense of other people, remember that it is always better to be safe than be sorry.
Leave a Comment
Comment

Tech Website Writing /Content Optimization
Singing, smiling, surprising every day!
So as a technical writer, it is my duty to gather effective and reliable solutions to answer questions on how to deal with the issues they are having with their devices.
Hot Articles
 /
/
INTERESTINGDULL
/
SIMPLEDIFFICULT
Thank you! Here' re your choices:
Excellent
Rating: 4.8 / 5 (based on 65 ratings)
