By Adela D. Louie, Last updated: March 31, 2022
There are actually a lot of ways to delete your emails. It can be through manual ways or through the use of some tools. Whatever these ways are, the important thing is that we can be able to know how to delete iCloud emails.
Although it could also be a choice, one of the reasons why there are times that we already cannot control the flow of emails is because it is a hassle to manually delete iCloud emails. It could also give headaches as some of us find it hard to do the decluttering, or do not even know where the cleaning should start.
Well, if that is the case, you are so lucky to have been crossed paths with this article. Here, we will be taking an in-depth discussion of how to delete iCloud emails, helping you to easily organize the files or emails that you really need or are necessary.
We will also be giving you an idea of why is it necessary to clean and organize your iCloud emails as well as be properly informed as to where you can be able to find your iCloud storage. This discussion will really be interesting as well as helpful to many of us, so let us start.
Part 1. Why Do You Need to Delete Your iCloud Emails?Part 2. How Can You Delete iCloud Emails?Part 3. How to Delete iCloud Emails Using The FoneDog iPhone Cleaner?Part 4. To Summarize It All
Part 1. Why Do You Need to Delete Your iCloud Emails?
Of course, before discussing the steps on how to delete iCloud emails, it would be best to figure out why is there a need to do so. These are some of the reasons why you should delete iCloud emails.
- It would be less stressful to locate important emails that you need and are necessary for your work or whatever that you do. You can be able to easily navigate as well as look through your inbox anytime that you will be needing files sent via it.
- It is important to take note of the fact that your Apple storage plan will be as is, free if you are not going to buy more storage.
- You also have to take note that the allotted free storage of 5 GB is applicable to every iDevices wherein you have connected your iCloud account.
- We are aware that having lots of emails will result in storage problems. So, if you are well informed about it, and you do regular cleaning of the files, you can be able to have enough storage for some of your important files such as music, photos, notes, applications, and a lot more.
Where Can You Find Your Storage Location Using Your iPhone?
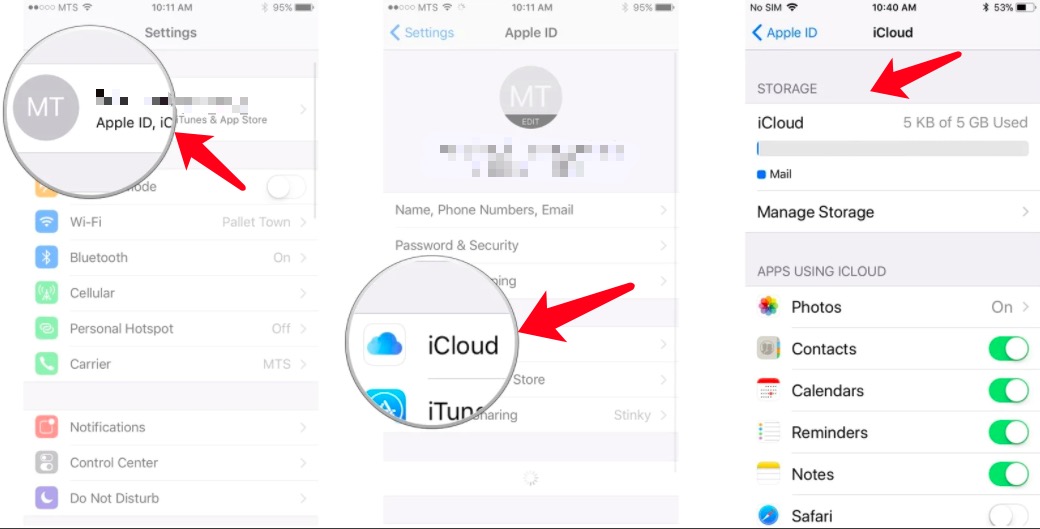
- Launch the “Settings” app on your iPhone.
- You will see a rectangular box; at the top of it is your name and an arrow which is pointed on the right side of the screen.
- You have to select the said rectangular box which has “iCloud” labeled on it, and you will be able to see the amount of storage that you still have, as well as the things that are taking up the said space. You can also be able to see what to do with the said storage capacity and contents and be able to figure out the next steps that you will be taking.
Where Can You Find Your Storage Location Using Your Macbook?
- Hover your mouse to the “Apple” icon which is located at the top left corner of the screen.
- Then, you have to choose “System Preferences”.
- You now have to click “Apple ID”, which is on the top right corner of the screen.
- In case iCloud is not automatically selected, you have to click it, which is on the sidebar leftward to be able to see the storage amount, the apps and files you have, as well as evaluate what you need to do to be able to free up some space.
Where Can You Find Your Storage Location Using Your PC?
- You have to key in iCloud.com on your browser.
- Then hover your mouse to “Account Settings”, to be able to view the storage amount that is left as well as the data that is taking up the space of your device and iCloud account.
Part 2. How Can You Delete iCloud Emails?
Method 1: Delete Email In Your iCloud
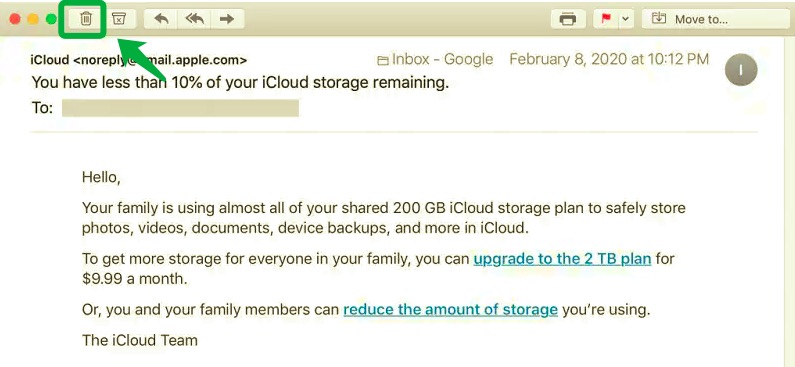
- On the Mail of your iCloud.com account, you have to select which messages or which particular email you want to delete. You can also select them all if you want, just press “
Command-A” for Mac computers, or “Control-A” on your Windows computer.
- If you have selected a particular email, you just have to tap the trash can-like icon to delete the selected email. Or if you have decided to delete multiple messages, you have to hover your mouse to “Delete”, and then click it.
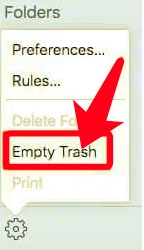
Please note that after you have deleted your emails, it will go to the “Trash folder” and would still somehow take up storage on your phone, here’s how you empty your “Trash folder”.
- Go to the web browser and launch iCloud.com. at the top of the list of Mailboxes, you will see an icon that looks like a gear, hover your mouse into it and then click it.
- Then, on the choices or menu that will appear, tap “Empty Trash”, and then confirm the process, you have to tap “Empty Trash” once more.
Note: Once you have deleted your emails on the “Trash folder” they will be permanently deleted on your device.
Method 2: Mass Delete iCloud Emails
You can also be able to delete mass emails on your iCloud. Since it would really be time-costing to manually delete emails one by one, here’s how to mass delete emails:
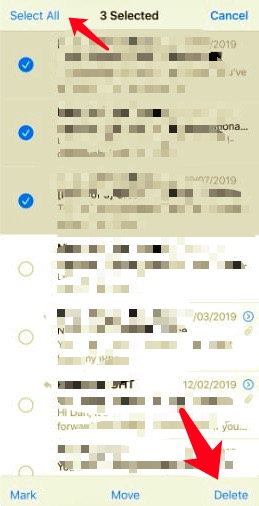
- Open your Mail application, and then proceed to “All Inboxes”. You can also select a particular Mailbox in case you wanted to choose or clean a specific one.
- Then tap “Edit”.
- Then you have to choose “Select All”, or you can also hover your mouse to each of the emails that you wanted to delete.
- Then once you have checked the box of each email, you have to tap “Delete”.
- Please note that in any case that you are using a Windows computer or a Mac computer, you can go to the website of iCloud directly to be able to delete your emails.
Method 3: Block iCloud Emails
There are also ways on how can you be able to block some emails, like those emails that were sent by pesky senders, and when you also know how to block these emails, you can be able to know and control the emails on your account, and avoid a sudden boost of storage capacity.
- Launch the Mail application, and then if you already have someone in mind that you wanted to block, tap it.
- Then, when you have selected the address of the said specific sender in the “From” area this will take you to the contact page of the sender.
- Then you can now select the option “Block this contact”. You have to select twice or two times to be able to finalize and complete everything.
Part 3. How to Delete iCloud Emails Using The FoneDog iPhone Cleaner?
Amongst the ones that we have mentioned above, you can also use a tool to permanently delete iCloud emails. This method on how to delete iCloud emails is one of the best that we will be sharing in this article. The FoneDog iPhone Cleaner, the best iPhone Cleaner of today’s technology has a lot to share with you.
Aside from being compatible with all iDevices, like iPhone, iPad, iPod, and also Windows computer or Mac computer, it is also known for being so efficient in cleaning your devices.
So how can FoneDog iPhone Cleaner exactly help you how to delete iCloud emails? What does it have that other iPhone Cleaner doesn’t have?
- Save time and energy and delete all the files, in this case, iCloud emails, that you want or need to get rid of with its “Erase All Data” feature. You can do this in one tap only.
- Choose which ones are too important to be kept, and get rid of the ones that you have to delete with the feature of FoneDog iPhone Cleaner where you can be able to delete selected files only.
- Do side jobs like restoring your files, creating a backup for your files, or transferring them to some of your other devices using this FoneDog iPhone Cleaner.
Free Download
Free Download
Now that you are amazed at how efficient this iPhone Cleaner is, we should now proceed with how you can be able to use it as a way how to permanently delete iMessages on your iPhone.
Knowing The Storage Of Your Device
- Download and install the FoneDog iPhone Cleaner on your computer, and make sure that you have completed the registration by using the email as well as the code is given initially.
- Do not forget to tap “Trust” for you to have access to the device, connect your device to the computer using a cable.
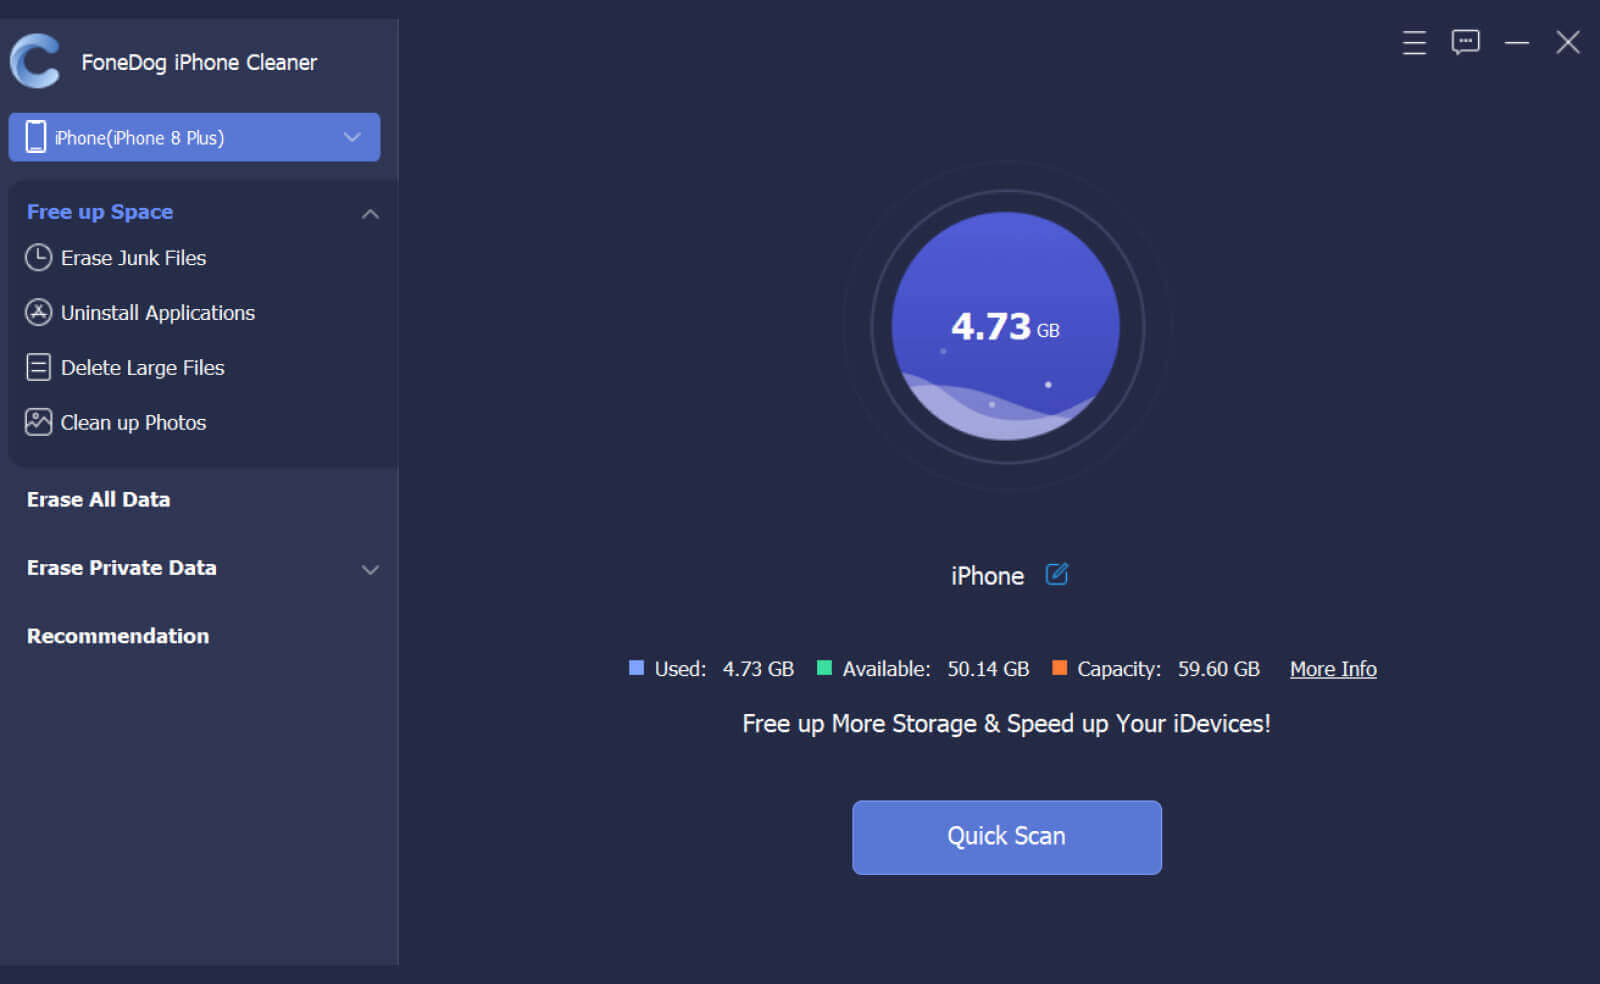
- Tap “Quick Scan”. This will start the scanning of your iPhone or device. And in a few minutes, you will see the total storage of your device. In case the details that you have read are not enough for you, you can still see the other details by tapping or clicking on “More Info”.
How to Delete iCloud Emails Using The FoneDog iPhone Cleaner?
There will never be a problem anymore in case you are too lazy to declutter your emails. FoneDog iPhone Cleaner helps clean up your iPhone easily and quickly. This iPhone Cleaner will help you secure all the private information that you have shared and received through iCloud emails. This is by far the most convenient and fastest way to keep the entire data safe, as well as free your device’s storage.
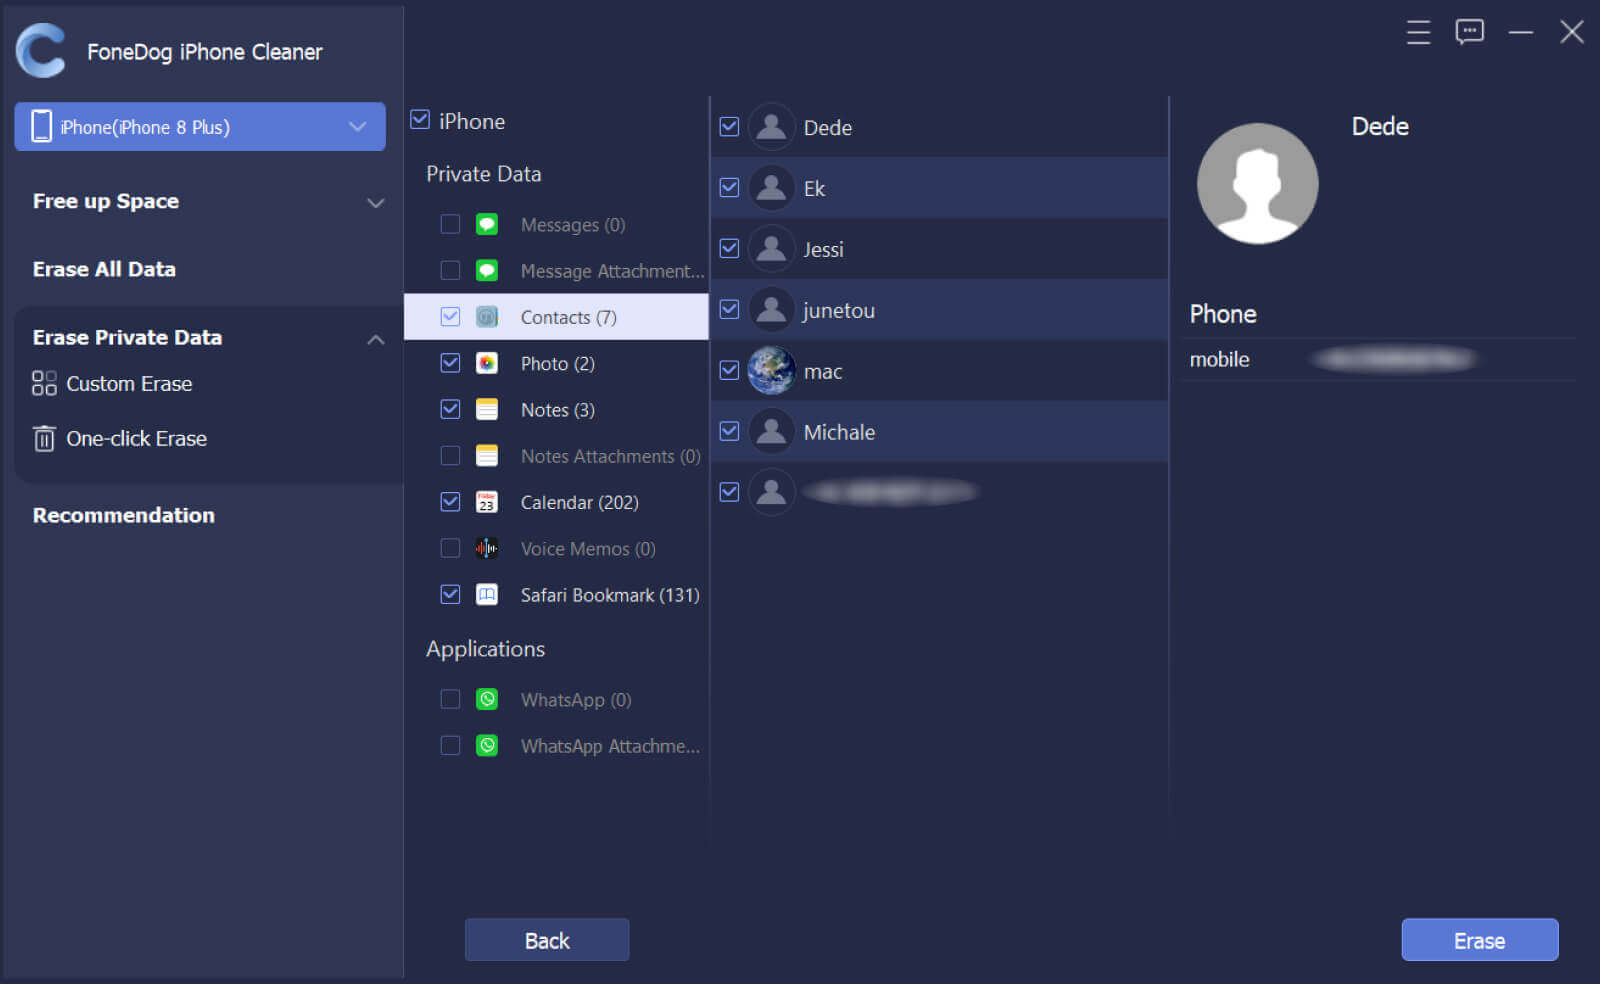
- Go and look for “Erase Private Data”, and then you have to carefully choose between “Custom Erase” or “One-click Erase”. Your choice will determine the next process.
- Secondly, you have to tap “Custom Erase” to be able to start the scanning of all the iCloud emails that you have and this will also let you see your private files. Also, start choosing the iCloud emails that you wanted to keep and those that you wanted to delete. Then once you have made and finalized your decisions, click “Erase”. In case you have something important stored on your email, you can create a backup first prior to deleting iCloud emails.
- Take note of the fact that if you have tapped the “One-click Erase” option, this will trigger the scanning of your iCloud emails, and then will automatically proceed to the deletion of the files.
People Also ReadHow to Fix iPhone Says Not Enough Storage But There IsThe Best iPhone Storage Cleaner to Clean up iPhone in 2022
Part 4. To Summarize It All
We have to securely dispose of our emails. It may contain a lot of valuable information related to us and to other persons. Being responsible enough might save you from the illegal use of your information. We have discussed in the parts of this article everything that you have to know about how to delete iCloud emails.
From the things that you have to know first, and the facts that you should take into consideration, everything was well imparted to each of you. This will make a large impact, especially on those that are using iCloud email to store information that is personal, work-related, or even school-related.
We hope that you have learned a lot about how to delete iCloud emails, as well as how to use the FoneDog iPhone Cleaner on how to easily take action on the clogging of emails that you may encounter from time to time.
Free Download
Free Download


 /
/
