FoneDog Screen Recorder
FoneDog Screen Recorder
Special Offer
Special Offer


By Gina Barrow, Last updated: January 30, 2022
“I am planning to sell my old iPhone since I got a new one and am currently stuck with resetting it. My iPhone erase all content and settings not working. It says verification failed. How do I fix this? Thanks”
Buying and selling used iPhones have a great market today however, this transaction is critical to data leaks that is why many online selling platforms and even customers ask the original owner to reset and wipe out their data completely.
How to reset your iPhone erase all content and settings not working? There could be varying reasons as to why this feature is not working. Let’s all find out how to fix this issue by checking out the options below. (If you want to factory reset your iPad without an iCloud password, we can offer you another guide.)
Part 1. Use the Most Recommended Alternative to Erase All Data on the iPhonePart 2. Use iTunes to Erase iPhone CompletelyPart 3. How to Fix iPhone Erase All Content and Settings Not WorkingPart 4. Summary
When the Erase all content and settings feature on your iPhone is not working, you may want to consider alternatives right away to continue resetting your device. The best alternative we recommend is to use a robust iPhone cleaner.
Using an iPhone cleaner gives you a list of cleaning features including wiping out all data and ensuring that your info is unrecoverable even by 3rd-party programs. One of the best programs out there is FoneDog iPhone Cleaner.
FoneDog iPhone Cleaner offers the following:
Here is the complete step by step guide on how to use FoneDog iPhone Cleaner:
You first need to download this software on your computer and install it. Follow the on-screen installation guide. After that, launch the program and connect your iPhone using a USB cable.
If prompted, unlock your device tap Trust this computer, and enter the passcode

Once the iPhone is connected, you can view the current status of your device, including the total storage capacity. You will also get a glimpse of how much data you have stored and left.
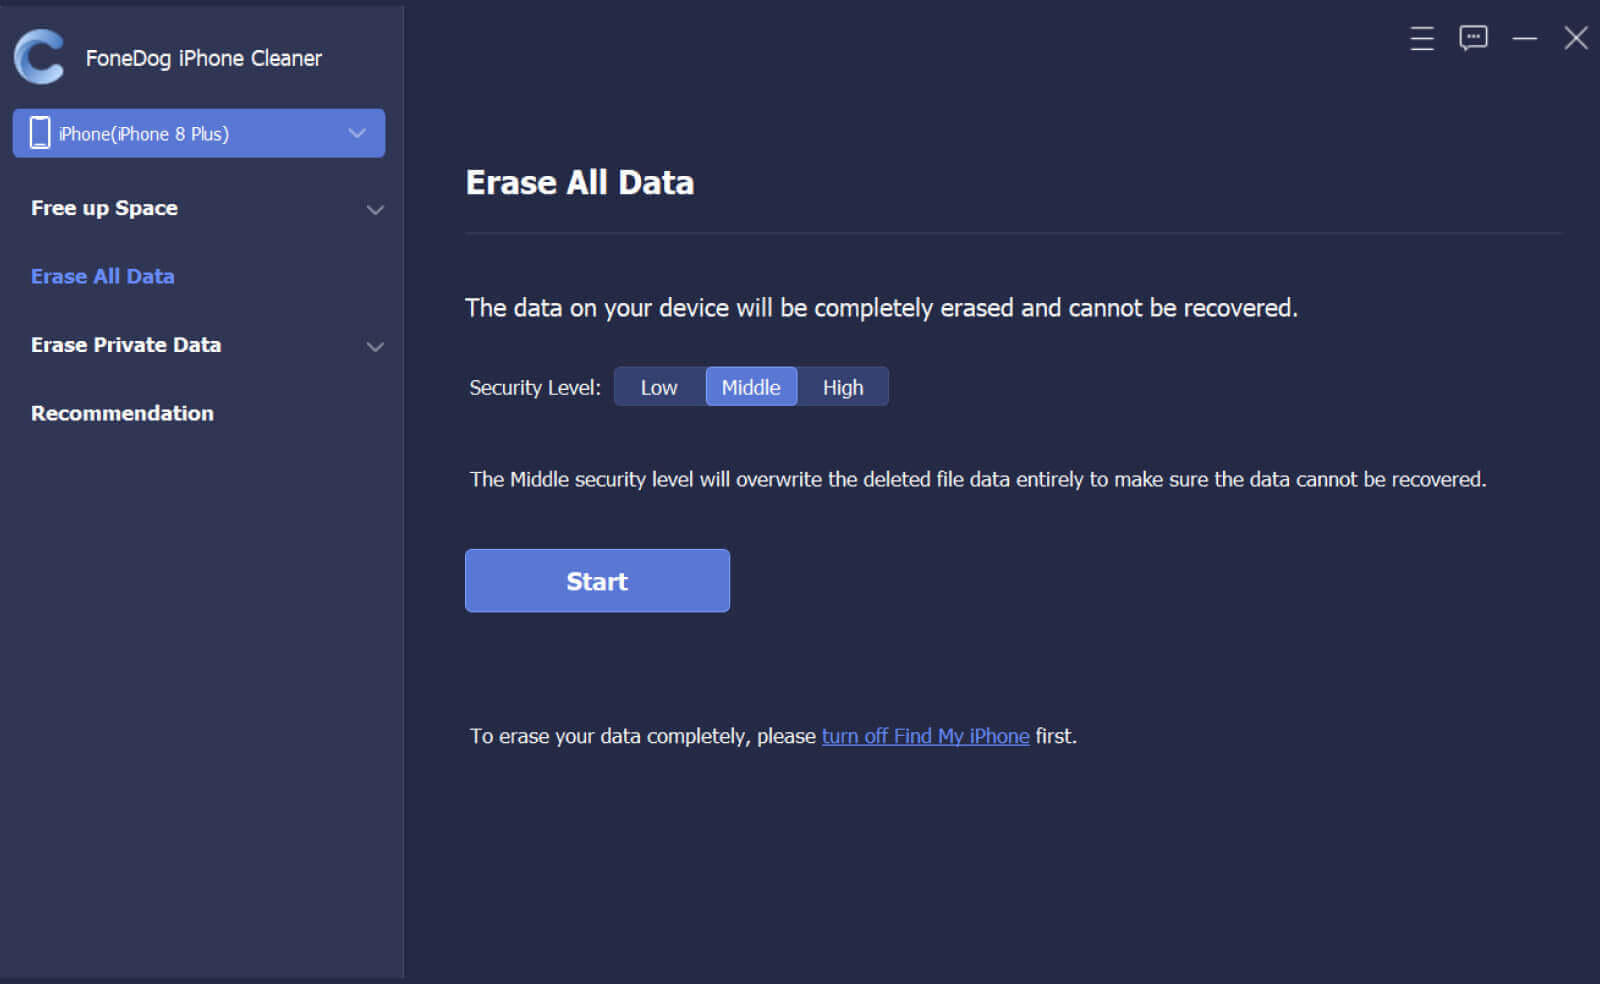
Click Erase All Data on the left menu and then choose the erasing level you prefer. By default, this software is set to Middle level erasing. You can change it anytime.
Enter the passcode 0000 to confirm the data wipe-out process. Remember, this process is irreversible and all data are unrecoverable.
Click the Erase button to commence the process.
That’s it! You are all set. Your iPhone is ready to go and join its new owner.
Apart from the Settings of your device, you can also connect your iPhone to the computer and let iTunes reset it for you. Thanks to this old buddy that’s been there since day one. iTunes gives you a number of features and services that you can take advantage of.
To reset your iPhone via iTunes, follow these:
When you notice that the Erase all content and settings are not working, don’t give up just yet. T may be due to some factors that the reset failed. You can work it out by doing this workaround:
Many users tend to forget that most settings and features of the iPhone require internet, including resetting your device. Before you reset your iPhone, check your internet connection first. Make sure you have an excellent signal and then do the reset.
If you have a stable connection yet the reset won’t go through, try resetting the network connection first. Go to Setting, then General, tap Reset, and select Reset Network Settings.
After that, retry erasing your phone content.
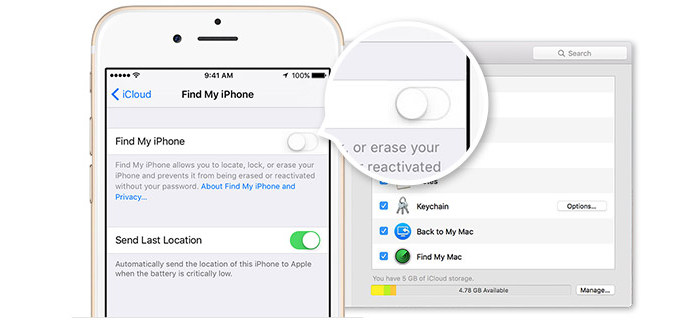
If you had this Find My turned on previously, you may temporarily disable the feature while resetting your device. This is because it may detect a redundant process the reason why the iPhone erase all content and settings not working.
To turn off Find My:
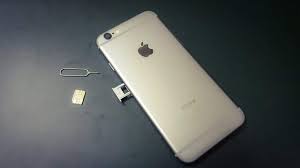
You may have taken the SIM card out from the iPhone since you already got a new one and then performed a reset. At some point, resetting an iPhone without the SIM card, causes verification to fail since it may need a connection to your carrier network.
Insert your SIM card on the old iPhone and retry resetting it.
You may also consider signing out of your iCloud account in case you are having issues with resetting the iPhone. Like the Find My option earlier, it may also conflict with the iCloud processes.
To sign out of your iCloud account. Go to Settings, select your profile, scroll all the way to the bottom and tap Sign Out.
Perhaps there was a pending iOS install on your iPhone that needs to be executed before you can erase all the data. Or maybe a bug is causing the setting to not work and an update can fix it right away. Whatever the reason may be, good thing you can always check for the latest update:
People Also ReadHow to Activate iPhone Without Apple ID: A Guide for YouIf I Reset My iPhone Will I Lose Everything
Wiping out your data completely before handing out your iPhone to the next owner keeps you safe from data leakage. And if you are having issues with the iPhone erase all content and settings not working, follow the recommendations we shared in this post.
When it comes to finding the most efficient way to clean the data off your device, FoneDog iPhone Cleaner is the best solution you can use.
Leave a Comment
Comment

Technical/Creative Writer
Kitchen, my safe space; black, my favorite color
Was a Technical Specialist for a while, troubleshooting Smartphone and Software-related issues until a writing stint caught my attention.
Hot Articles
 /
/
INTERESTINGDULL
/
SIMPLEDIFFICULT
Thank you! Here' re your choices:
Excellent
Rating: 4.6 / 5 (based on 98 ratings)
