FoneDog Screen Recorder
FoneDog Screen Recorder
Special Offer
Special Offer


By Adela D. Louie, Last updated: September 17, 2019
In today’s technology, the iPhone is one of the most leading smartphone devices that we have. This is because Apple, the manufacturer of iPhone devices, had become very competitive with their products and that they have made it more advance, put some best features that every user enjoys. And with the fast growth of technology, several iPhone models had already come out having the most awesome features that every user can enjoy.
This is the reason why it is more likely that you will sooner or later get the newest version of your iPhone device. And with that, the only thing that you will be concerned about is the data that you have stored with your old iPhone. The question you might be asking is how to transfer data from iPhone to iPhone without losing any of your important data. Find the answer in this post!
Part 1: iPhone Data Transfer Using Third-Party SoftwarePart 2: iPhone Data Transfer Via iCloudPart 3: iPhone Data Transfer Using iTunesPart 4: Automatic Setup On iPhone Device - Transfer A Little DataPart 5: Conclusion
People Also ReadHow to Transfer Data to New iPadHow to Transfer Data from One iPhone to Another
One best and convenient way for you to do an iPhone data transfer is by using the software. And with that, it is highly recommended that you make use of the FoneDog Phone Transfer. This tool will do all the trick for you.
Through the use of the FoneDog Phone Transfer, you will be able to transfer your Music, Contacts, Photos, Videos, and Messages. Not only that, but the FoneDog Phone Transfer can also work for you to backup your data from your iPhone device. This tool also comes with a HEIC converter and a ringtone maker which can make it more fun for you to use it.
Using the FoneDog Phone Transfer, you will be able to transfer your photos from iPhone to iPhone, iPhone to the computer, and even iPhone to Android device. This tool is very easy to use because of its user-friendly interface and at the same time, very safe to use because you will not lose any of your data during the iPhone data transfer.
And with that, we are going to show you how easy to use this program is by showing the step by step guide that we have below. Simply follow them and you will be able to transfer your data from your iPhone device to another device as you wish.
The very first thing that you need to do is to download the FoneDog Phone Transfer from our website and then have it installed on your computer.
After installing the program completely, go ahead and launch it on your computer. And once that the program is up and running on your computer, go ahead and connect your iPhone device with the use of your USB cable. From here, all you need to do is to wait for the FoneDog Phone Transfer to detect your iPhone device. And once it does, you will be able to see information about your device.
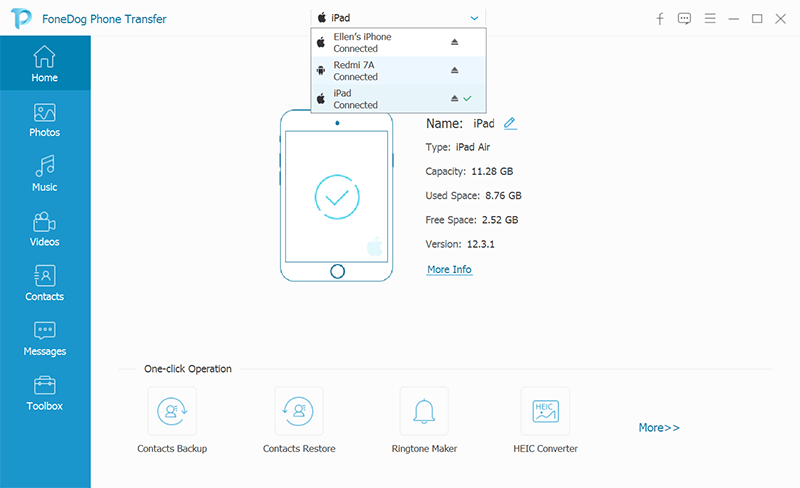
After the FoneDog Phone Transfer had detected your iPhone device, you will also be able to see different file types on the left side of your screen. These are Photos, Videos, Messages, Music, and Contacts. From there, just go ahead and choose which of those would you like to transfer.
Then once that you click a certain file type on the left side of your screen, then be able to see all the data that they contain on the right side of your screen. From there, each of the items will be seen with their details such as the date of creation, the size of the file, the name of the file and more. So here, all you need to do is to click on all those data that you would like to transfer.
Once that you have chosen all of the data that you want to transfer, then you have two options on how you can do an iPhone transfer. One is by choosing the Export to PC option wherein the data that you have chosen will be transferred to your computer and will serve as a backup. The other one is you can connect your other mobile device to your computer and then directly transfer your data from your iPhone device to another using the FoneDog Phone Transfer.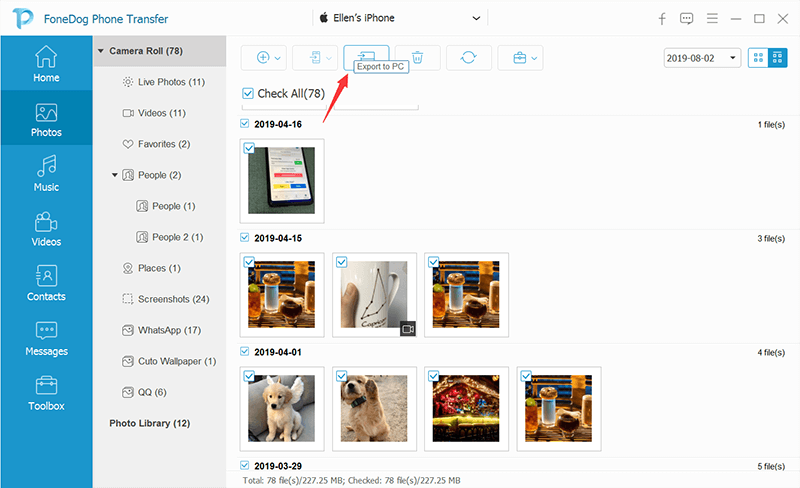
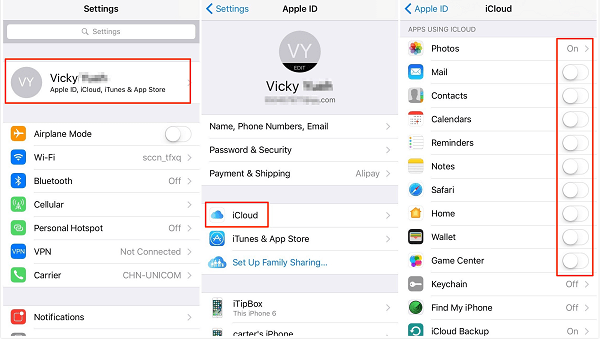
Another way for you to do an iPhone data transfer is by using your iCloud. And with that, here are the steps that you can follow.
Step 1: On your old iPhone device, go ahead and launch the Settings app.
Step 2: From the Settings, choose and tap on the Apple ID banner on top of your screen.
Step 3: And then, tap on the iCloud.
Step 4: From there, simply tap on the iCloud Backup.
Step 5: Then choose Backup Now.
Step 6: And once that the iPhone backup is complete, go ahead and turn off your old iPhone.
Step 7: Then, go ahead and take out the SIM card on your old iPhone device if you are going to use it as well on your new iPhone device.
Once that you are done backing up your old iPhone device, you can then set it aside and work on your new iPhone device. And with that, here is what you will be needing to do.
Step 1: On your new iPhone device, go ahead and insert your SIM card if you still want to use it.
Step 2: Then turn on your iPhone.
Step 3: Then, you can slide up or you can press on the Home button which depends on the type of iPhone you are setting up.
Step 4: Then, simply follow the procedure that is seen on your screens such as choosing your Wi-Fi connection and language.
Step 5: After that, go ahead and tap on the Restore from iCloud backup option that is shown on your screen.
Step 6: From there, all you need to do is to sign in using the same iCloud account that you use to back up your old iPhone device.
Step 7: After that, tap on the Next button.
Step 8: And then choose on Agree.
Step 9: And after that, tap on the backup that you had just created with your old iPhone device.
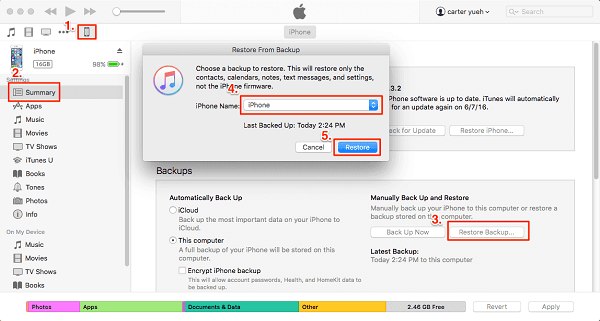
Another way for you to do an iPhone data transfer is by using your iTunes. With that, here are the steps that you will be needing to follow.
Step 1: First is that you have to check if your iPhone has the latest version of iTunes.
Step 2: After ensuring that you have the latest version of iTunes on your iPhone, go ahead and connect your old iPhone to your computer via your USB cable.
Step 3: After that, go ahead and start running the iTunes program on your computer.
Step 4: Then, simply click on the iPhone icon which you can find at the menu bar.
Step 5: Then, go ahead and choose on the Encrypt Backup. Here, you will be asked to set up your password.
Step 6: After that, go ahead and click on the Back Up Now button. Also, you can skip on the Backup Apps if in case they show up on your screen.
Step 7: Once done with the backup process, go ahead and disconnect your iPhone device from your computer.
Step 8: After that, go ahead and turn your iPhone off.
Step 9: And then, take out your SIM card from your old iPhone device if you are planning to use it on your new iPhone.
Then on your new iPhone device, here is what you need to do.
Step 1: First is you have to put your SIM card in on your new iPhone device.
Step 2: Then go ahead and turn your new iPhone on.
Step 3: Then go ahead and connect your new iPhone to your computer using your USB cable.
Step 4: Then go ahead and slide up for you to set up your iPhone device.
Step 5: Then there will be directions on your screen for you to be able to select your language and for you to set up your Wi-Fi connection.
Step 6: Then go ahead and choose on the Restore from iTunes backup option.
Step 7: Then on your computer, go ahead and choose the Restore from this backup from your iTunes program window.
Step 8: Then from there, simply select on your most recent backup.
Step 9: Then click on the Continue button.
Step 10: Then, go ahead and simply key in the password that you have made if you have a backup file that is encrypted with a password.
From here on, just keep your iPhone connected to your computer until such time that the iPhone data transfer is complete. You have stayed connected to the Wi-Fi network until such time that all of the apps and other things are done downloading on your iPhone device. This process may take some time depending on the data that you are trying to download.
If you just transfer a little data from the iPhone, you can set by yourself on your iPhone device. Here are the steps that you can follow:
Step 1: Simply choose the language that you like on your iPhone device as well as those other devices that are close to you.
Step 2: After which, simply tap on the Continue button on your iPhone device and a pop-up menu will show up on your screen. From there, all you need to do is to set up your iPhone device using your Apple ID and password.
Step 3: Then, you can make use of your old iPhone for you to make a scan on the photo that will show up on your new iPhone device.
Step 4: Then, simply key in the passcode of your old iPhone on your new iPhone.
Step 5: Then from here, simply set up your Touch ID on your latest iPhone device.
Step 6: And from there, you can simply choose if you want to restore your new iPhone device on the latest backup that you have.
Step 7: Simply choose to restore a new iPhone device using your iCloud or iTunes backup, transfer data from the Android device, or set it up as a new iPhone device. It is your choice on what you would like to do.
Step 8: And once that you are done, simply tap on the Agree button from the Terms and Condition that will show up on your screen.
Step 9: Then go ahead and select on the Continue button located under the Express Settings tab for you to make use of other features such as Find My Phone, Siri, and Location.
Step 10: Then you can set up your iPhone device in the normal process like how you did it before with your old iPhone device.
Now you know to do the automatic setup with your new iPhone device. This time, let proceed with doing the iPhone data transfer.

You see, doing an iPhone data transfer if not a difficult thing to do. All you need to have are the proper methods that you will be needing to do and you will be able to transfer your data from one iPhone to another.
However, if in any case that you would like to transfer your data from your iPhone device to a different mobile device such as an Android device, then the FoneDog Phone Transfer is the right tool for you to use. Do not worry because this program is very easy to use and that your data from your iPhone will be transferred over to another device or even to your computer.
Leave a Comment
Comment

Tech Website Writing /Content Optimization
Singing, smiling, surprising every day!
So as a technical writer, it is my duty to gather effective and reliable solutions to answer questions on how to deal with the issues they are having with their devices.
Phone Transfer
Transfer data from iPhone, Android, iOS, and Computer to Anywhere without any loss with FoneDog Phone Transfer. Such as photo, messages, contacts, music, etc.
Free DownloadHot Articles
 /
/
INTERESTINGDULL
/
SIMPLEDIFFICULT
Thank you! Here' re your choices:
Excellent
Rating: 4.7 / 5 (based on 80 ratings)
