FoneDog Screen Recorder
FoneDog Screen Recorder
Special Offer
Special Offer


By Adela D. Louie, Last updated: November 23, 2022
Viber is one of the most popular online messaging apps today. A lot of people use it for school, socializing, and even for work. Since it is used most often, it is important to know how to transfer Viber history from iPhone to computer. It is so important especially if you are afraid that you might lose your device, and someone might use all the information that was transacted on your Viber application.
Well, it is really one of the wise precautions that you can do. Also, it can happen that you have purchased a new device or phone, and you wanted to retain most of your Viber messages history intact on your device. Data loss can also be caused by a sudden update in the system, a damaged device or iPhone, tasks or operations that were done mistakenly, and many other instances. That' when you need a tool to transfer and bakcup. For example, you may need to transfer your text messages files from Andrioid to iPhone.
To some, Viber is really one of the most important applications so if you really wanted to get ahead of the possible outcomes once you lose all the data stored in your Viber account, learn all the possible fixes that you can do, here.
Part #1: What Are The Methods to Transfer Viber History from iPhone to Computer?Part #2: What Is The Most Guaranteed Way to Transfer Viber History from iPhone to Computer?Part #3: To Summarize It All
In this part of the article, we will directly discuss some of the methods together with the steps that you can follow in case you think that a specific method can help you. You can also choose a method depending on the difficulty level, and the resources that you have. So, let us begin learning how to transfer Viber history from iPhone to the computer.
One of the disadvantages that you should know if you use this method is the backed-up history does not include videos or pictures that are attached to your Viber conversations; hence, only textual history is viable for transfer.
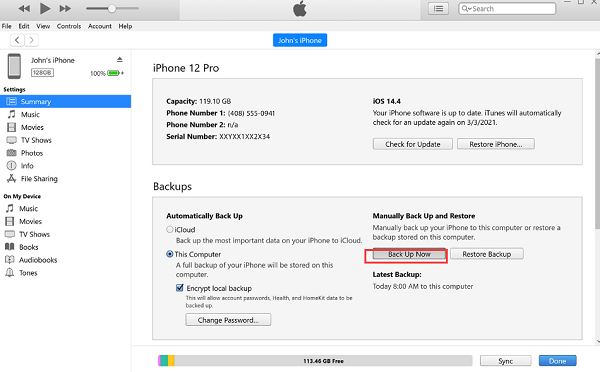
The second method how to transfer Viber history from iPhone to computer is through the use of one of the most essential applications in Apple devices, the iTunes app. This is actually considered the backup option since you can use it to create a backup file for your messages in Viber. Let us have a look at the steps on how you can use iTunes to transfer your Viber history from iPhone to computer.
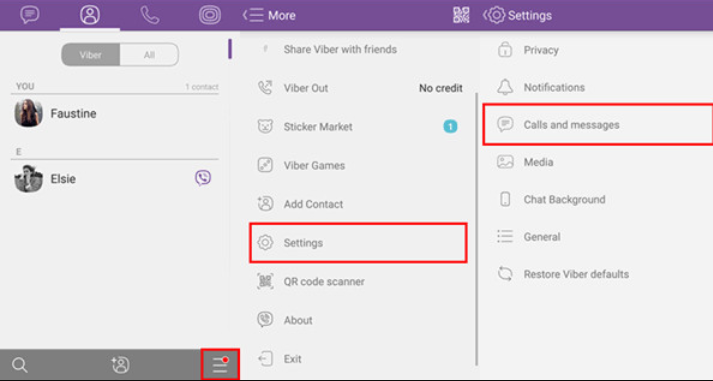
You can also use the Viber app itself to transfer Viber history from iPhone to computer. This app offers a way for us to manually back up our Viber messages on our personal computers through the use of zipped CSV files being transferred to your Skype or email ID. This is considered one of the simplest methods that you can try to transfer your files.

As the previous method said, this one has also the same disadvantage, you can only view the text messages stored in your Viber account; however the viewing of the images may be the ones that you have sent, or received is impossible.
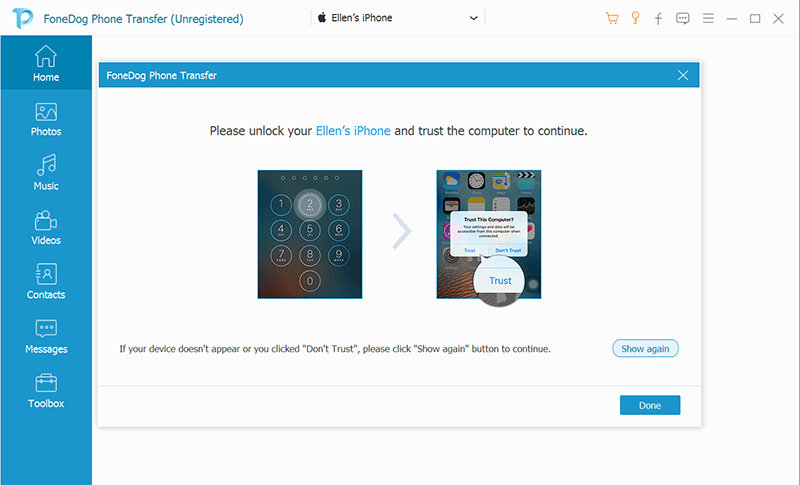
We have come to the most exciting part of the article, aside from the ones that we have shared above, there is another fix that you can do. This time, you will be using a tool called FoneDog Phone Transfer tool. This is one of the most efficient and effective ways to easily transfer your data among any type of device that you have. You can use it on Android devices, Windows and Mac computers, and of course iOS devices.
Phone Transfer
Transfer files among iOS, Android and Windows PC.
Transfer and backup text messages, contacts, photos, video, music on computer easily.
Fully compatible with the latest iOS and Android.
Free Download

The FoneDog Phone Transfer tool can be used to easily transfer your files from your Windows or Mac computer to any of your mobile devices and vice versa. It can also be used if you wanted to experience a smooth switch between your iOS and Android devices, or vice versa. It can also be a time saver; since it can help you transfer your files from your device to your personal computer via one tap only.
You can also use the FoneDog Phone Transfer to transfer your messages to your new iPhone as well as create a backup of your files. You can also use it to restore all the backup files that you have to any type of device you are going to use. In case you think you have contacts that have been duplicated this tool can easily detect them, and can immediately process the steps that you have to follow. You can also use it to change your ringtones, and even convert the HEIC image file to a JPEG or PNG file format.
So, how can we use the FoneDog Phone Transfer tool to transfer Viber history from iPhone to computer? Let us check the steps below.
People Also ReadHow to Transfer Apps from iPhone to iPhone in 4 Different WaysHow to Transfer Photos from iPhone to Hard Drive Easily in 2022
It is really vital nowadays that we protect ourselves even with the proper use of the smallest details about us. If you use the Viber app most often, it is only right that you know the proper methods and procedures on how to transfer Viber history from iPhone to computer.
We hope that we have helped you thoroughly understand every vital information that you ought to know so you know what you should do in case of emergencies and a total breakdown of your device.
Leave a Comment
Comment

Tech Website Writing /Content Optimization
Singing, smiling, surprising every day!
So as a technical writer, it is my duty to gather effective and reliable solutions to answer questions on how to deal with the issues they are having with their devices.
Phone Transfer
Transfer data from iPhone, Android, iOS, and Computer to Anywhere without any loss with FoneDog Phone Transfer. Such as photo, messages, contacts, music, etc.
Free DownloadHot Articles
 /
/
INTERESTINGDULL
/
SIMPLEDIFFICULT
Thank you! Here' re your choices:
Excellent
Rating: 4.8 / 5 (based on 105 ratings)
