FoneDog Screen Recorder
FoneDog Screen Recorder
Special Offer
Special Offer


By Adela D. Louie, Last updated: October 2, 2021
Do you have an iPhone device? Having a hard time keeping tons of your photos on your iPhone device? Want to know how to transfer photos from iPhone to hard drive? Then this is the article that you should read.
One of the most popular dilemmas of every iPhone user is that they cannot keep a lot of photos on their phone. It is because if you are using any iOS device, photos that are stored on their device are one of the main reasons why they are running out of storage space quickly. It is because photos saved on iPhone, or any iOS device comes with the largest size among all of the other data that you have.
And because of this, what most iPhone users do is that they tend to transfer their photos to a computer or an external hard drive. However, for those people who are new to using an iPhone device, it would be a struggle for them to do so.
You see, transferring photos from iPhone to a hard drive is not as easy as doing it on an Android device. For some, it could be a bit complicated. That is why we have included here some easy ways on how to transfer photos from iPhone to hard drive. And if you want to know more about this, keep on reading this post and follow the methods below whichever you think is the easiest for you.
Part 1. The Best Way on How to Transfer Photos from iPhone to A Hard DrivePart 2. Other Ways on How to Transfer Photos from iPhone to A Hard DrivePart 3. Conclusion
Of course, we know that you only want the best and the easiest way on how to transfer photos from iPhone to a hard drive. That is why here is the best solution that you can do for you to accomplish what you are aiming for. And that is to transfer your photos from your iPhone to your hard drive. And with that, what we highly recommend for you to use is the FoneDog Phone Transfer.
The FoneDog Phone Transfer is software that you can download on our official website (www.fonedog.com). The FoneDog Phone Transfer is one amazing software that you can use to transfer any data that you have on your iPhone to any other device such as to another iPhone device, to an Android device, and to a hard drive. You can also do the transfer the other way around. And with that, you can make use of this software on how to transfer photos from iPhone to Hard drive easily and safely.
Phone Transfer
Transfer files among iOS, Android and Windows PC.
Transfer and backup text messages, contacts, photos, video, music on computer easily.
Fully compatible with the latest iOS and Android.
Free Download

Aside from your photos, you can also transfer other data from your iPhone like your videos, audio or music, messages, contacts, and many more. In addition to this, the FoneDog Phone Transfer also comes with another feature which is called the HEIC converter which you can use to convert your photos to another format such as JPEG and PNG format without losing the quality of your photos.
And to show you how to transfer photos from iPhone to hard drive using FoneDog Phone Transfer using FoneDog Phone Transfer, here is a quick step that you can follow.
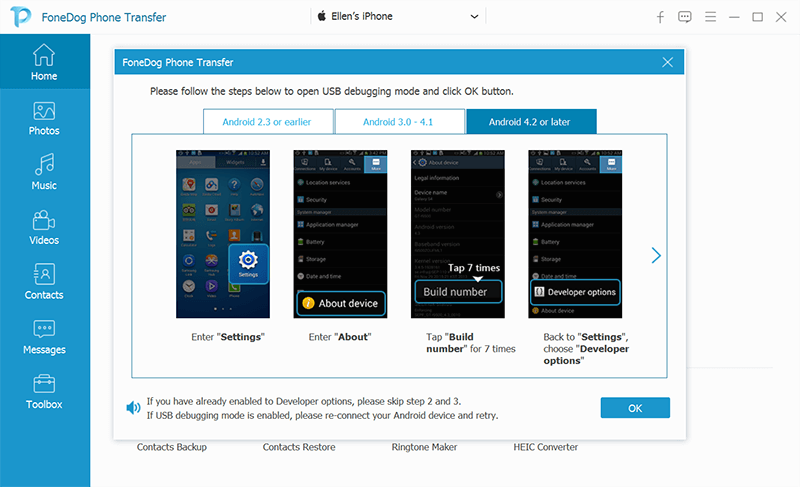
Step 1. Download and Install Phone Transfer
Of course, you need to download and install the FoneDog Phone Transfer first from our website and have it installed on your computer.
Step 2. Launch FoneDog Phone Transfer
After downloading and installing the program on your computer, go ahead and double-click on it for you to be able to launch it.
Step 3. Connect Your iPhone and Had Drive
Once that you have launched it, go ahead and connect your iPhone device to your computer and also your hard drive using your USB cable.
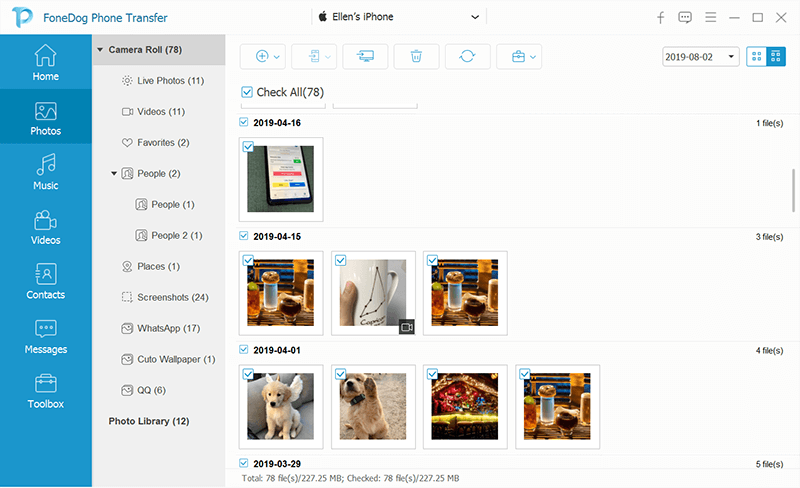
Step 4. Choose Photos to Transfer
Once that you have connected both your iPhone and your hard drive to your computer, check on the main interface of the FoneDog Phone Transfer to see if the program was able to recognize your device. And then, choose the Photos Category on the left side of your screen and you will then be able to see all of the albums that you have on your iPhone beside the category. And if you are going to click each album, you will be able to see what it contains on the right side. From there, you can now choose all of the photos that you want to transfer.
Step 5. Transfer Your Photos to Hard Drive
Once that you are done choosing all of the photos that you want to transfer from your iPhone to your hard drive, you can now go ahead and export those photos and choose your hard drive name.
Step 6. Complete the Transfer
From there, all you need to do now is to wait for the transfer to finish. And once done, you can now go ahead and browse the photos that you have transferred to your hard drive. And when you are done, you can now go ahead and disconnect both your iPhone and hard drive from your computer.
So, there you have it. That is how easy to use the FoneDog Phone Transfer. With just a few clicks of a button, you will be able to transfer your photos from your iPhone to your hard drive safely and quickly.
Aside from the FoneDog Phone Transfer that we have shown you above, there are also some other ways on how to transfer photos from iPhone to Hard Drive. This time we are going to show you the most common way on how you can do it.
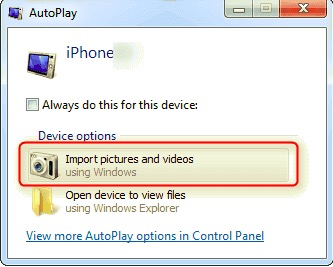
One of the ways on how you can transfer your photos from your iPhone to your hard drive is by simply using your USB cable and connecting your device to your computer. And with that, we are going to show you how you can transfer them whether you are using a Mac or a Windows computer.
If you are using a Windows computer and you want to transfer your photos from your iPhone to your hard drive, then here are the steps that you need to follow.
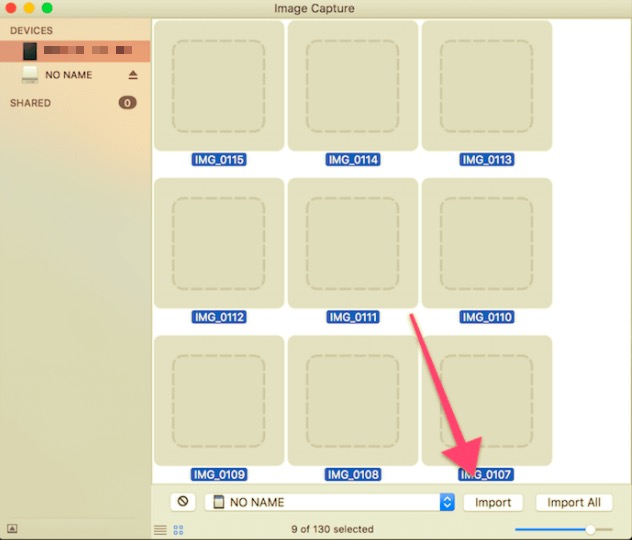
And if you are using a Mac computer, what you will be needing to do to transfer your photos from iPhone to hard drive are the following steps below.
Another way on how to transfer photos from iPhone to hard drive is by using some official source of iOS devices to do so. And one of those sources that you can use on your iPhone is your iCloud photos library. And to show you how you can do this, here are the steps that you can follow.
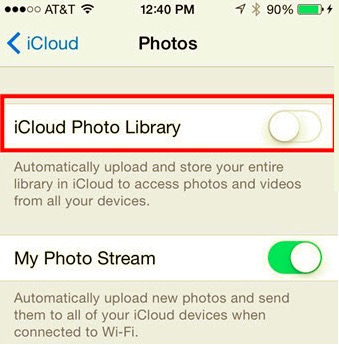
Though if you are going to use this method, you must know that this may take some time to complete and that you can only use a limited storage space for free.
Another method that you can use is your iTunes program wherein you can use to transfer your photos from your iPhone to your hard drive. And here are the steps that you need to follow.
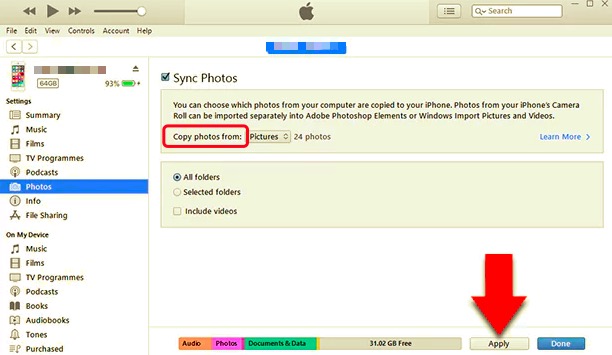
As you can see, it is very easy to transfer your photos from your iPhone to your hard drive. However, there are some weak points here in using this method. One is that this is a pretty slow process, and will not work on those updated versions of your device. And also, you will be needing to have a stable internet connection to finish the whole process.
People Also ReadHow to Transfer Photos from iPad to Computer without iTunesHow to Move Photos from iPhone to iCloud Storage
So, you see, there are a lot of ways on how you can transfer photos from iPhone to hard drive. However, there are also some weak spots that you can encounter in the process. But if you are going to use the FoneDog Phone Transfer to transfer your photos from your iPhone to your hard drive, you will not experience any conflicts or delays.
And also, when you make use of the FoneDog Phone Transfer, you will be able to get the job done easily because of the user-friendly interface that comes with this program. And also, this program is very safe to use, and that none of your data will be deleted or corrupted. Again, what we want for you is only the best that is why we are highly recommending you to use the FoneDog Phone Transfer for a smooth way to transfer your photos from one device to another.
Leave a Comment
Comment

Tech Website Writing /Content Optimization
Singing, smiling, surprising every day!
So as a technical writer, it is my duty to gather effective and reliable solutions to answer questions on how to deal with the issues they are having with their devices.
Phone Transfer
Transfer data from iPhone, Android, iOS, and Computer to Anywhere without any loss with FoneDog Phone Transfer. Such as photo, messages, contacts, music, etc.
Free DownloadHot Articles
 /
/
INTERESTINGDULL
/
SIMPLEDIFFICULT
Thank you! Here' re your choices:
Excellent
Rating: 4.7 / 5 (based on 84 ratings)
