FoneDog Screen Recorder
FoneDog Screen Recorder
Special Offer
Special Offer


By Vernon Roderick, Last updated: April 8, 2021
Every one of us has tried to migrate our photos into the smartphone that we mainly use. For Android users, it may not be as hard as it seems, but it’s a completely different thing when it comes to iPhone users.
No matter how updated your iPhone devices are, it doesn’t change the fact that they have their own world, so transferring files to other brands can be difficult. This article will show you how to transfer photos to iPhone easily. Let’s start with the first entry and perhaps the most effective method there is.
Part 1. Transfer Photos to iPhone from A DevicePart 2. Transfer Photos to iPhone from MacPart 3. Transfer Photos to iPhone from WindowsPart 4. Transfer Photos to iPhone from Android
There are ways to transfer photos to iPhonefrom Windows, Mac, and even Android. However, there are only a few methods that allow you to do it regardless of the device. Most of the time, it will require special software to make this possible, and that’s precisely what we will be using.
FoneDog Phone Transfer is a specialized software developed by the FoneDog group. It only has one purpose, and that is to transfer files from one device to another.
It specializes in transferring photos. Additionally, it can be used in Windows, Mac, and can even transfer files from Android to iPhone. Thus, it is the best tool for the job. Here are the steps that you’d need to follow:
Phone Transfer
Transfer files among iOS, Android and Windows PC.
Transfer and backup text messages, contacts, photos, video, music on computer easily.
Fully compatible with iOS 13 and Android 9.0.
Free Download

Connect your iPhone to the computer using a compatible USB cable, preferably the one that was given along with the phone. Make sure FoneDog Phone Transfer is already open before you do this. Then, at the top of the window, make sure your computer is the one selected and not the recently-connected iPhone.

On the left side of the window, there will be a list of file types. Since our goal is to transfer photos to iPhone, select Photos. This will prompt the software to scan for files belonging to the Photos category. It may take a minute or so to finish scanning.
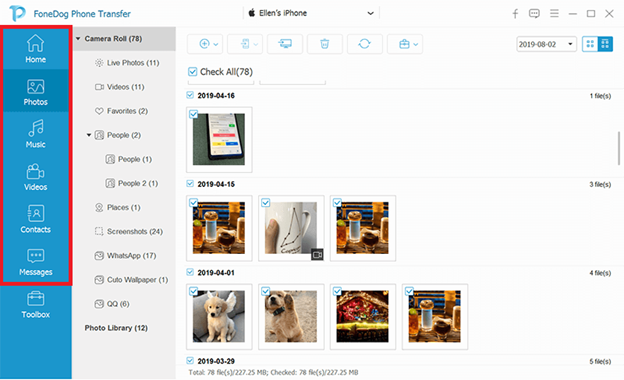
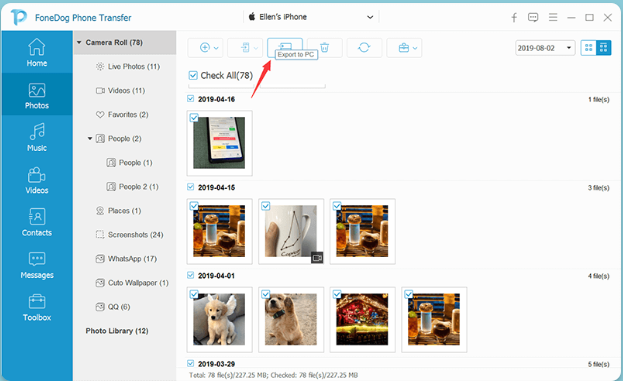
Now you will get a list of items on the right side of the window. These are files that can be transferred. Simply select the files you want to transfer by clicking on their corresponding boxes. Once you’re done selecting, click on the second to the right button at the topmost area of the window to import all the selected files into your iPhone.
At this point, you only have to wait until the transfer finishes. That’s how simple file transfer is when it comes to using a third-party tool. Unfortunately, it can be risky, especially if the tool isn’t well-received by others. So to compensate for that, I will introduce another method that doesn’t use any third-party tool.
Perhaps you’ve heard of AirDrop at least once. It may sound confusing to others, so just think of it as the Apple counterpart of Bluetooth. It’s a method that makes use of a built-in function of the operating system to share files from one device to another.
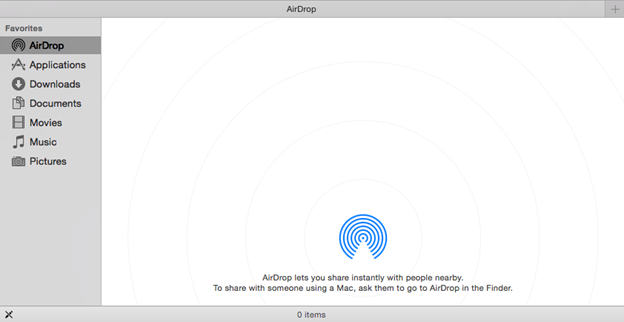
It can be considered the most suitable method for Mac users for many reasons. One, it is a built-in function in Mac as well as in iPhone. Two, it supports sharing of photos regardless of size. There are many more, but let’s not take too long and discuss the steps immediately.
Make sure your Mac and iPhone are able to send and receive AirDrop requests. Since it can be disabled by mistake, here’s how you can enable them again:
Once you’ve prepared the AirDrop on both iPhone and Mac, you will be able to transfer photos to the iPhone. Follow these steps if you are ready:
AirDrop will start to share the selected photos with the selected recipient. It may take a while, but it will work smoothly unless there are some mishaps that might be present.
Sometimes, AirDrop will malfunction either through the Mac or your iPhone. As such, we recommend that you take note of these things if AirDrop didn’t work at first:
With this, you should be able to do anything you want to do with AirDrop, be it sending files, receiving files, or both ways. Unfortunately, AirDrop may not be the best idea for your iPhone or Mac is outdated even for a bit.
While iCloud was originally a product of Apple, they made it so that even Windows PC users can enjoy its benefits. As such, for us to transfer photos to the iPhone from Windows, we will be using iCloud.
Surely many of us already heard of iCloud, the cloud storage made especially for iOS devices. It’s basically the same as Google Drive in the way that it stores files and makes them accessible to users across most platforms.
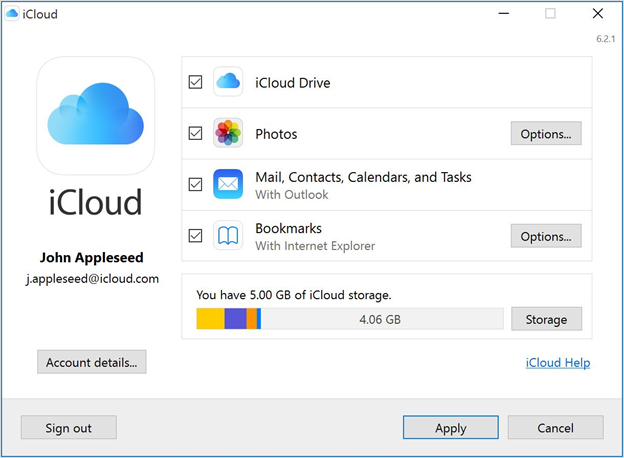
As luck would have it, iCloud can also be used to transfer files from your iOS device into Windows, and vice versa. With that said, let’s begin by checking out how to set it up.
Not all Windows PC users can use iCloud, especially if your ultimate goal is to transfer photos to an iPhone. Here’s a look at some of the things that you should do before you even try to transfer your photos using iCloud:
So are you all set up and ready to transfer photos to your iPhonefrom your Windows PC? If so, follow these steps carefully and make sure you stick to them to avoid unnecessary mistakes:
Once you turn on iCloud Drive, iCloud will automatically create a folder for iCloud Drive on your File Explorer. Any file that you store here will be accessible by users that have access to the same iCloud account. With that said, perhaps you already know what to do:
With iCloud, you will be able to synchronize your photos from one place to another. The advantage of this is that you don’t need to regularly connect the two devices with each other. You only have to do it once and every file you send to the iCloud Drive folder will be easily accessible.
Unfortunately, it may not go smoothly the first time you do it. And for that reason, I suggest you make sure you follow these tips:
Once you adhere to these tips, you should be able to solve most issues in iCloud, including its malfunction when trying to transfer files. Again, the downside of this is that it is exclusive to Windows 10. Now, what if you want to transfer photos to your iPhone from your Android?
Now we’ve come to the point where we will be trying to transfer photos to iPhone from Android devices. Just like the previous methods, we will also be using a tool, particularly an application called Move to iOS.
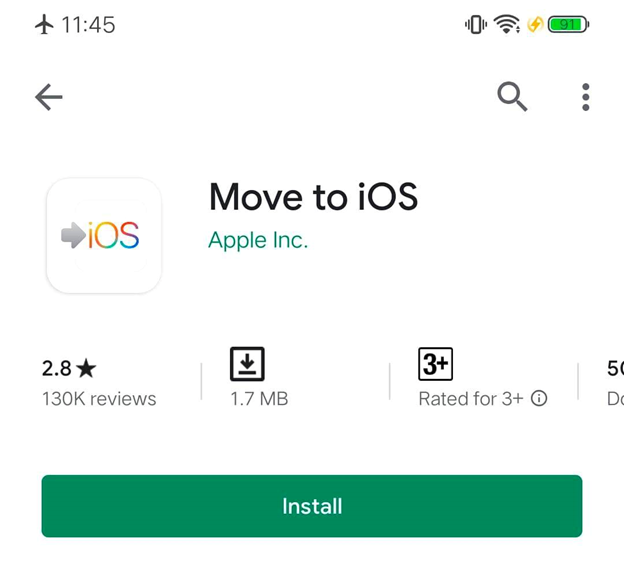
As the name suggests, Move to iOS is an app that allows users to move their files into iOS. Of course, it is available on Android devices for free from Google Play. It is the app that experts usually use when they plan on migrating their data from Android to iOS.If you want to transfer Android data to iPhone without using Move to iOS, you can use FoneDog Phone Transfer to finish.
Although the app is pretty much all set up once you install it on your Android, there are a few things that you’d have to make sure of first. Here’s a look at some of the things that should be included on your checklist:
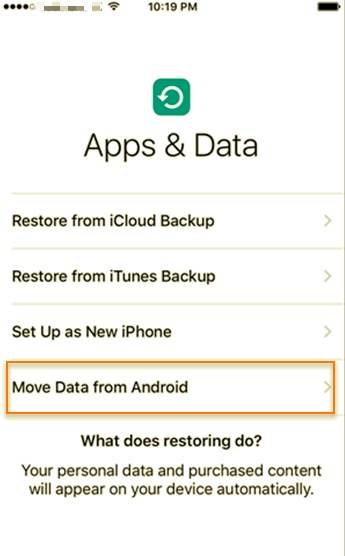
Once you’ve checked all these four entries, you are now ready to transfer photos to your iPhoneusing the magical app that is Move to iOS.
The steps for transferring files using the Move to iOS app are pretty technical. That being said, you have to make sure you follow these steps carefully since one mistake may lead to a disaster:
This should be enough to get you by when trying to transfer photos to an iPhone. Now as you can see, it’s not only capable of transferring photos, but it may also include other file types. However, as great as the app is, there are some things that might not work.
Usually, people don’t encounter any issues when using the Move to iOS app. But as they say, there is a first time for everything, and that also applies to problems. If you did face the unpredictable, here are some of the things you can do to remedy it:
People Also ReadHow to Transfer MP3 to iPhoneHow to Transfer Files from PC to Samsung Tablet
This article is talking about transfer photos to iPhone from other devices, here has an opposite example talking about transfer photos from iPhones to other devices, likes PC. It is difficult to transfer your files from Android to Android or from iPhone to iPhone, but what’s more difficult is to transfer photos to iPhone from other devices. Fortunately, there are remedies for this that are available to users for free.
While that being said, you should still be careful what you use. After all, some apps or tools can bring great risk to their users. Either way, this should be enough to assist you in migrating your data to your iPhone.
Leave a Comment
Comment

Technical Expertise for PC/Website Optimization
One of my passion is to develop software of my own
I write articles to share knowledge about IT technology and some experience in developing my own software, and developing my own software is one of my passions for work.
Phone Transfer
Transfer data from iPhone, Android, iOS, and Computer to Anywhere without any loss with FoneDog Phone Transfer. Such as photo, messages, contacts, music, etc.
Free DownloadHot Articles
 /
/
INTERESTINGDULL
/
SIMPLEDIFFICULT
Thank you! Here' re your choices:
Excellent
Rating: 4.7 / 5 (based on 77 ratings)
