FoneDog Screen Recorder
FoneDog Screen Recorder
Special Offer
Special Offer


By Vernon Roderick, Last updated: January 10, 2024
There are tons of browsers out there, but Chrome is, by far, the most frequently-used browser on the market owing to its speed, convenience, and security.
However, just as much as we can’t deny that it is the best, there’s also no denying that there are times when you encounter issues in Chrome, one of them being the Chrome not showing images issue.
Fortunately, there are numerous ways to fix this problem. But first, let us know what it means to encounter this issue and how it happens in the first place.
Why is Chrome Not Showing Images?How to Quickly Solve Chrome Not Showing ImagesFinal Words
Chrome not showing images is a common problem for Google Chrome users. Additionally, it’s not something that will happen once in your lifetime.
Thus, it is crucial to know right from the get go the origins of this issue. Outlined below are the probable cause of Chrome not showing images:
Now that you know the six main reasons for Chrome not showing images, it is perhaps the best time to introduce to you the ten best ways to fix this issue. Let us start with our first solution.
As we’ve said before, Chrome could've stopped loading images because of improper system or network configuration, so the quickest fix to solve the issue is to check the Show Pictures option on Internet properties.
As you might expect, there is actually a setting for showing images in browsers, and in Chrome in particular. Perhaps this setting is disabled, resulting in Chrome not showing images. Here’s how to enable the one for the network and internet configuration.
This would allow all the browsers and other programs to show pictures. Of course, that includes Google Chrome. However, even with this setting enabled, it won’t make a difference if the settings of Google itself prohibits showing images.
The Internet Properties that we discussed earlier is actually different from the Chrome settings. Even with a properly set up internet configuration, it won’t solve the Chrome not showing images issue if Chrome itself doesn’t allow showing images. Fortunately, you can also tweak with Chrome settings with these steps:
This will prompt Chrome to allow every website to show images. Of course, you may also use this to prohibit other websites from showing images.
Our third entry will be the last solution for when Chrome not showing images issue is caused by an improper configuration. This time, we will be talking about the JavaScript component on Chrome.
JavaScript is one of the components that is required for several Chrome operations. That includes showing images to the users. With this disabled, it’s likely that you won’t see images. So here’s how you can enable it:
With this, you have completed setting up your Chrome properly without any mistakes. This should solve the Chrome not showing images. In an event that you still encounter this problem, then the cause of the problem is not what it seems.
Instead of improper configurations, perhaps the reason behind Chrome not showing images is that there isn’t enough space on your Chrome.
In that case, all you have to do is delete some files to make some space. However, how can you know what to delete? Fortunately, there are some files that are safe to delete, and that includes temp files.
Temporary files only consume storage space on your device, so it is safe to delete them as you wish. Here’s how you can do this:
A popup window should appear on your screen which contains a menu with a list of the available drives on your computer.
With this method, you may also choose to delete other files by ticking their corresponding checkboxes. However, we suggest being rational when deleting files as you may need them later.
Temporary files are not the only files that you can delete to solve Chrome not showing images. This time, we will be deleting files that are directly from Chrome’s data, and that would be its browsing history and cache.
The cache is not necessary for the operations of Chrome, but deleting too much of it might cause more harm than good. Fortunately, there is a way to delete only unnecessary cache, and here’s how you can do it:
This will clear the cache of Chrome, creating more space and allowing for more important data to be stored. Now if these two methods of clearing up some space didn’t work, then perhaps it’s not about not having enough space.
This leads us to another reason behind Chrome not showing images, and that would be the antivirus program, or any third-party for that matter, interfering with Chrome.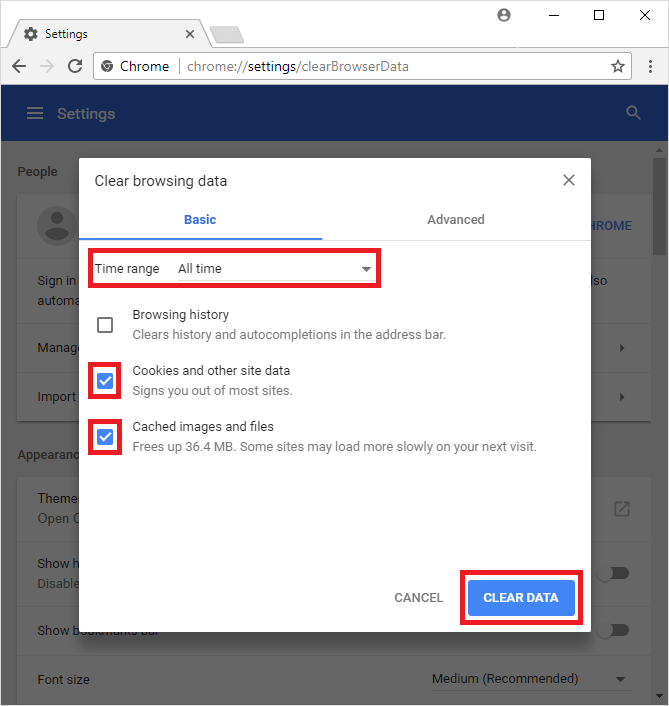
As we’ve said, if there will be a third-party tool that is interfering with Chrome, then it would most likely be your antivirus program.
Thus, the best thing to do now is to delete the antivirus program, or at least disable it for the meantime as you try to fix Chrome not showing images.
Unfortunately, we don’t have the exact steps to tell you how to disable an antivirus program owing to the fact that there is countless software out there like this. Regardless, disabling it should fix the problem for you.
In case disabling the antivirus program didn’t work, then the next step is to assume that this is all due to an unreliable extension. So this time, we will be disabling extensions.
This might be a bit difficult especially if you have countless extensions since you will be doing it individually and manually. Either way, here’s how to fix Chrome not showing images by disabling extensions:
Since you are technically going to do the trial-and-error process on this one, it might take some time. But what if you can do it all at once?
The previous method can be very time-consuming. What’s more, if the extensions aren’t the problem, you would’ve wasted your time.
Fortunately, you can easily disable all extensions with one click. That way, you can really ensure that Chrome not showing images is really due to an extension. To do this, we will use the Incognito mode. Here’s how to use it:
If the problem still didn’t disappear, then the problem is most likely not because you have an incompatible extension. So what is the problem here?
Sometimes, you try to fix the problem through small things such as the components, configurations, extensions, and such. However, you should also assume that it is caused by Chrome itself.
Thus, to fix the problem, we will have to repair Chrome. There are three ways to do this including reset, update, and reinstall.
Since resetting is the easiest, let’s start with that. What you need to know now about resetting is that it would restore your settings to its default. Here’s how you can do this:
That is how you can reset the settings of Chrome. Now to update it would be much simpler. You simply have to go to About Chrome then it will automatically update.
As for reinstalling it, uninstall it first from the Control Panel > Programs and Features. There, select Chrome then click on Uninstall. Once uninstalled, install it again through this link. This should solve the Chrome not showing images issue.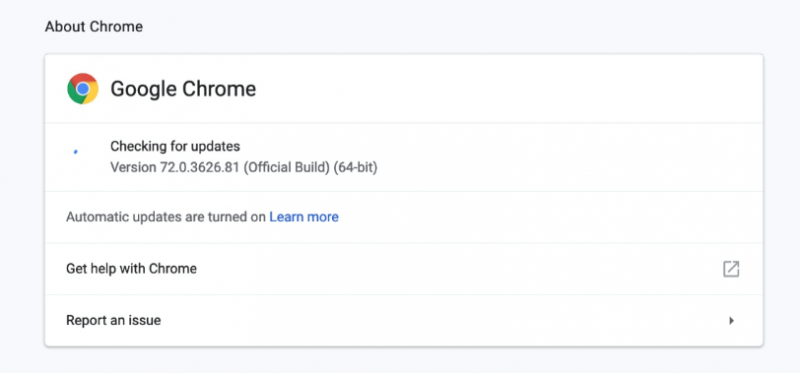
Chrome is definitely worth using, despite all its flaws. After all, it is continuously developing and such flaws will be removed update after update. However, you shouldn’t rely on those updates too much.
Thus, we suggest solving Chrome not showing images issue yourself with the solutions that we’ve outlined in this article. Hopefully, this should be enough to get you out of trouble most of the time.
Leave a Comment
Comment

Technical Expertise for PC/Website Optimization
One of my passion is to develop software of my own
I write articles to share knowledge about IT technology and some experience in developing my own software, and developing my own software is one of my passions for work.
Hot Articles
 /
/
INTERESTINGDULL
/
SIMPLEDIFFICULT
Thank you! Here' re your choices:
Excellent
Rating: 4.7 / 5 (based on 99 ratings)
