FoneDog Screen Recorder
FoneDog Screen Recorder
Special Offer
Special Offer


By Vernon Roderick, Last updated: January 9, 2024
If you have multiple users that sign in to a single computer or you have set up an incorrect language in Windows 10, then this is a definitive guide to teach you on how to change display language in Windows 10. You do not need to reinstall the Windows 10 operating system.
All you have to do is to change the display language in two ways: via the Settings app or via the PowerShell tool in Windows 10. This article provides the detailed steps on installing a language pack, changing the display language, and setting the language.
Follow this guide to know-how. The display language of win10 is very important in the process of use, the other important is time, and another article can be used for reference on changing the time of win10.
Part 1. How To Change Display Language In Windows 10 By Install A LanguagePart 2. How To Change Display Language In Windows 10 Via SettingsPart 3. How To Change Display Language In Windows 10 Via PowerShellPart 4. How To Change Display Language In Windows 10 For User Accounts And Welcome Screen
This section provides the basic steps that will guide you on how to add a language first in your computer before how to change display language in windows 10. This method will allow multiple users that choose to use different languages but log on to a single PC.
Step 01: On your Windows 10 computer, sign in as an administrator.
Step 02: Go to the Start menu.
Step 03: Click the Settings gear icon from the list of programs.
As a shortcut, you can press Windows logo + letter I keys.
You can also access Settings by entering ‘settings’ in the search box of the taskbar, and then select Settings from the list of suggestions.
Step 04: On the Settings window, click on Time & Language.
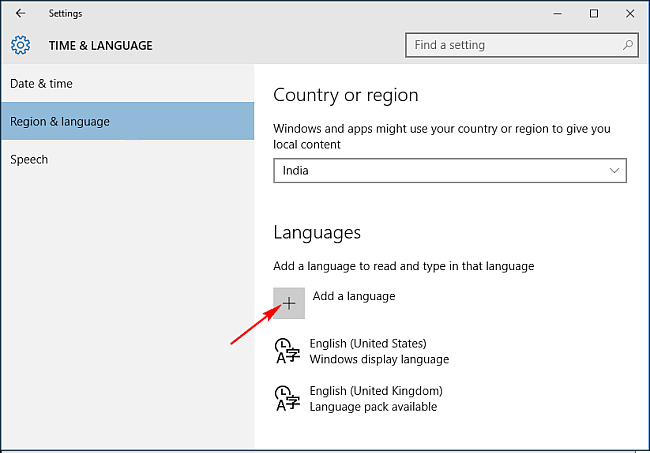
Step 05: Time & Language window appears. Click Region & language on the left pane.
Step 06: On the right under Languages, click Add a language.
Step 07: Add a language window that appears which shows a list of all available languages.
Step 08: Select the language that you want to install on your PC.
Step 09: The language you have selected will be downloaded and installed on your PC. Wait until the process is done and then go back to the Time & Language window.
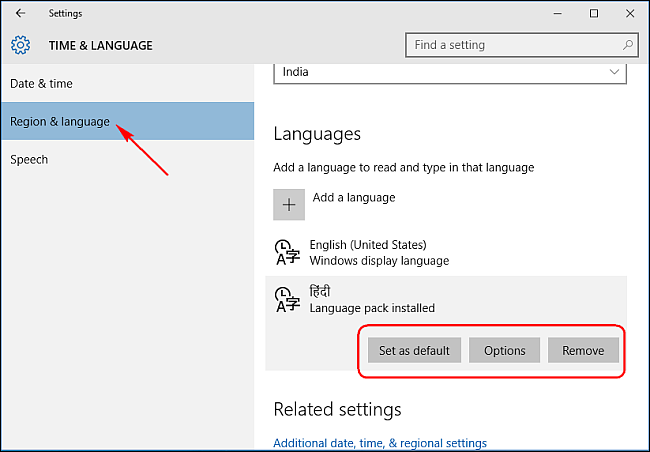
Step 10: The newly installed language is now shown under the Languages section. Click a specific language.
Step 11: There are three options that are shown. Click on the Options button.
Step 12: Next, click on Download.
Step 13: The keyboard and language pack you have selected will be downloaded to your PC.
This section provides the step by step instructions that will teach you how to change display language in Windows 10 operating system via the Settings app.
Step 01: On your Windows 10 computer, sign in as an administrator.
Step 02: Go to the Start menu.
Step 03: Click the Settings gear icon from the list of programs.
As a shortcut, you can press Windows logo + letter I keys.
You can also access Settings by entering ‘settings’ in the search box of the taskbar, and then select Settings from the list of suggestions.
Step 04: On the Settings window, click on Time & Language.
Step 05: Time & Language window appears. Click Region & language on the left pane.
Step 06: On the right under Languages, select a specific language.
Step 11: There are three options that are shown. Click on the Set as default button.
Step 12: A message will appear below the selected language which says that language will be displayed after the next sign-in.
Step 13: Sign out from Windows and then sign back in. Verify that the new language is now set in Windows.
When you want to change the display language of another user, sign out from Windows and sign in using the account of the other user. Follow the same exact steps as above.
.
This section provides an alternative method on how to change display language in Windows 10 operating system using the PowerShell command.
Step 01: On your Windows 10 computer, launch the PowerShell command as an administrator.
As a shortcut, press Windows Logo + X keys and select PowerShell (Admin).
Step 02: To view the installed language pack:
On the PowerShell command, type in DISM /online /Get-Intl and press the Enter key.
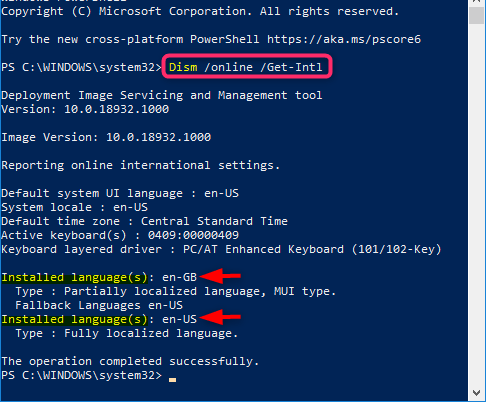
Step 03: Take note of the installed language tag (e.g. en-US) that you wish to be set as the display language.
Step 04: To change the display language:
Type in Set-WinSystemLocale
Step 05: Press the Enter key.
Step 06: Type in Set-WinUserLanguageList
Step 07: Exit from the PowerShell tool.
Step 08: Sign out from Windows and then sign back in. Verify that the new language is now set in Windows.
When you want to change the display language of another user, sign out from Windows and sign in using the account of the other user. Follow the same exact steps as above.
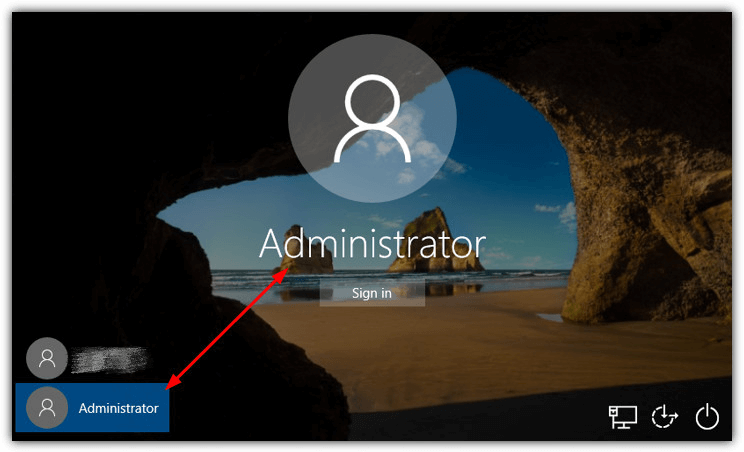
This method provides steps that will help you on how to change display language in Windows 10 for new user accounts, system accounts, and the welcome screen by copying the current settings.
Step 01: On your Windows 10 computer, sign in as an administrator.
Step 02: Go to the Start menu and access the Control Panel (in icon view).
Step 03: Select Region.
Step 04: Go to the Administrative tab.
Step 05: Under the Welcome screen and new user accounts, click on the Copy settings button.
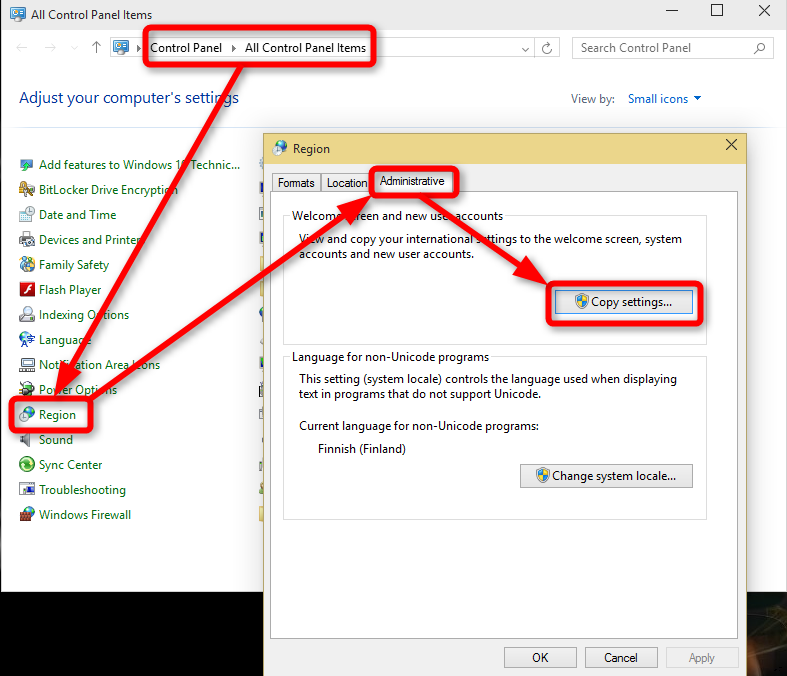
Step 06: Go to the bottom part of the window, if you want to copy the current settings, check the boxes for New user accounts and Welcome screen, and system accounts.
Step 07: Click OK.
To reflect the changes, restart your computer when prompted.
People Also ReadKIK ON WINDOWS - Let's Chat and Kik With ItNine Solutions To Fix Facebook Comments Not Showing
How to Change display language in Windows 10 is a simple process. You can either set it in the Windows Settings or in a PowerShell command tool.
This is especially useful when there are several users that are accessing a single PC but want to set it in different languages. When an incorrect language is set up, you can follow the same process without the need for a Windows reinstallation. Another article about solving the win10 problem is recommended. This is to solve the problem that iTunes can't open.
Leave a Comment
Comment

Technical Expertise for PC/Website Optimization
One of my passion is to develop software of my own
I write articles to share knowledge about IT technology and some experience in developing my own software, and developing my own software is one of my passions for work.
Data Recovery
FoneDog Data Recovery recovers the deleted photos, videos, audios, emails, and more from your Windows, Mac, hard drive, memory card, flash drive, etc.
Free Download Free DownloadHot Articles
 /
/
INTERESTINGDULL
/
SIMPLEDIFFICULT
Thank you! Here' re your choices:
Excellent
Rating: 4.5 / 5 (based on 83 ratings)
