FoneDog Screen Recorder
FoneDog Screen Recorder
Special Offer
Special Offer


By Nathan E. Malpass, Last updated: October 16, 2018
I love Android devices. Not that I have anything with iOS devices. I just love Android so much and I find it very useful. It just suits my personality. I have important files within my Android devices and I want to keep them safe. I want to have a backup of my data on my Android devices and save it to my PC. How do I do this?
~Android Devices User
Part I: IntroductionPart II: Backing Up Your Android Device To That Of Your PC Using A ToolPart III: Manually Transferring Data From Your Android Device To Your PCPart IV: Using Nandroid Backup To Back Up Your Android Device To That Of The PCPart V: Conclusion
People Also ReadHow to Selectively Backup Android Phone DataHow to Backup Android Data to PC Before Factory ResetQuick Way on How to Backup Android Phone With Broken Screen
Smartphones have played a very important role in our lives. It has our contacts, our important messages, our email correspondences, our documents, and even our files from work. With the power of technology, everything seems to be possible even with a small device on our hands.
That’s why we’ve come to the age where sensitive information is kept in small devices including those powered by the Android operating system. So, if you have an Android device and you want to back it up you’re lucky you’re in this article.
Backing up your Android device is a great way to keep data and information secure and safe. When data is mistakenly deleted, it can always be retrieved through the saved backup. In this way, you do not end up losing every single important data you have.
This article will be a guide to help you back up your Android device to that of your PC. In this way, you don’t experience data loss and you can have multiple backups of all your Android devices in no time.
Fonedog’s Android Data Backup & Restore is a tool you can use to back up your Android device to that of your PC. It has a very easy to use interface and is a secure method of backing your data up.
Here are the advantages and the steps to use the tool:
* You can select which data to backup and restore easily with a few simple clicks.
* It backs up both your applications and the data contained within it.
* You can preview the backup and its content.
* You can restore the backup selectively to any Android device.
* Supports over 8000 Android devices.
* It is 100% secure. Only you have access to your data.
* Data is always safe and will not be overwritten.
* You are given a 30-day free trial. This means you can experience the benefits of Android Data Backup & Restore without the need to pay out of your pocket.
* Android data is backed up in lossless quality.
Here’s how to use it step by step:
Step 01 - Downloads the FoneDog toolkit from their official website. It’s up to you if you want the free trial or if you want to purchase it immediately.
Step 02 - Launch the FoneDog toolkit on your computer device.
Step 03 - Ensure that no other backup tool is operating alongside with FoneDog.
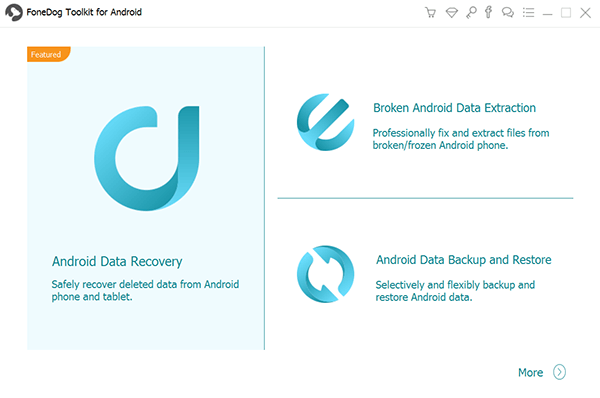
Step 04 - Choose Android Data Backup & Restore.
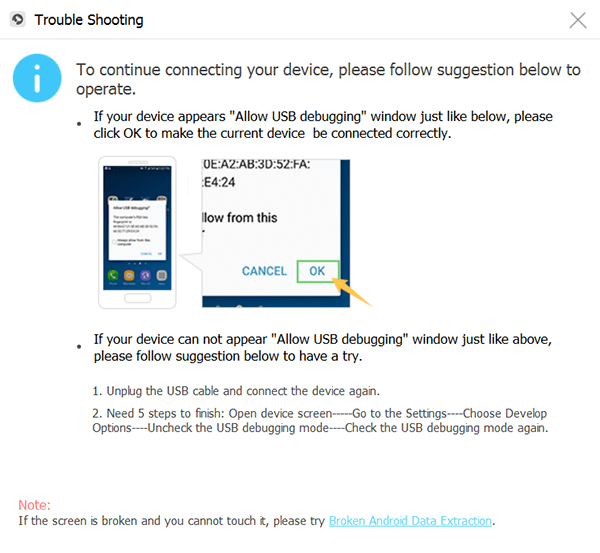
Step 05 - Connect the Android device towards the computer device by utilizing the USB cable. Ensure that debugging mode is activated on your Android device. If you have a version of Android 4.0 and higher, a pop-up window will appear and confirm if you wish to accept USB Debugging Mode. Press OK.
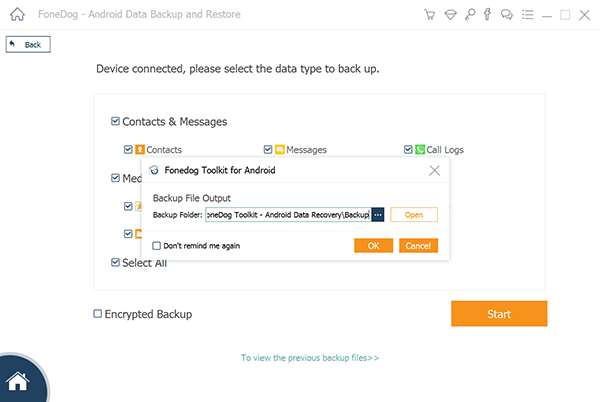
Step 06 - Now, FoneDog should have detected your phone. If this is the case, press the button labeled Device Data Backup. Usually, FoneDog is set by default to scan all types of files for you. However, you still have the option to select which type of data you wish to backup.
Step 07 - After you have chosen various data types, press Start. This will start the process of backing up your Android device. Do not disconnect the Android device. Do not use your device during the process or even transfer or delete data while it is happening.
Step 08 - Once the entire backup process is completed, click the button labeled OK. You will now be able to view the content of your backup file. Or, you can wish to restore it to another device.

Now, you have backed up your data using FoneDog’s Android Data Backup & Restore. Here’s how to restore it to another device.
Step 09 - Select Android Data Backup & Restore.
Step 10 - Select Device Data Restore.
Step 11 - FoneDog will display backup files. You can choose a specific backup file to restore.
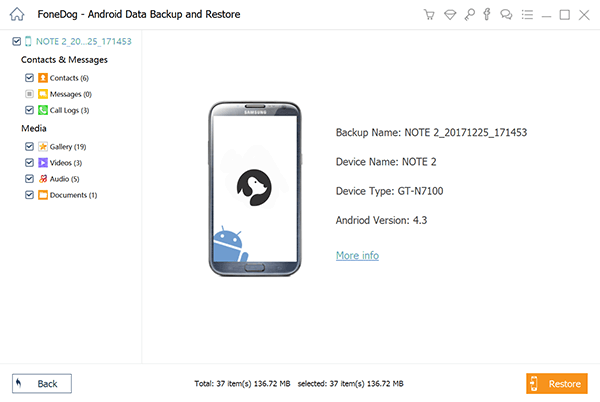
Step 12 - Select the type of data you wish to restore. After which, choose the files you wish to restore.
Step 13 - Press Restore to start the process.
Step 14 - Confirm the process in order for it to start by pressing OK.
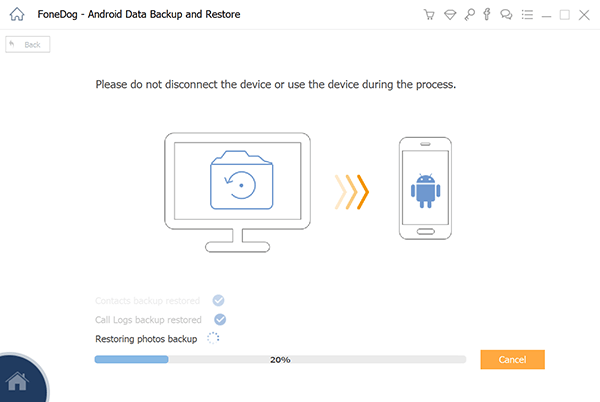
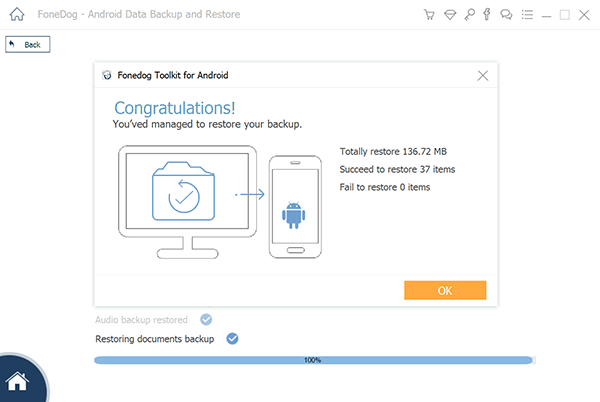
Step 15 - Wait for the process to finish. Do not disconnect your Android device or open any phone management tool for Android. Once it is finished, FoneDog will give you a notification of the completion of the process.
If you don’t want to use a tool, you can transfer data from your Android device to your PC by copying and pasting them manually. This is the most basic method of transferring data from your Android device to that of your PC (and vice versa). With this method, you will need a USB cable.
That’s why it is recommended that you always keep the USB cable that comes with the Android device upon purchase. In this way, you can easily connect the device to that of the computer. Here’s how you can do the process step by step:
Step 01 - Turn your Android device on.
Step 02 - Activate USB Debugging. To do this, go to Settings and go towards the Developer option.
Step 03 - Utilize the USB cable in order to connect the computer and the Android device.
Step 04 - Activate USB for transferring files.
Step 05 - The computer will display a new window where you can see the SD card and the Internal Storage of the Android device. Open the location of the file you want to transfer.
Step 06 - Copy the file from the Android device’ internal storage or memory card (SD card) and paste it to your desired location in the PC. If you want to transfer (cut) the file, you can simply drag and then drop the file to the desired location in the PC.
Step 07 - When the transfer of files is finished, eject the connected Android device to disconnect it.
This method is one of the easiest ones you can do in order to transfer data from your phone to your computer. Plus, it is free. But there’s one downside to this. You can only transfer media files and documents with this method of backing up your data. A comprehensive backup is not done. Other file types are not supported by this method.
Nandroid Backup is one method you can utilize wherein a particular device NAND memory data is saved or a copy of it is created. This is one great way for you to back up your data within the Android device. However, it is necessary for the device to be actually rooted when using this method.
Thus, it is necessary for you to be cautious when doing this method. This is because it has risen when it comes to your data and also the operating system of your phone. Before backing up your phone, it is necessary for you to root the actual device.Here are the steps to do it:
Step 01 - Visit Google Play Store.
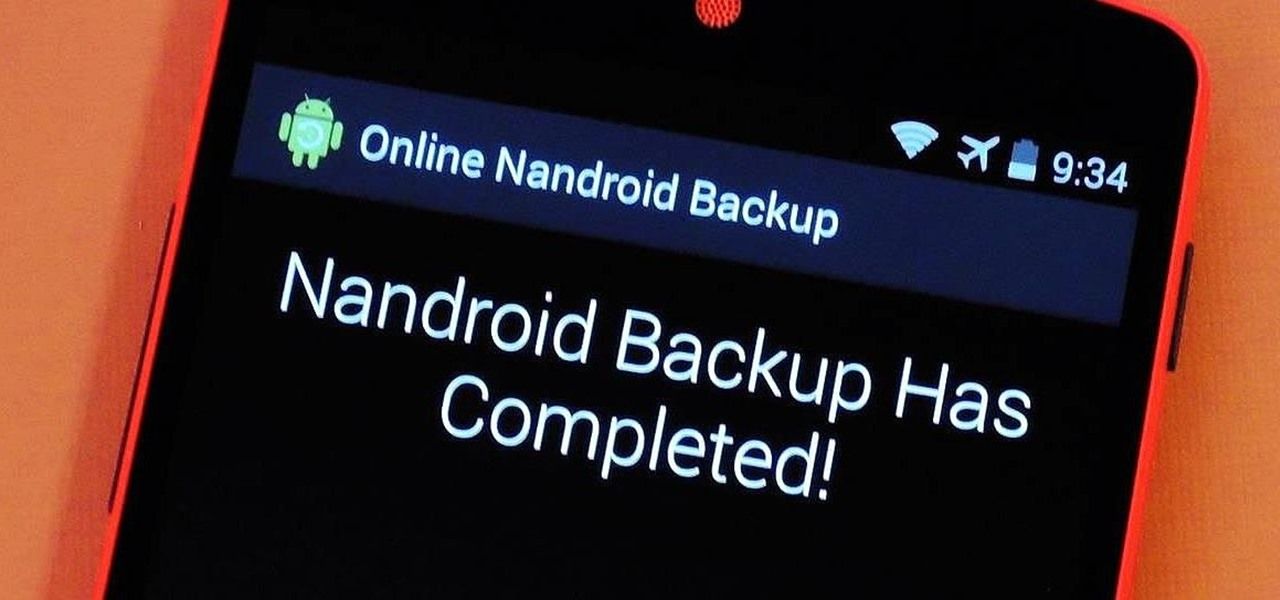
Step 02 - Download and install the application named Online Nandroid Backup.
Step 03 - Open the application you have just installed for the first time. It will confirm if you want to give it superuser privileges. All of these privileges should be granted.
Step 04 - Now, you can begin the process of backing up your data. Some backup options should be configured. Now, you should select the Backup Name. You can select your own label for the Nandroid backup. The default one is called UTC Timezone Name. This means the label name will be dependent on the date when the backup was created.
Step 05 - Select a particular Backup Type. This will allow you to select the format wherein the backups will actually be saved. It sets Clockworkmod as the default type of backup. However, you can also choose TWRP if you wish to.
Step 06 - Select the Backup Mode. This allows you to select which specific partition you wish to begin to back up. Normal is the default setting of the Backup Mode.
Step 07 - Select a particular location where you wish to store the file of the Nandroid Backup. Ensure that you always know where the location is actually at.
Remember that you can also select the number of Nandroid backups you wish to be saved before the earlier one is actually overwritten. It is recommended that you keep it to about 2 only. Now, you can save the actual changes you made within the configured settings. You can now proceed with the process of backing up data.
Step 08 - In order to create a backup, go to the man screen of the OLB and press Quick Backup.
Step 09 - Choose Start Backup.
Step 10 - Wait until the backup process is complete.
The files of the backup can actually be copied from that of the SD (memory) card and then saved within your PC. The backup file is already made and put into storage within the SD card. That’s why a PC is not necessary. However, for this process to be complete, it is necessary to a have the Android device’ root access. You should only choose this method if you are comfortable and knowledgeable with rooting a specific device. This is not to be taken lightly. It is not for everyone.
Backing up your Android device to that of your PC or computer is very easy. You can do it manually by copy and pasting the files. However, you can do a comprehensive backup by using a tool called Fonedog’s Android Data Backup & Restore. It is a great tool that can back up different file types of your Android device.
Leave a Comment
Comment

iPhone/Android Devices’ Maintenance Expert
Staying home, listening to music, writing tech articles
Many people asked me to repair their mobile phones so I have a lot of experience in mobile phone repair, and I know a lot about Android or Apple phones.
Android Data Backup & Restore
Back up your Android data and selectively restore to Android
Free Download Free DownloadHot Articles
 /
/
INTERESTINGDULL
/
SIMPLEDIFFICULT
Thank you! Here' re your choices:
Excellent
Rating: 4.5 / 5 (based on 107 ratings)
