FoneDog Screen Recorder
FoneDog Screen Recorder
Special Offer
Special Offer


By Vernon Roderick, Last updated: July 9, 2021
Avast Antivirus is a utility program that scans your computer for malware threats. One feature of the program is the quarantine which locks the malware-detected files in a safe virus chest. In this tutorial guide, multiple methods are presented to help you fix the error on Avast cannot restore file. Because there are users that encounter a problem of false-positive detection in which files that are believed to be clean are detected as malware by Avast and cannot be restored from the quarantine.
The error that is thrown out when restoring it is “Whoops error occurred, this file can't be restored.” If the problem cannot be resolved with these options, it is possible to restore the deleted file using a reliable data recovery program called FoneDog Data Recovery.
By the way, have you encountered other errors such as "You Need to Format the Disk in Drive"?if you happen to encounter it, then you can click to read this article.
Part 1. The Best Sofrware to Restore Deleted FilesPart 2. Fix Avast Cannot Restore File Error by Reopening Virus ChestPart 3. Fix Avast Cannot Restore File Error via System TrayPart 4. Fix Avast Cannot Restore File Error by False Positive ReportPart 5. Fix Avast Cannot Restore File Error by Repairing Avast AntivirusPart 6. Fix Avast Cannot Restore File Error by Updating Avast AntivirusPart 7. Fix Avast Cannot Restore File Error by Clean InstallPart 8. Fix Avast Cannot Restore File Error by Deactivation and ActivationPart 9. How to Add Exclusion to Files in Avast AntivirusPart 10. In Summary
FoneDog Data Recovery is a professional and trusted data recovery program that will help you recover lost and deleted files of any type. For example, here is an article about recovering deleted files from Windows 10. With its simple interface and Help wizard, the tool assures safe and secured data without any data loss during the scan and recovery process. You can recover files on any device and in any type of situation.
FoneDog Data Recovery offers quick and deep scan modes for your device. The results are returned by category which you can choose to preview each file. You can also filter the results and select what specific file that you want to restore. The tool can be run on Windows and Mac OS. It has a free trial version available and can also be purchased with a 30-day money-back guarantee and full-packed features.
Data Recovery
Recover deleted image, document, audio and more files.
Get deleted data back from computer (including Recycle Bin) and hard drives.
Recover loss data caused by disk accident, operation system crushes and other reasons.
Free Download
Free Download

This section provides simple information that will guide you on how to resolve the error on Avast cannot restore file. Re-launch the Avast Antivirus app and open again the Virus Chest.
Step 01: On your computer, close and launch again the Avast AntiVirus app.
You can access the app on the desktop shortcut icon, the pinned icon on the taskbar, or via the Start menu programs.
Step 02: On the left sidebar of the window, click on the Protection tab.
Step 03: Next, select Virus Chest to view the quarantined files.
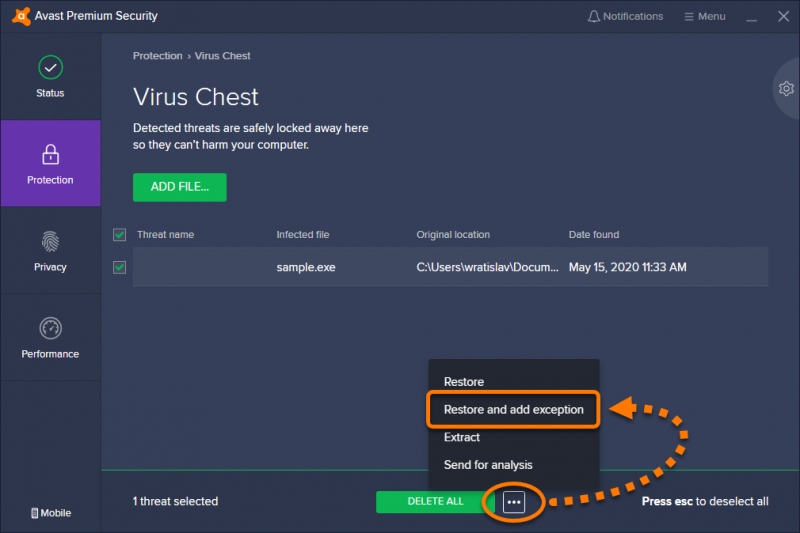
The Virus Chest stores the detected threats that are quarantined with details such as threat name, infected file, original location, and date found.
Step 04: Right-click on the file that you want to restore and select Restore from the dropdown that appears.
On other versions, check the box next to the file and click the three dots on the bottom and select Restore from the dropdown that appears.
Step 05: To restore the file and add it as an exception on the next Avast Antivirus scans, right-click on the file and select Restore and add exception. All exceptions will not be included in the Avast scans.
Step 06: A confirmation dialog appears that says the file is successfully restored. Click Close.
Step 07: Verify that the file has been restored to its original location.
If the file cannot be restored due to an error, try restarting your computer. Launch again the Avast Antivirus and restore the quarantined file in the Virus Chest.
This basic method provides helpful information that will guide you on how to resolve the error on Avast cannot restore file. Launch the Avast Antivirus via the system tray on your computer.
Step 01: On your computer, open the Avast AntiVirus app via the system tray located on the bottom right of the taskbar. Right-click on its orange icon and select Virus Chest from the popup.
Step 02: On the Virus Chest list, right-click on the file that you want to restore.
Step 03: Click Restore from the dropdown that appears.
On other versions, check the box next to the file and click the three dots on the bottom and select Restore from the dropdown that appears.
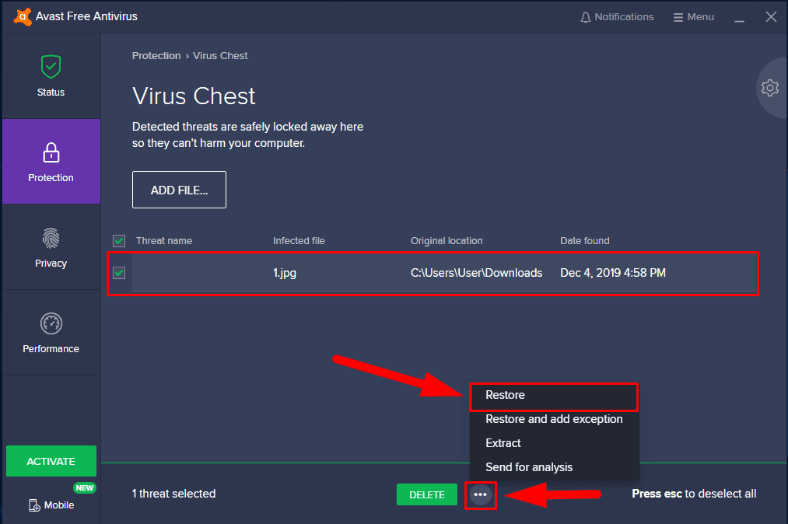
Step 04: To restore the file and add it as an exception on the next Avast Antivirus scans, right-click on the file and select Restore and add exception. All exceptions will not be included in the Avast scans.
Step 05: A confirmation dialog appears with a message that says the file is successfully restored. Click Close.
Step 06: Check if the file has been successfully restored to its original location.
If ever that the quarantined files cannot be restored on your computer, you can utilize the FoneDog Data Recovery tool to recover the deleted files which are discussed in another section of this article.
This section will teach you how to resolve the error on Avast cannot restore file by sending a false positive report to Avast. False-positive means that the file is believed to be clean but is tagged by Avast Antivirus as malware during the scan.
Step 01: On your computer, launch the Avast AntiVirus app.
Step 02: On the left pane of the window, click on the Protection tab.
Step 03: Next, select Virus Chest to view the quarantined files.
Step 04: Right-click on the quarantine file that you want to send and select Send for analysis from the dropdown that appears.
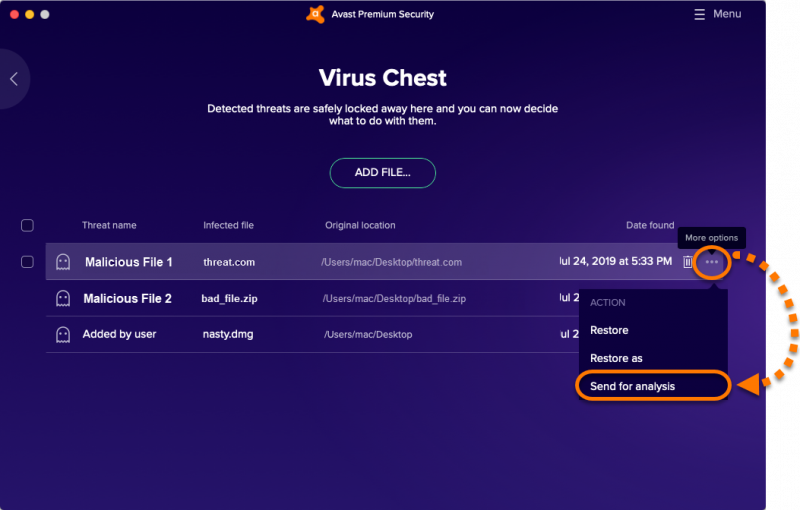
On other versions, check the box next to the file and click the three dots on the bottom and select Send for analysis from the dropdown that appears.
Step 05: A form will appear. Select False positive from the options and provide any additional information.
Step 06: If you have no more modifications, click the Send button.
Step 05: A confirmation dialog appears with a message that says the file is successfully sent for analysis. Click Close.
If you are looking for a simple process to guide you on how to resolve the error on Avast cannot restore file, performing a repair of the Avast Antivirus app will help, here are the steps:
Step 01: On your computer, launch the Control Panel.
Step 02: Go to Programs then click Uninstall a program.
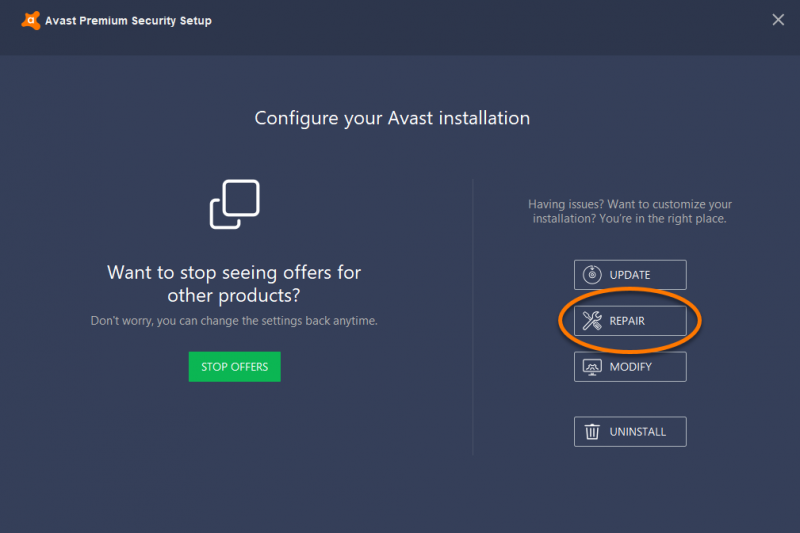
Step 03: On the list of programs, find Avast Antivirus and select it.
Step 04: Click Repair. Wait for the repair process to complete.
Step 05: Launch again Avast Antivirus and go to Virus Chest. Check if you can now restore the file.
If ever that the quarantined files cannot be restored on your computer, you can utilize the FoneDog Data Recovery tool to recover the deleted files which are discussed in another section of this article.
This section provides steps that will help you on how to resolve the error on Avast cannot restore file by updating the Avast Antivirus app.
Step 01: On your computer, open the Avast AntiVirus app via the system tray located on the bottom right of the taskbar.
Step 02: Right-click on its orange icon and select Update from the popup.
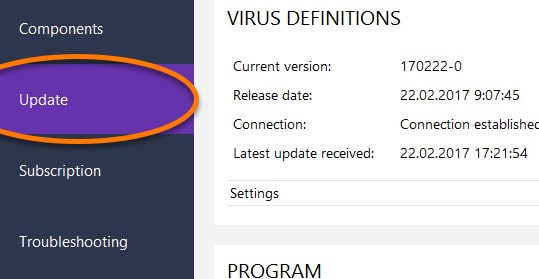
Step 03: Select Program.
Step 04: If Avast Antivirus does not automatically check for updates, click Check for Updates.
Step 05: Wait until the application update is complete. The app will display that Your application is up to date when done.
Step 06: Click the More options arrow and select Automatic update for updates to be automatically updated and downloaded.
Step 07: Click Restart Now when prompted to restart your computer. Make sure to save any work on other apps you have before doing the restart.
If ever that the quarantined files cannot be restored on your computer, you can utilize the FoneDog Data Recovery tool to recover the deleted files which are discussed in another section of this article.
This section provides step-by-step instructions that will guide you on how to resolve the error on Avast cannot restore file by performing a clean install of the Avast Antivirus program if the repair does not fix the issue. Make sure that you back up your Avast settings if it is not the default settings.
Step 01: Download the Avast Uninstall Utility program from the Avast website.
Step 02: Download the latest version of Avast Antivirus from the Avast website.
Step 03: If you want that your Avast settings to be restored after the clean install, disconnect from the internet. This applies to the Avast settings that are not in default settings.
When you restored your Avast settings:
Step 01: On your computer, open the Avast AntiVirus app.
Step 02: On the upper right corner of the window, click Menu.
Step 03: Next, select Settings.
Step 04: Select Backup Up Settings.
Step 05: Check all the components that you want to be saved and restored later on.
Step 06: Click Continue to save.
To restore the saved settings, open and select the backed up settings file (.avastconfig) that you want to restore.
Step 07: Run the Avast Uninstall Utility program and follow the instructions to proceed on the next steps. Wait until the uninstallation process is finished.
Step 08: When prompted to reboot to safe mode, confirm to restart your computer.
Step 09: Reboot your computer.
Step 10: Connect to the internet again.
Step 11: Reinstall the Avast Antivirus app following the directions on the screen and wait until the installation is complete.
Step 12: Reboot again your computer.
This simple process provides steps that will guide you on how to resolve the error on Avast cannot restore file by trying to deactivate the antivirus app.
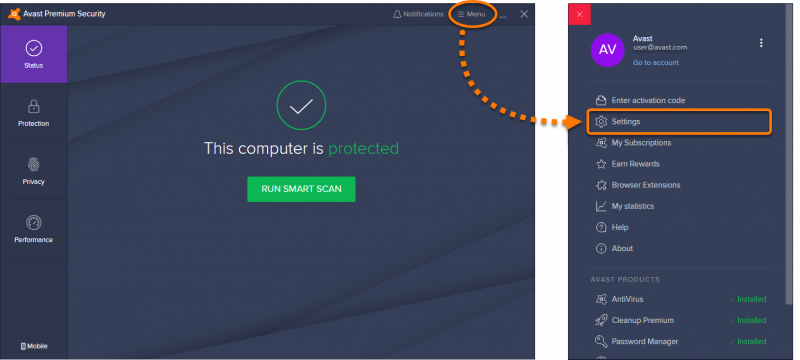
Step 01: On your computer, open the Avast AntiVirus app.
Step 02: On the upper right corner of the window, click Menu.
Step 03: Next, select Settings.
Step 04: Open the Components tab on the left sidebar.
Step 05: Switch off the settings in the Security.
Step 06: Click OK.
Step 07: Restore the quarantined files. Re-activate the Avast Antivirus app.
Deactivating the Avast antivirus app that provides security protection will mean a risk to your computer. Make sure that you activate the antivirus app again.
This section discusses how to add exclusions to a file which means it will not be included from Avast antivirus scans and shield protection.
Step 01: On your computer, start the Avast AntiVirus app.
Step 02: On the upper right corner of the window, click on the Menu tab.
Step 03: Select Settings from the popup.
Step 04: Select the General tab.
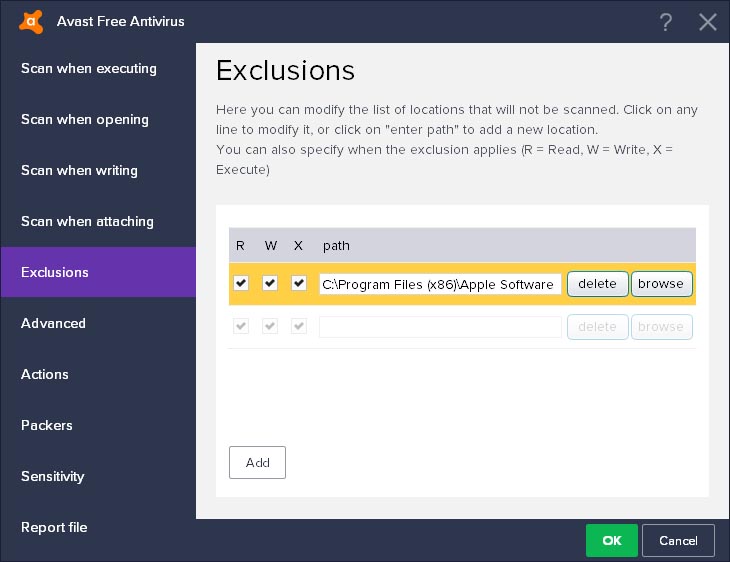
Step 05: Scroll down and go to the Exclusions section.
Step 06: Specify the file path, URL, and other details of the file that will be excluded from the Avast antivirus scanning and shield protection.
Step 07: Click the Add button.
Step 08: When done, click OK.
People Also ReadHow to Restore iPad from iPhone BackupWhat Does Restore from Backup Mean
There are some cases that a problem will occur in the antivirus scanners such as the Avast Antivirus. One example is a false positive detection that will send a clean file to the quarantine because it is detected by the antivirus as a malware threat. And if you restore the file, the antivirus app will throw out an error and will not allow you to restore it even if it is a 100% clean and safe file.
To fix this problem, there are several methods that are discussed in this tutorial guide. It is also recommended to add an exclusion list of the files that are to be excluded from the antivirus scans and shield protection. If the files cannot be restored with the given methods, FoneDog Data Recovery can help restore the files to your device.
Leave a Comment
Comment

Technical Expertise for PC/Website Optimization
One of my passion is to develop software of my own
I write articles to share knowledge about IT technology and some experience in developing my own software, and developing my own software is one of my passions for work.
Data Recovery
FoneDog Data Recovery recovers the deleted photos, videos, audios, emails, and more from your Windows, Mac, hard drive, memory card, flash drive, etc.
Free Download Free DownloadHot Articles
 /
/
INTERESTINGDULL
/
SIMPLEDIFFICULT
Thank you! Here' re your choices:
Excellent
Rating: 4.6 / 5 (based on 79 ratings)
