FoneDog Screen Recorder
FoneDog Screen Recorder
Special Offer
Special Offer


By Nathan E. Malpass, Last updated: May 25, 2021
Every time that a file is created or used on your computer, automatically the Windows operating system will generate a temporary file that holds the data temporarily and serves as a backup until the working file is saved. Once the document is saved, the temporary file is automatically deleted.
Temporary files are junk files that can slow down and reduce the performance of your computer. Because they can accumulate huge space and memory, temporary files should be cleaned up every time. Several users, however, reported that they cannot delete temporary files in Windows 10.
Every time they do the cleanup, the temporary files are deleted as shown in the results but when they come back to check it again, the files are still there. The disk space on the computer is getting full each day, thus decreasing its performance.
To solve the problem of how to delete temporary files in Windows 10, this tutorial guide is created to provide the detailed steps you need to follow for each method given. It also introduces an easy-to-use and reliable professional data recovery software that you can utilize should you need to restore the deleted files.
Part 1. Best Software to Recover Deleted FilesPart 2. Delete Temporary Files in Windows 10 via Disk CleanupPart 3. Delete Temporary Files via File ExplorerPart 4. Delete Temporary Files via Command PromptPart 5. Delete Temporary Files via Microsoft Store ResetPart 6. Delete Temporary Files via Safe ModeIn Summary
If you are thinking about where the temporary files in Windows 10 are located, check the paths below. C: drive can be changed to any drive that you have identified to be the system drive.
1. Temp Files (created by Windows):
C:\WINDOWS\Temp
2. App Data Files (created by the user when using an application)
C:\Users\Your Username\AppData\Local\Temp
3. Prefetch Files (created when the application is run for the first time):
C:\WINDOWS\Prefetch
A reliable and professional data recovery wizard that allows you to quickly and safely recover your deleted files including videos, FoneDog Data Recovery is easy and convenient to use tool that allows quick and deep scans of your files with a high success rate and 100% data secure.
Preview your data files before recovery and restore them easily. You are wholly assured that no data is lost while on recovery with this awesome data recovery program.
Recover from any device, restore any data type, and in any situation. A free trial of the software is available. A 30-day money-back guarantee is offered for you should you purchase it. You can download the software according to your computer’s operating system (OS) like Windows or Mac. Other details and features of the data recovery software:
1. Supported Operating System: Windows, Macintosh
2. Supported Devices: Computers including Recycle Bin, Memory Cards, Hard Drive, USB, Digital Camera, Removable Drives
3. Supported Data Types: Image, Video, Audio, Email, Archive, Documents
4. Supported File System: NTFS, FAT16, FAT32, EXT, exFAT
5. Supported Situations: File Recovery, Partition Recovery, Hard Drive Recovery, Memory Card Recovery, Flash Drive Recovery, Crashed Windows or Mac Recovery
Remember three clicks to recover your deleted data: launch, scan, and restore. This is the process on how to use the FoneDog Data Recovery program:
After you have downloaded and installed the FoneDog data recovery software, start the FoneDog Data Recovery software by double-clicking its shortcut icon located on the desktop or click its pinned icon on your taskbar (if a shortcut is created or it is pinned to the taskbar). You can also go to the Start menu and then search FoneDog Data Recovery from the Programs list.
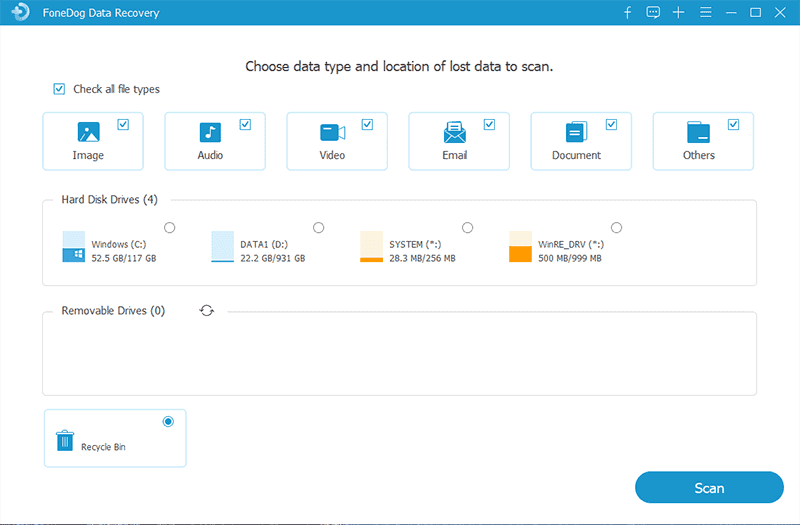
On the main page of FoneDog Data Recovery, select one or more file types to restore and the drives (hard disk or removable) where you want to recover the deleted files. Next, press the “Scan” button to start scanning the data files.
While scanning the data, you need to establish a stable connection between your computer and the removable devices. Different data types are available that you can choose to recover. It can be an image, audio, video, email, document, and others, as well as retrieve the files from various storage devices.
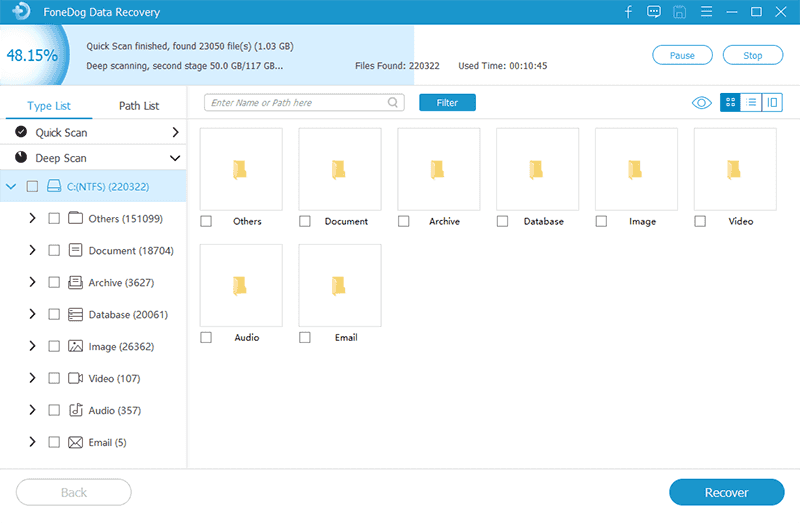
There are two scans that are available. You can choose Quick Scan or Deep Scan. The first scan will work at a faster speed while the latter will display more results but will take a longer time to scan. After FoneDog Data Recovery is scanning the data, it will show the file results based on the options you have entered.
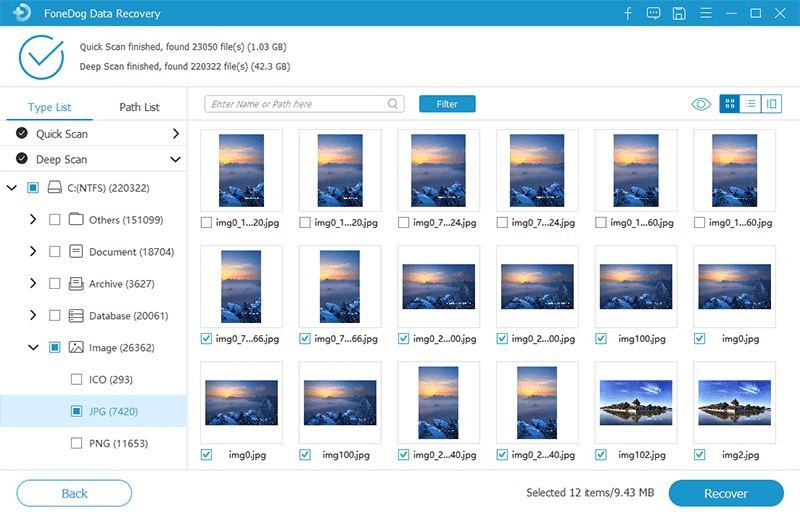
After the scan, choose the data files that you want to recover. The results will be shown by type or by the path. To add, you can quickly locate the specific data files by inputting the file name or path in the search bar and then click Filter. After selecting the data files to be restored, click the Recover button to restore the data files.
This simple process will guide you on how to delete temporary files in Windows 10 using the Disk Cleanup tool.
Step 01: On your taskbar, type “disk” on the search box. You can also press Windows Logo + S keys and type “disk” on the search box.
Step 02: Select “Disk Cleanup” from the results.
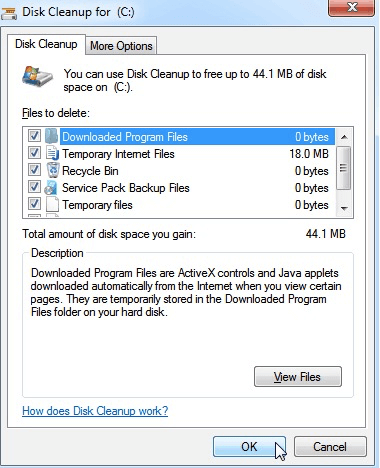
Step 03: Select the system drive (default drive is C:) for cleanup and click “OK”. Wait for the scan to complete.
Step 04: Select the file types that you want to clean up under “Files to delete”.
Step 05: Click “OK”.
To free up more space by removing additional files, delete some system files by following the steps below:
Step 01: Open Disk Cleanup.
Step 02: Click “Clean system files”.
Step 03: Select the file types to be cleaned up and click “OK”.
This is a basic method to clean up the different temporary files in Windows 10 and free up space on your computer.
If you receive a message when opening the Temp File Explorer that says, “You don’t currently have permission to access this folder”, just click “Continue”.
To delete Temp files:
Step 01: Press Windows Logo + R keys to launch the Run dialog window.
Step 02: On the Open box, type “temp” and hit “OK”.
Step 03: The Temp File Explorer window appears. Select all files, right-click and click Delete. Alternatively, you can press CTRL + A keys to copy all files and press the Delete key.
This will delete all temporary files and send them to the Recycle Bin. If you want to permanently delete the temp files, you can press the Shift + Delete keys.
To delete App Data temp files:
Step 01: Launch the Run dialog window again. Press Windows Logo + R keys.
Step 02: Type %temp% on the box and press “Enter” or click “OK”.
Step 03: Press CTRL + A keys to copy all files and press the Delete key.
To delete Prefetch temp files:
Step 01: Launch the Run dialog window again. Press Windows Logo + R keys.
Step 02: Type “prefetch”on the box press “Enter” or click “OK”.
Step 03: Press CTRL + A keys to copy all files and press the Delete key.
If you cannot delete the temporary files manually or using the Disk Cleanup tool, here is a simple solution to delete temporary files in Windows 10 using Command Prompt or PowerShell.
Step 01: Launch the Run dialog window by pressing Windows Logo + R keys.
Step 02: Type “cmd” on the box and press “Enter” or click “OK”.
You can also press Windows Logo + X keys and select “Command Prompt (Admin)” or “PowerShell (Admin)”.
Step 03: On the Command Prompt, type del /q/f/s %TEMP%\*
Step 04: Hit “Enter”. Wait until all the temporary files are deleted.
If you encounter a low disk space, it is possibly caused by the application files used by Microsoft Store. Follow the steps below to reset the Microsoft Store and clear its cache, and reset the Windows Update and delete its files.
To reset the Microsoft Store:
Step 01: Go to Start, then “Settings”.
Step 02: Select “Update & Security”, then “Troubleshoot”.
Step 03: From the list, select “Windows Store Apps”, then click “Run the troubleshooter”.
To clear the Microsoft Store cache:
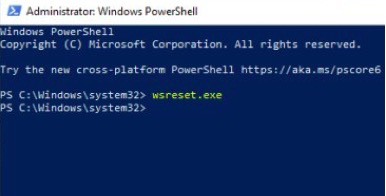
Step 01: Launch the Run dialog window by pressing Windows Logo + R keys.
Step 02: Type “wsreset.exe” on the box and press “Enter” or click “OK”.
Step 03: A Command Prompt will appear and will close after 10 seconds. Then the Microsoft Store will open automatically.
To reset Windows Update:
Step 01: Go to Start, then “Settings”.
Step 02: Select “Update & Security”, then “Troubleshoot”.
Step 03: From the list, select “Windows Update”, then click “Run the troubleshooter”.
The SoftwareDistributionDownload directory is the location where the Windows Update files are stored. Sometimes this prevents you from deleting the temporary files. Some users reported that deleting the files under this folder resolves their issue and allows them to successfully delete the temporary files thereafter.
To delete Windows Update files:
Step 01: Confirm that Windows Update is not downloading any updates.
Step 02: Launch the Run dialog window by pressing Windows Logo + R keys
Step 03: Type %WINDIR%SoftwareDistributionDownload on the box and click “OK”.
Step 04: Select all files under the Download folder and press Delete.
Step 05: Restart your computer and see if the issue still persists.
Another thing to remember is to always install the latest updates for Windows. Sometimes, system errors prevent you from deleting the temporary files in Windows 10. To check for updates manually, follow the steps below.
Step 01: Go to Start, then “Settings”.
Step 02: Select “Update & Security, and click “Check for updates”.
Step 03: The system will check for available updates. Windows 10 will automatically download the updates to your computer after checking and alerts you to reboot your computer.
Step 04: Restart your computer when alerted and Windows will start installing the updates.
Should all else fail, you have another option to delete temporary files in Windows 10 by going to Safe Mode when you reboot your computer.
Step 01: Go to Start, then press the “Power” button.
Step 02: Press and hold the Shift key and click “Restart” from the dropdown list.
Step 03: Select “Troubleshoot”, then “Advanced options”.
Step 04: Select “Startup Settings” and click “Restart”. The computer will reboot.
Step 05: When your computer reboots, select “Safe Mode” in the given options and press the corresponding key. You should now be able to delete the temporary files in Safe Mode.
People Also ReadHow Do You Recover Deleted Files from a USB Flash DriveHow to Recover Deleted Files from SD Card
Unable to delete temporary Files is upsetting for most people using the Windows system because it takes up more space and slows down the computer.
Temporary files are generated to hold the files temporarily until a file is saved or a task is ended and the temporary file should have been deleted but are still retained in the system, hence accumulating more space if not freed up. The performance of the computer is reduced affecting your work productivity.
To save you from further trouble, this tutorial guide provides you step-by-step instructions on the various methods presented to resolve the issue in deleting temporary files in Windows 10. It is recommended to regularly do a cleanup of temporary files so that it will not take up much disk space and memory on your computer.
The provided solutions in this guide are made available for you as a fix for your problem on how to delete temporary files in Windows 10. An extra offer for you that is well recommended is to use a data recovery software like the FoneDog Data Recovery program which is a special and essential tool should you need a solution to restore your deleted files.
Leave a Comment
Comment

iPhone/Android Devices’ Maintenance Expert
Staying home, listening to music, writing tech articles
Many people asked me to repair their mobile phones so I have a lot of experience in mobile phone repair, and I know a lot about Android or Apple phones.
Data Recovery
FoneDog Data Recovery recovers the deleted photos, videos, audios, emails, and more from your Windows, Mac, hard drive, memory card, flash drive, etc.
Free Download Free DownloadHot Articles
 /
/
INTERESTINGDULL
/
SIMPLEDIFFICULT
Thank you! Here' re your choices:
Excellent
Rating: 4.7 / 5 (based on 81 ratings)
