FoneDog Screen Recorder
FoneDog Screen Recorder
Special Offer
Special Offer


By Vernon Roderick, Last updated: February 25, 2020
It can be very heartbreaking to know that the files that you once had on your phone will be forever lost and never seen again. This is especially true if those files had sentimental value, or at least some sort of significance to your studies, job, and the such.
Although that might be true for some, losing data on your Samsung Galaxy is not always going to be the worst thing you’ll ever experience. This is because there are ways to do Galaxy recovery which should be enough to solve your current issue. But before we proceed to that subject, let us first know the why’s of this topic.
Why Should You Do Galaxy Recovery?1. Samsung Galaxy Recovery with FoneDog Data Recovery2. Samsung Galaxy Recovery with Samsung Cloud3. Samsung Galaxy Recovery with Samsung/Google Account4. Samsung Galaxy Recovery with Google DriveFinal Words
The possible reasons why people are led to believe that they need to do Galaxy recovery is wide-ranging. It can be due to simple mistakes, or it can be caused by malfunctions by the software. To give you a better idea of what we will be dealing with, here’s a list of the possible causes and their corresponding descriptions:
Although these are the three categories for the causes of data loss that may require Galaxy recovery, there are other less known reasons. This includes ejecting Galaxy device without using safe remove. Another cause includes a sudden power outage. Now since you have an idea of the possible causes, let’s start with the solutions.
Our first entry features a third-party software that was designed for doing tasks such as Galaxy recovery. Although they were not made exclusive for doing Galaxy recovery, they still have the capability to do so, and there are tons of them out there. We, in particular, suggest that you use FoneDog Data Recovery.
To begin with, FoneDog Data Recovery allows the recovery of files from different devices. Of course, this includes Samsung Galaxy devices. The software can be installed on Windows and Mac, so there’s no need to worry about compatibility.
Compared to most software, the Galaxy recovery process is fairly simple and one can do it without dwelling too much in the instructions. With that said, here are the steps on how to do Galaxy recovery using FoneDog Data Recovery.
To start off, you will have to download the software from the official website which should be found in this link. Then, install it after getting the setup file. The installation process shouldn’t be too hard to deal with.
Once the software is available on your computer, launch the program. Next, connect the Samsung Galaxy device to the computer by using a cable. The software should automatically detect the device and you’ll get the very first interface. Here, you can select the file type and storage drive. We suggest simply selecting Check all file types to cover more ground. Then for the storage drive, just select the one referring to your Samsung Galaxy device which should be under the Removable Drives section.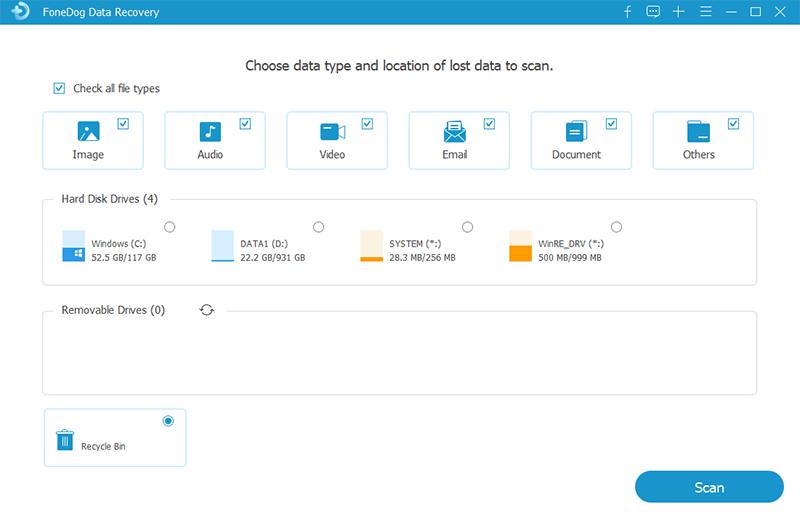
After the configurations, you should simply click on the Scan button. This will start the scanning process wherein you may choose from Quick Scan or Deep Scan. Quick Scan would, of course, be faster, while Deep Scan would take longer but is more accurate. Quick Scan would be used by default, but you may click on Deep Scan after the initial scan.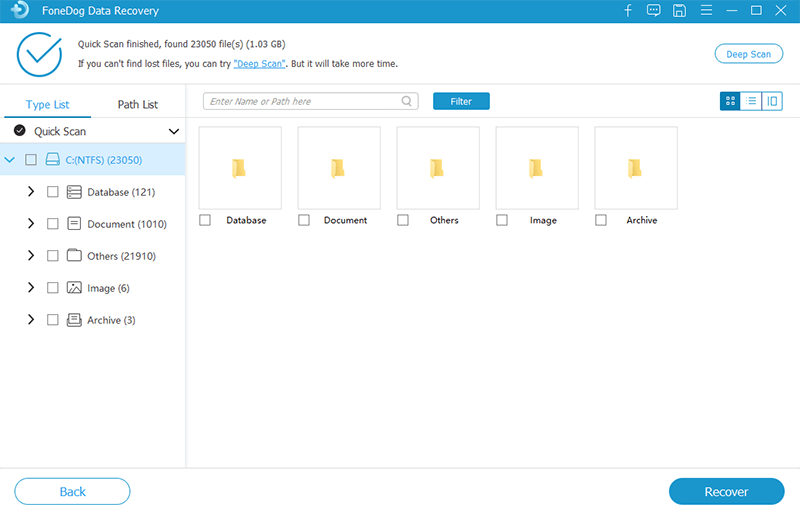
Upon the completion of the scan, you will get a list of files with the File Paths on the left side and the files on the right side. As a final step, you simply have to select the files that you want to recover by clicking on their corresponding boxes. Once the selection is done, click on the Recover button. This will start the Galaxy recovery and all you have to do is wait.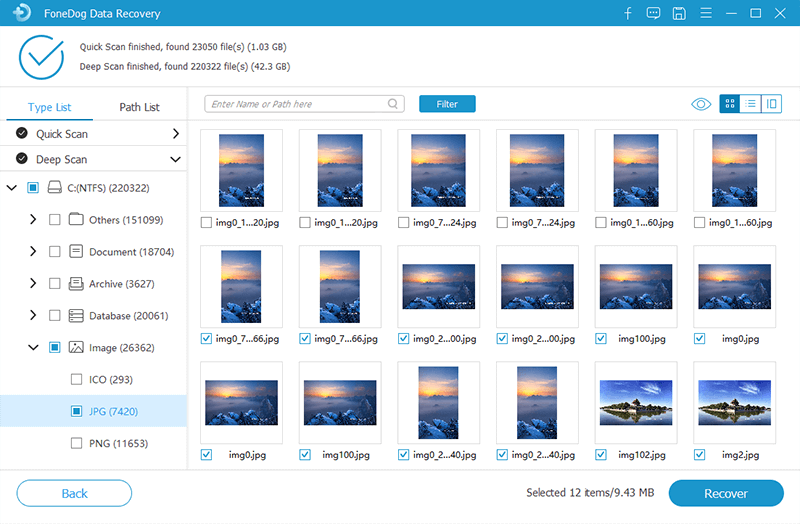
If you are worried about how it may not work on your Samsung Galaxy device, rest assured. The software supports most device brands and that includes Samsung. Plus, you have to remember that there are other ways to do Galaxy recovery. With that said, let’s head to our next entry for the day.
On our first entry, we made use of a software that has nothing to do with Samsung. This time, we will be using Samsung’s own way of Galaxy recovery, and that involves Samsung Cloud.
We all know that every Cloud service has its own server where users or members can store their data. As the name suggests, Samsung Cloud is a dedicated server for Samsung users. There are numerous functions of the Samsung Cloud. Here’s a look at some of them:
Thus, if you want to do Galaxy recovery, you better have an account here, that is, if you’re in the habit of creating backups regularly.
Unfortunately, the Samsung Cloud won’t store your data by itself. You will first have to take the initiative. And you can do this by using the Backup feature on your Galaxy device. Here are the steps to do this:
To begin with, on your Galaxy device, head to the Settings. Now on the Settings screen, scroll down and locate Cloud and accounts then tap on it. On the next screen, there will be tons of option. Simply tap on Samsung Cloud which should be the very first option.
On the Samsung Cloud page, there will also be countless selections. Firstly, there is the Cloud usage option that shows the storage space used in the cloud server. Under this will be the Sync settings which indicates the different file types that were backed up. Finally, there is the Back up my data option which allows you to back up your files. Tap on this option then on the next screen, select the file types you’d like to back up, then tap on BACK UP NOW.
This will create the backup which you will be able to use later on. Now when the time comes when data loss occurs on your device, you only have to restore from that backup.
All you have to do is access the Samsung Cloud with the same steps we discussed earlier, but instead of Back up my data, select the Restore Now option. This will automatically restore the files that you’ve backed up earlier.
It may take some time to download the data from the Samsung Cloud, but that’s pretty much how you can do Galaxy recovery with Samsung’s own features. Speaking of which, there’s another feature of Samsung that you might be interested on.
As you may have seen before on our previous section, it’s not only the Samsung Cloud that is capable of storing large amounts of data. There’s also your accounts on different platforms such as Samsung and Google.
To clarify, the Samsung Cloud is different from the server of your Samsung account and the maximum storage capability is also different. The same goes for your Google account. However, as a prerequisite to use such feature, you have to make sure you are logged into your Samsung or Google account before doing all of this. Either way, here’s how you can do it:
That sums up all the steps for creating a backup and restoring from the backup made using your Samsung or Google account. Remember that each of these has different servers. Now we head to our last method to do Galaxy recovery which is also tied to Google.
There’s the method for doing Galaxy recovery with a third-party app. There’s also one that makes use of built-in functions of Samsung. Finally, we have a method that features the use of an default app that is present in Samsung devices, which is Google Drive.
Google Drive allows users to store files manually with the use of drag-and-drop mechanism. This will require one to simply drag a file from your phone’s file manager then drop it on the Google Drive app.
Thus, the main difference between this is creating a backup using a Google account is that you will add files individually and manually. Here’s how you can do Galaxy recovery using this method:
This is applicable to other apps such as Google Photos, but that would only allow the recovery of photos. Google Drive, on the other hand, allows for a complete Galaxy recovery since it can store files such as documents, audios, videos, and images.
Data Recovery
Recover deleted image, document, audio and more files.
Get deleted data back from computer (including Recycle Bin) and hard drives.
Recover loss data caused by disk accident, operation system crushes and other reasons.
Free Download
Free Download

That completes our list of methods for doing Galaxy recovery. Although you can’t be sure that they will solve your problem, it should at least serve its purpose as one of the possible ways to recover your precious files.
However, if you truly want to avoid losing your files, then perhaps preventing the problem altogether might be the most suitable option for you. Hopefully, this article helped provide you with knowledge on how to handle your underlying problem.
Leave a Comment
Comment

Technical Expertise for PC/Website Optimization
One of my passion is to develop software of my own
I write articles to share knowledge about IT technology and some experience in developing my own software, and developing my own software is one of my passions for work.
Data Recovery
FoneDog Data Recovery recovers the deleted photos, videos, audios, emails, and more from your Windows, Mac, hard drive, memory card, flash drive, etc.
Free Download Free DownloadHot Articles
 /
/
INTERESTINGDULL
/
SIMPLEDIFFICULT
Thank you! Here' re your choices:
Excellent
Rating: 4.8 / 5 (based on 98 ratings)
