By Nathan E. Malpass, Last updated: November 21, 2023
Our photographs are more than just snapshots; they're our memories frozen in time. With the advent of cloud technology, the way we store and access these cherished moments has undergone a revolutionary transformation. Among the leading platforms that offer seamless photo storage and synchronization, iCloud Photos stands out, catering to Apple users with its convenience and integration across devices.
Whether you're an avid traveler capturing breathtaking landscapes or a parent capturing the countless milestones of your child's growth, accessing iCloud Photos has never been more critical, because that's the premise of the sharing of the iCloud photos. However, as technology evolves, so do the methods for accessing these precious memories.
This comprehensive guide is designed to walk you through the various techniques and approaches to effortlessly access your iCloud photos, regardless of whether you're using an iPhone, iPad, Mac, or even a Windows PC.
Part #1: Accessing iCloud Photos through Various Devices
Method #1: Accessing iCloud Photos through Mac Computers
If you're a Mac user, accessing your iCloud Photos is a breeze thanks to the seamless integration that Apple provides. Follow these simple steps to access iCloud Photos:
- Ensure iCloud Photo Library is Enabled: Before you can access your iCloud Photos on your Mac, make sure you have iCloud Photo Library enabled. Go to “System Preferences” on your Mac, click on “Apple ID”, and then select “iCloud”. Ensure that the “Photos” option is checked.
- Open the Photos App: Once iCloud Photo Library is enabled, open the Photos app on your Mac. You can find it in your Applications folder or by searching through Spotlight.
- Sign In to iCloud: If you aren’t already signed in, the app will prompt you to log in with your Apple ID and password. Make sure you use the same Apple ID that you’ve used for iCloud Photo storage.
- Access Your Photos: After signing in, you’ll see your entire iCloud Photo Library synced and accessible within the Photos app. You can browse through your albums, moments, and memories just like you would with photos stored locally on your Mac.
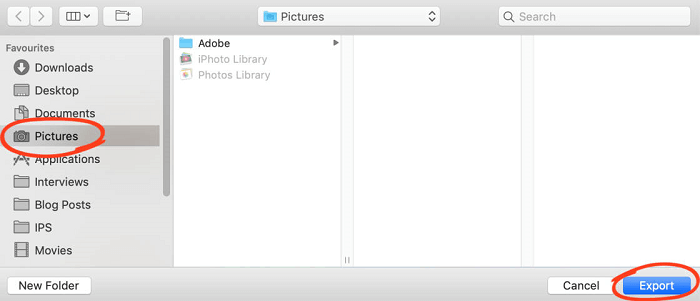
- Downloading Photos: To download a photo from iCloud to your Mac, simply select the photo, right-click, and choose “Export” to save it to your desired location on your Mac.
- Upload and Sync: Any new photos you add to your Mac’s Photos app will automatically sync with iCloud if iCloud Photo Library is enabled. This ensures that your photos are seamlessly backed up and accessible across all your devices.

Remember, the storage space on your Mac is not impacted by the iCloud Photos storage. The photos are stored in the cloud, and you can optimize your Mac's storage to keep only smaller, device-sized versions of your photos on your computer.
Accessing iCloud Photos on a Mac is just the beginning. In the following sections, we'll explore how to access your photos through other Apple devices and even non-Apple platforms like Windows PCs, making sure your memories are at your fingertips no matter where you are.
Method #2: Accessing iCloud Photos on iOS (iPhones)
Having your cherished memories accessible on the go is one of the primary advantages of iCloud Photos. If you're an iPhone user, here's how you can access iCloud Photos right from your device:
- Ensure iCloud Photo Library is Enabled: On your iPhone, go to “Settings”, tap on your name at the top, then select “iCloud”, and finally, “Photos”. Make sure “iCloud Photos” is turned on. This ensures that your photos are continuously synced across your devices.
- Open the Photos App: Simply tap on the Photos app on your iPhone’s home screen. This app is where all your iCloud-stored photos and videos are accessible.
- Browse and Enjoy: Once inside the Photos app, you’ll find your entire iCloud Photo Library at your fingertips. You can explore your photos by moments, albums, and more. The app’s intuitive interface makes navigation a breeze.
- Download Photos: To download a specific photo or video to your iPhone, simply tap on it to view it in full screen. Then, tap the share button (the square with an arrow pointing upward) and choose “Save Image” or “Save Video”.
- Uploading and Syncing: Any new photos and videos you capture with your iPhone will automatically sync with iCloud if iCloud Photos is enabled. This ensures that your memories are backed up and accessible across all your devices.
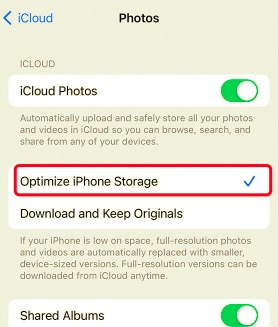
- Optimize iPhone Storage: To save space on your iPhone, you can enable “Optimize iPhone Storage” in the iCloud Photos settings. This feature automatically replaces full-resolution photos with device-sized versions, keeping your storage usage in check.

Accessing your iCloud Photos on your iPhone empowers you to relive your moments wherever you are. But the convenience doesn't stop there. In the upcoming sections, we'll delve into how you can access your iCloud Photos on other Apple devices, ensuring that your memories are seamlessly available across your entire ecosystem.
Method #3: Accessing iCloud Photos through iPadOS (iPads)
Bringing the magic of iCloud Photos to your iPad is a fantastic way to relive your memories on a larger screen. If you're an iPad user, here's how you can access your iCloud Photos with ease:
- Confirm iCloud Photo Library is Enabled: Begin by navigating to Settings on your iPad. Tap on your name at the top, then select “iCloud”, and finally, “Photos”. Ensure that “iCloud Photos” is toggled on to enable seamless synchronization.
- Launch the Photos App: Locate and open the Photos app on your iPad’s home screen. This is your gateway to accessing all your iCloud-stored photos and videos.
- Explore Your Collection: Once inside the Photos app, you’ll be greeted by your entire iCloud Photo Library, neatly organized for your perusal. Explore your memories by various categories, albums, and moments.
- Downloading Content: To download a specific photo or video to your iPad, tap on the item to view it in full-screen mode. Then, tap the share icon (a square with an arrow pointing upward) and select “Save Image” or “Save Video”.
- Synchronization and Uploading: With iCloud Photos active, any new photos or videos captured using your iPad will automatically sync with your iCloud account. This ensures that your memories are seamlessly accessible across all your connected devices.
Accessing iCloud Photos on your iPad adds an extra dimension to your visual journey. The large, vibrant display enhances your viewing experience, allowing you to immerse yourself in the details of each captured moment. As we continue our exploration, we'll delve into accessing your iCloud Photos from a broader array of devices, ensuring your memories are never out of reach.
Method #4: Accessing iCloud Photos on Windows PCs
Even if you're using a Windows PC, you don't have to miss out on the convenience of iCloud Photos. Apple provides a way for you to access your cherished memories right from your Windows computer. Here's how:
- Download and Install iCloud for Windows: Start by downloading and installing the "iCloud for Windows" application on your PC. You can find this application on the official Apple website. Once downloaded, run the installer and follow the on-screen instructions to set up iCloud on your Windows PC.
- Login with Your Apple ID: After installation, launch the iCloud for Windows application. Sign in with your Apple ID—the same one you use for iCloud Photo storage.
- Select “Photos” for Syncing: In the iCloud for Windows app, you’ll see various options for syncing different types of content. Make sure the “Photos” option is checked. You can also choose whether to download full-resolution photos or device-sized versions to conserve space.
- Access Your Photos: Once synchronization is complete, you’ll find a new “iCloud Photos” folder in the “This PC” section of File Explorer. Open this folder to access all your iCloud-stored photos and videos.
- Uploading to iCloud: You can upload photos from your Windows PC to iCloud Photos by dragging and dropping them into the “Uploads” folder within the “iCloud Photos” folder. These photos will then be available across all your iCloud-connected devices.
- Web Browser Access: Another way to access your iCloud Photos on a Windows PC is by using a web browser. Simply visit the iCloud website (icloud.com), sign in with your Apple ID, and click on the “Photos” icon to view and manage your entire photo collection.
Accessing iCloud Photos on a Windows PC demonstrates Apple's commitment to cross-platform compatibility. Now, your memories are seamlessly accessible whether you're using a Mac, an iPhone, an iPad, or a Windows computer. As we continue our exploration, we'll cover more tips and tricks to make the most of your iCloud Photos experience.
Method #5: How to Access iCloud Photos on Android
While iCloud Photos is primarily designed for Apple's ecosystem, there isn't a direct official method to access iCloud Photos on Android devices. Access iCloud Photos on an Android device using a workaround:
- Access iCloud Photos via Web Browser: One of the simplest ways to view your iCloud Photos on an Android device is by using a web browser. Open a web browser on your Android device and navigate to the iCloud website (icloud.com). Sign in with your Apple ID and password.
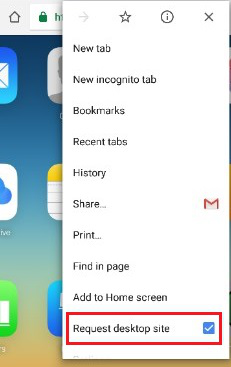
- Use the Desktop Site Option: Many web browsers have the option to request the desktop version of a website. This can be useful to access iCloud’s full features. In the browser’s settings, find the “Desktop site” or “Request desktop site” option and enable it.
- Access Your Photos: Once you’re on the iCloud website’s desktop version, click on the “Photos” icon to access your iCloud Photo Library. You can view and manage your photos and albums just like you would on a computer.
- Download and Upload: While you can view your photos, direct download and upload options might be limited. You can try selecting and downloading individual photos, but keep in mind that iCloud’s interface on Android browsers might not be as optimized.

It's important to note that accessing iCloud Photos on Android through a web browser might not offer the same seamless experience as on Apple devices. Additionally, any changes you make on the Android browser might not reflect instantly across your Apple devices due to potential synchronization delays.
Part #2: Accessing iCloud Photos That Are Lost Or Deleted: FoneDog iOS Data Recovery
Mistakenly deleting photos from iCloud or losing them due to device issues can leave you in a state of panic. Thankfully, FoneDog iOS Data Recovery, a powerful iPhone 15-supported tool, offers a lifeline by enabling you to restore your missing iCloud photos, ensuring that your memories are not lost forever. This section will walk you through the process of using FoneDog iOS Data Recovery to recover your iCloud photos and alleviate the stress of potential data loss.
iOS Data Recovery
Recover photos, videos, contacts, messages, call logs, WhatsApp data, and more.
Recover data from iPhone, iTunes and iCloud.
Compatible with latest iPhone and iOS.
Free Download
Free Download

- Download and Install FoneDog iOS Data Recovery: Begin by downloading and installing the FoneDog iOS Data Recovery software on your computer. The software is available for both Windows and Mac platforms.
- Launch the Software and Connect Your Device: Launch the FoneDog iOS Data Recovery software and connect your iPhone, iPad, or iPod touch to your computer using a USB cable. Select the “Recover from iCloud Backup File” option from the main interface.
- Sign in to iCloud: You’ll be prompted to sign in to your iCloud account using your Apple ID and password. FoneDog ensures your privacy and security throughout the recovery process.
- Choose and Download iCloud Backup: Once logged in, FoneDog will display a list of iCloud backups associated with your account. Select the backup that likely contains the lost photos and click “Download”.
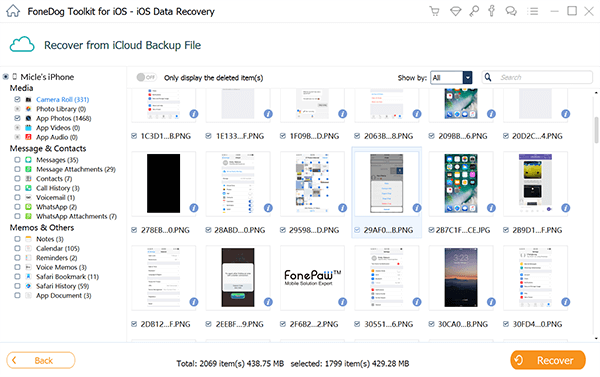
- Scan and Preview Lost Data: After downloading the iCloud backup, the software will begin scanning the backup file for your lost or deleted photos. Once the scan is complete, you can preview the recoverable data, including photos, before proceeding.
- Recover Your iCloud Photos: Select the lost photos you want to recover, and then click the "Recover" button. Choose a location on your computer to save the recovered photos.

This free iOS photo recovery tool offers a reliable solution for accessing iCloud Photos that have been lost or deleted. By following these steps, you can effectively recover your memories and alleviate the stress of data loss. Remember to act promptly when you realize photos are missing to maximize the chances of successful recovery. With FoneDog iOS Data Recovery, you can restore your iCloud photos and continue cherishing your special moments.
People Also ReadTop 2023 GUIDE: How to Recover Deleted iMessages from iCloudA Step-by-Step Guide: How to Implement WhatsApp Restore from iCloud
Conclusion
In the digital era, our memories are preserved through photos, making access to them crucial. This article explored various methods on accessing iCloud Photos across different devices, from Macs to Windows PCs, and even Android devices using workarounds. Additionally, we introduced FoneDog iOS Data Recovery, a tool to retrieve lost or deleted iCloud photos. Remember, whether you're accessing or recovering photos, technology provides solutions to ensure your cherished memories remain within reach.


/
/